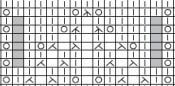
Written Instructions
You will need 3 stitch markers to separate each repeat. Cast on 30 stitches and close in the round.
Round 1. *K1, YO, K3, CDD, K3, YO. Place Stitch Marker*. Repeat from * 2 more times.
Round 2. K30;
Round 3. *K2, YO, K2, CDD, K2, YO, K1* Repeat from * 2 more times.
Round 4. K30;
Round 5. *K3, YO, K1, CDD, K1, YO, K2* Repeat from * 2 more times.
Round 6. K30;
Round 7. *K4, YO, CDD, YO, K3* Repeat from * 2 more times.
Round 8. K30;
Round 9. P30;
Round 10. K30; Fasten Off.
You can do as many repeats as needed.