

Yep. It’s totally possible. You can pretty much get any Mac on the internet – as Macs have been designed for networking since day one. But… it’s not exactly “plug n’ play”. I’ve seen a few websites and bloggers pull this feat off a few different ways. Below, I’ll give you a quick run down of some of the ways people have gotten it to work, along with how I was able to get my Macintosh SE FDHD online.


Introducing a computer from the 80’s to today’s internet
In trying to research how to get my SE online I came across a few different ways people have gotten their 68k Macs online, here’s a summary of some:
- Install an Ethernet card
- Use a SCSI Ethernet adapter
- “Share” the internet connection from a newer Mac via LocalTalk and bridge software
- Use a Raspberry Pi … and that’s the method I used and will describe below.
How I got it working
Without spending $100s of dollars on vintage networking cards I did happen to have a Raspberry Pi kicking around. The other nice thing about using the Pi was it essentially gives me wireless internet on the old Mac, so I don’t have to be tethered to an Ethernet jack.
At risk of over-simplifying things, the Raspberry Pi shares it’s internet connection over a serial cable. The Mac connects with PPP over the serial cable and the Pi has a PPP sever running called SLiRP.
In the end, I needed the following hardware:
- The Mac. In my case, it was an SE FDHD with 4mb of ram. OS was 7.5
- The Raspberry Pi. My Pi was an older “Model B” running Raspian. Since the older Pi didn’t have internal WiFi, I used a small TP Link usb Wifi adapter.
- SD Card for the Pi
- A newer computer to create write the Raspian image to the SD card
- A DB9 Female to Mini Din-8 Male serial cable. These are cheap on Amazon, eBay etc. This connects to the Mac modem/printer serial port.
- A DB-9 RS-232 to USB 2.0 serial cable. This adapts the cable coming from the Mac to the USB port on the Pi. These are also fairly common and cheap to come by.
As a side note, some people have successfully made their own serial cable by cutting into a Mac serial cable (a printer, AppleTalk, cable etc) and splicing it with a USB cable. There are wiring schematics to do this, but with everything else that has to come in place, I figured why risk messing that up. Besides, the two cables were about $5 each.
Software used on the Pi:
- Raspian, which I used Apple Pi baker (via a MacBook Pro) to install to my SD card
- SLiRP
- telnetd (not required, more about this later!)
Software used on the Mac SE:
- System 7.5 (I chose this version in order to run MacWeb, but I’ve also got this working under 6.0.8)
- Mac PPP version 2.1.1SD (includes an extension and control panel, System 6 I had better luck with PPP 2.0.1)
- Mac TCP 2.0.4 – this should have been installed with 7.5
- Other goodies I’ve used on the Mac in this process: MacWeb 2.0, Fetch 3.0.3, NCSA Telnet 2.6, PopMail II 2.2
The Steps
Ok, ready? Let’s get started!
The Pi
First, set up the Raspberry Pi. I used Apple Pi Baker to install Raspian onto my SD card. Then, attach the Pi to a monitor/keyboard/mouse and make sure the Pi can see the internet. Next, open up a command line. Run the command raspi-config as root:
sudo raspi-config
 Once you’re in the config menu you’ll want to enable SSH so you’ll be able to remote into the Pi during the process to make tweaks. This option is under “5. Interfacing Options” I would also advise setting a new password while you’re in there. In my setup, the Pi’s hostname is “raspi” and the user is “pi”. Test that you are able to SSH over to the Pi. On the MacBook I used to set this up, you would open the terminal application and type:
ssh pi@raspi
Plugging In
Using your serial cable(s), attach the Mac to the Pi. On the Mac I used the modem port, but you can use the printer port if you’d like. Just remember which one you pick.
Configure the Pi
Using SSH, remote into the Pi. Again, open a terminal and type “ssh pi@raspi” or ssh yourusername@yourhostname.
A few things need to be set up on the Pi. We’re essentially setting up the Pi so it will listen on the serial (usb) port for the Mac, allow it to log in, and serve PPP.
To install the SLiRP software which is key to this process, type the command:
sudo apt-get install slirp
Next, we need to figure get the Pi to use the serial port as a console. We need to identify what the name of the console is. If you type the following you should see your usb port listed:
dmesg | grep tty
In my case, I saw my USB cable was set up here:
[ 19.814298] usb 1-1.3: pl2303 converter now attached to ttyUSB0
..meaning “ttyUSB0” is the console I’ll work with.
To configure Linux to use this port as a console, we have to edit the file /boot/cmdline.txt, so type in:
sudo nano /boot/cmdline.txt
At the very beginning of the line, add a new console by typing:
console=ttyUSB0,9600
Make sure there’s a space after this to separate it from the other consoles in this file. Note the “9600” is the baud rate of the serial port, and 9600 was about as fast as my SE could cut it. SE/30s and newer machines may be able to go higher. When you’re done here, hit CTRL+O to save the file and then CTRL+X to exit the nano text editor.
NOTE: (Added 1/3/22) In the latest version of Raspian, I found that editing the cmdline.txt file in this way caused the Pi to fail startup. However, I was able to get things working WITHOUT editing this file at all. If you run into problems, try skipping the cmdline.txt step. By the way, you can easily edit the cmdline.txt on the boot partition directly on the SD card if you insert it into a Mac/PC. Keep that in mind if you run into this issue.
Next up, enable the console with:
sudo systemctl enable serial-getty@ttyUSB0.servicesudo systemctl start serial-getty@ttyUSB0.service
It wouldn’t hurt to reboot the Pi at this point:
sudo reboot 0
At this point, we have the PPP server (SLiRP) and the Pi is set up to use the serial port as a console. But now, we need the Mac to be able to start it once it makes the connection over the serial port. What we’ll do here is create a shell script on the pi the Mac can call which will start up SLiRP with the appropriate settings.
Open the nano text editor with the name of your script specified:
nano ~/slirp.sh
Then, include the following into this file:
#!/bin/bashslirp -S -b 9600 -P "host addr 10.0.2.1" "dns 10.0.2.3" "asyncmap 000a0000" "debugppp debugppp.log" "debug 1" "mru 500" "mtu 500"
Note again, I’m setting my baud rate to 9600 for my SE, but faster Macs can try out higher values.
I’ve also specified some IP addresses that I’ll be using in MacTCP, remember these!
Hit CTRL+0 to save and then CTRL+X to exit nano. Then, make the script executable with:
chmod +x ~/slirp.sh
Still with me? Great! That’s pretty much it for the Pi at this point. To summarize, we set up a console on the serial port the USB cable is attached to. We installed the SLiRP software that will provide PPP services to the Mac, and finally set up a script that the Mac’s PPP client will run once it connects in. Let’s move on to the Mac:
The Mac
On the Mac, Install the software I listed earlier. If you need to download anything, check out the resources page. If you’re fresh-installing the Mac OS, make sure you include Mac TCP. You can install Mac TCP and PPP after the fact as well. I had to play around with finding the right combination of versions that worked for me, and the ones I listed above were what I got working. Again, remember this is specific to my Mac SE, later 68k Macs would have OpenTransport which would be a slightly different process.
Once you have everything installed there are two control panels we’ll need to jump into. (MacTCP and Config PPP)
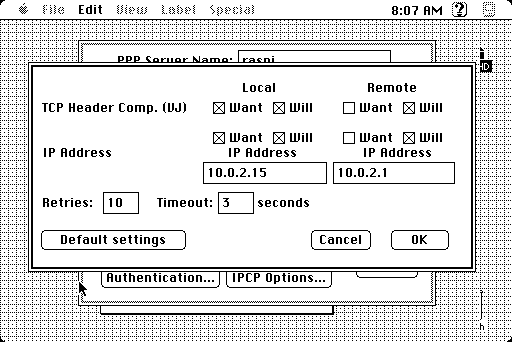
In Mac TCP, select PPP, click more and set the values as shown in the screenshots:


We’re manually setting the IP based on the configuration the Raspberry Pi is set up with. Note that under “Domain Name Server Information” (DNS) I specified the IP address of my home router. Other tutorials I’ve read used the SLiRP DNS which should be 10.0.2.3, based on our setup… but that didn’t work for me whereas this did.
Ok that’s it for MacTCP. Next is the Configure PPP control panel. There are many more screens of configuration here, so look at my settings carefully:


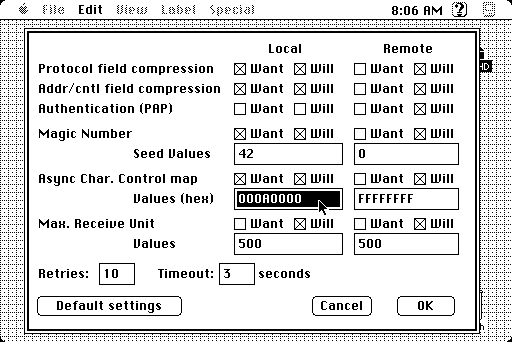
A bunch of things to note here:
- In the PPP control panel create a New config, I named mine “raspi”, but you can name it whatever you want.
- If you used the printer port instead of the modem port, be sure to set that accordingly.
- Within the main configuration window where there are buttons for “Config Script”, “LCP Options…”, and “IPCP Options…” you’ll need to open and set up based on my screenshots.
- On the login script screen, this is where the Mac connects to the Pi’s console and issues commands and waits for responses. These values may vary for you. Perhaps your username isn’t “Pi” if you changed it at some point. The password I blanked out, you’ll have to enter yours, of course. Finally, the “slirp.sh” script may be located someplace else for you if you don’t want it sitting in your home directory like I did earlier.
- Also note the port speed is set on the main config window also. This makes a total of 3 places we set that baud rate. If you are experimenting with different speeds, remember to change it here on the Mac, and the two locations it’s set on the Pi.
- When attempting to connect to the Pi, make sure it’s up and running. If you connect or partially connect and need to establish your connection, you’ll have to reboot the Pi so the console can go back to the login. In other words, reboot the Pi before trying to connect.
- There is a “Terminal Window” checkbox which can be useful for troubleshooting. You should be able to see stuff come back from the Pi here to confirm your baud rate and other settings are correct. In linux, you can actually read and write from the /dev/ttyUSB0 with the cat and echo commands respectively. This will help troubleshoot from the Pi side.
Ok, so if everything’s set up right, you should be able to click the “Open” button in the PPP control panel and see it run through the connect script and show two happy faces indicating the Mac and the Pi are happily connected:


At this point, any time you open an application that requests a TCP connection (web browsers, telnet, etc) the Mac will open the PPP window and go through the connection process. Again, the Pi will need to be ready – so when you restart the Mac, restart the Pi.
Now that you’re up and running…
- Try accessing google.com through MacWeb! If you aren’t connecting right away don’t panic, it might just be your DNS settings. You can always try connecting via an IP address.
- Note that MacWeb has a patch to solve background color issues on black & white macs.
- Don’t expect anything to be fast. If you’ve used the same settings I did, your baud rate is going to be a large limiting factor. You’ll essentially be running at dial up modem speeds – so if you remember those days, transferring even 1mb can take several minutes.
- If you’re on a “faster” 68k consider iCab, which is a more advanced browser than MacWeb.
- Also note that MacWeb, iCab, Netscape, or whatever ye olde browser you choose is going to have issues connecting to modern websites. One really big issue is the newer sites will use security protocols that just aren’t supported in these older browsers.
But wait there’s more!
A lot of guides out there end with “yay it’s online”, but let’s consider for a second that there really isn’t much you can do with an antique web browser like MacWeb. The browser doesn’t support modern image formats, JavaScript, and worst of all – modern SSL sites. In other words, you’ll be lucky to see a text box on google.com.
BUT…
What if I told you I’ve been able to send email, browse Reddit & Wikipedia, and download files off my home NAS?

It’s very possible, here’s how:
The Mac can get pretty far on its own. Some essentials include Fetch for FTP, PopMail, and NCSA Telnet. In particular, having a Telnet client will open up a world of options. There are many neat Telnet sites out there for various things ranging from StarWars to weather. One cool example is RedditBox.us which is a full reddit client you can access through Telnet.
But it gets even better. We can also Telnet into the Raspberry Pi, and using an “up to date” text-based browser called Lynx– we can call up pretty much any website. You won’t be streaming YouTube videos, but you can easily search google, read Wikipedia, Reddit, or even my own website. (The more technical folks out there my scoff at using Telnet like this. If your Mac can support MacSSH that’s a better option – the SE however can’t!)
Another great benefit of using the terminal approach is the only thing that the Mac has to transfer is the final rendered text – the Pi will do the heavy lifting, meaning internet browsing will actually be, dare I say, fast.
Installing Lynx from the Pi’s command line:
sudo apt-get install lynx
Install the telnet server on the Pi with the command:
sudo apt-get install telnetd
Websites are actually becoming very text-friendly due to WCAG accessibility requirements. Due to screen readers and other assistive devices, websites are becoming designed to be consumed as text.
System 6 Bliss
A few weeks after I wrote this up, I decided to bring my SE back down to System 6.0.8. And the good news is, this process still works with MacPPP 2.0.1! The big issue is that MacWeb requires System 7, but with System 6 you can enjoy all of the performance benefits and still use telnet, ftp, and surfing via the terminal and Lynx.
Unlike MacWeb, the NCSA Mosaic web browser supposedly can run under System 6, but not on my SE.
Some final thoughts

So there you have it, a Mac SE connected to the internet. A computer dating back to the 80’s able to poke around Reddit, Wikipedia, and more – like a time-traveler seeing this weird world of ours for the first time!
I hope you enjoyed this post and that it was in some way helpful in taking your 68k Mac on this excellent adventure.
P.S. Gotta give credit where credit’s due… I used this resource heavily in getting my SE online: http://bylenga.ddns.net/index.php?page=68KMacPPPSLiRP.php He walks through making a cable and getting his (much faster) SE/30 online with a similar process.

You must be logged in to post a comment.