Sometimes an entire garment can be a challenging project, and sometimes just a single element on the garment can make your palms sweaty and cause a severe case of sewing-room-avoidance-syndrome.
It’s happened to you, too. You know WHAT the next step is, but the HOW looks like a toddler’s art project in your head. So you sit and look at the garment instead of sewing. For days. Maybe weeks!
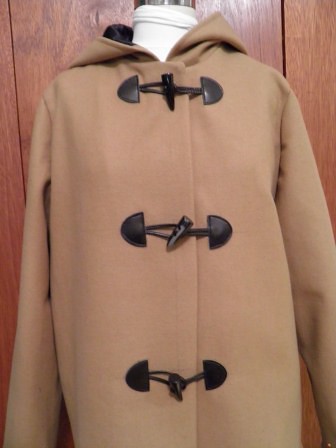
I was totally flummoxed by how to add leather toggles to my DD’s duffle coat. Because I am a completely rational and experienced sewist, I did no research about my questions. Nada. Zip. Viewed zero You Tube videos. Opened not a single one of my 2,487 sewing reference books. Sent exactly zero questions to my ASG sisters. Checked not a single forum on patternreview.com or burdastyle.com. What I did was stew. (Not “sew”, mind you, but STEW.) How was I going to hold the toggles in place on the coating? What foot should I use when stitching? What if my stitching was crooked and created an unwanted hole in the leather? Should I use heavy thread? How could I align the center fronts and keep the the correct alignment with a floppy toggle instead of a button and buttonhole?
Enough already! I just plunged into the deep end without knowing a single stroke, and discovered I actually DID know how to swim in the deep end. So here is what I did to avoid drowning in my coat project:
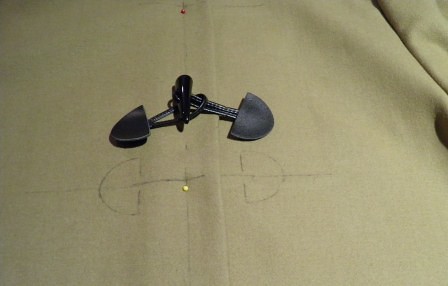
1. Drew the center front line on both coat fronts using a Frixion marking pen.
2. Drew the 3 horizontal placement lines for the toggles on both fronts.
3. Pinned the right front over the left, aligning the center fronts AND the horizontal toggle placement lines.
4. Connected each toggle pair, and centered the “horn” on the (right) center front, and the loops on the horizontal placement lines.
5. FLASH OF BRILLIANCE! I drew around each of the leather tabs using the Frixion pen, marking the exact placement for each tab. Aha! Now I knew exactly where to hold the leather tab while stitching it down! (Very important, since leather cannot be pinned.)

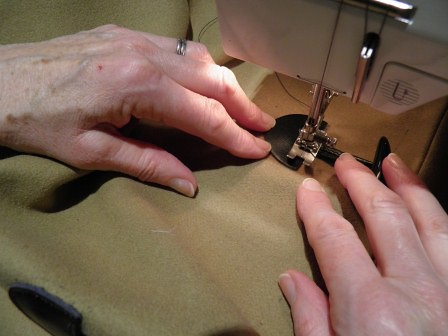
6. Took the coat and the toggles over to my sewing machine, placed a leather tab inside the “tab shape” drawn on the coat, and stitched that sucker down. Repeat x5. DONE!
I have to relearn this lesson every once in a while. When you aren’t sure exactly how to do something, one approach that may work is to just START. Do what you know, and the rest of the process may be given to you as you need it. Or of course, you could do some research. 😉
For supplies, I used some kind of heavier black thread I had in my stash (the label was gone so not sure what it was), a leather needle that may have come with my machine, and my universal foot. It didn’t take more than 10 minutes to get all 6 toggles stitched on, and would have been faster if I had stitched them on before assembling most of the coat.
Next up– sleeve heads and shoulder pads, and the lining. Maybe my DD will actually get to wear this coat before it gets too warm.
Happy sewing!
Maris Olsen