


We may receive a commission when you use our affiliate links. However, this does not impact our recommendations.
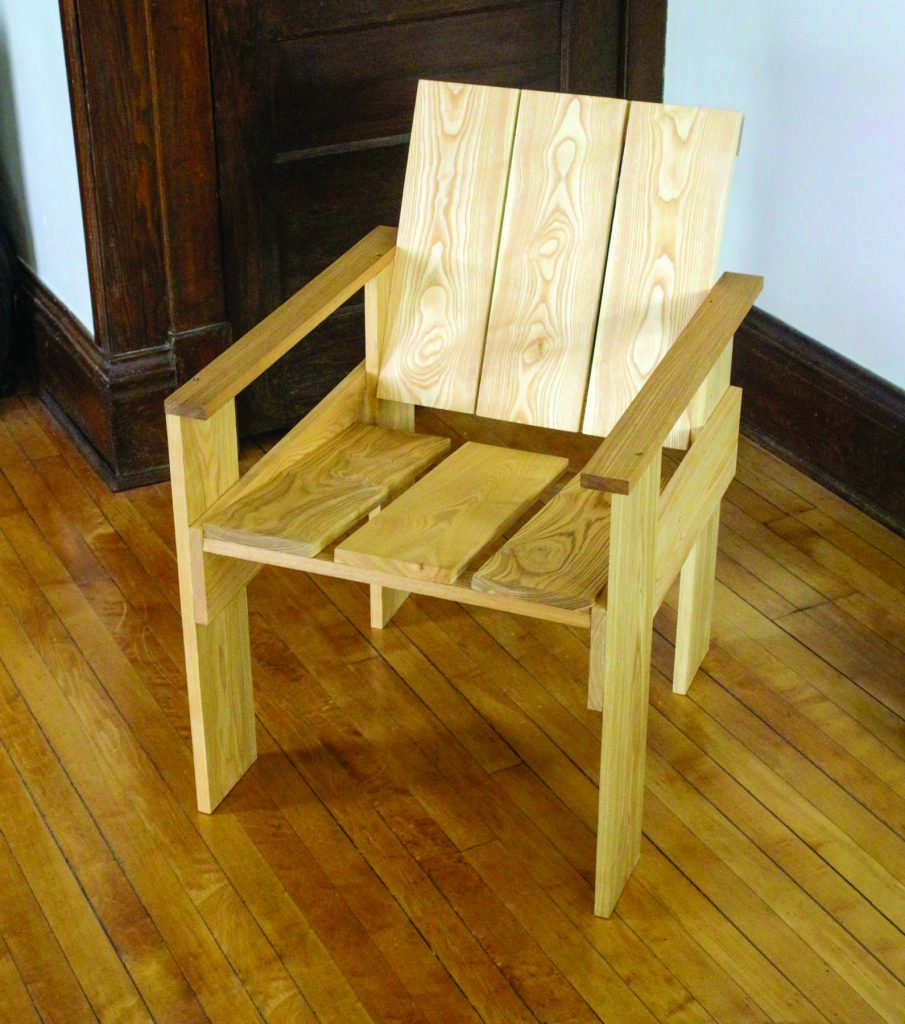
Gerrit Rietveld’s simple design for a lounge chair is a great platform for exploring ergonomics.
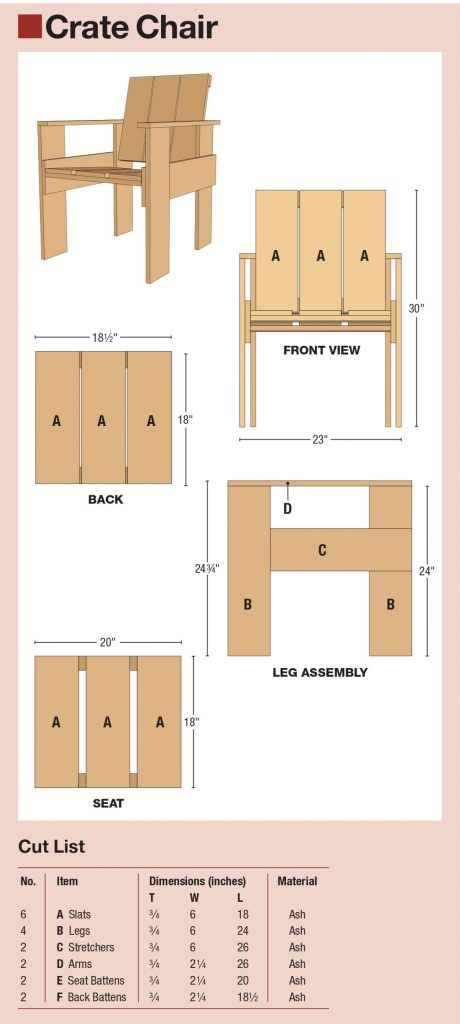
PROJECT #2005 • Skill Level:Beginner • Time: 4 hours • Cost: $50
Gerrit Rietveld was a Dutch furniture designer and architect that worked in the first half of the 20th century. Part of the De Stijl art movement, Rietveld’s furniture was often reduced to just the essentials to make a piece work. His 1917 Red and Blue Chair is an icon of modern design. After breaking away from De Stijl, he also designed the Zig-Zag Chair and the Crate Chair.
I was drawn to the form of the crate chair immediately after seeing a pair in an online auction. It looked pretty straightforward to build but still had a modern feel. Plus I had a pile of ash offcuts that I’d collected over the years, and they seemed perfect for a project like this.
The design itself is pretty ingenious. Most of the pieces are the same width, no pieces are longer than 30″ and there are no panel glue-ups needed. Researching the design further, the chairs appeared with different seat angles, back angles and even different leg heights. The original design had the seat about a foot off the ground. I settled on a size that better handled my burly frame, with the seat and back angled for comfortable lounging. Now, let’s get building.
Gather the Pieces
The bulk of the boards in this chair are 6″ wide, save for the armrests (2 1/4″ wide) and the battens for the seat and back (2 1/4″ or so—whatever offcuts you have available).
You can get the bulk of the pieces for one chair out of four 8′ 1x 8s if you’re shopping at the home center. That’s what I’ll do when I build a pair of these for the front porch. (And I’ll paint them blue and red in honor of their designer.)
Assemble the Sides
The chair is made up of four main parts: two mirrored sides, a seat and a back. Build the sides first.
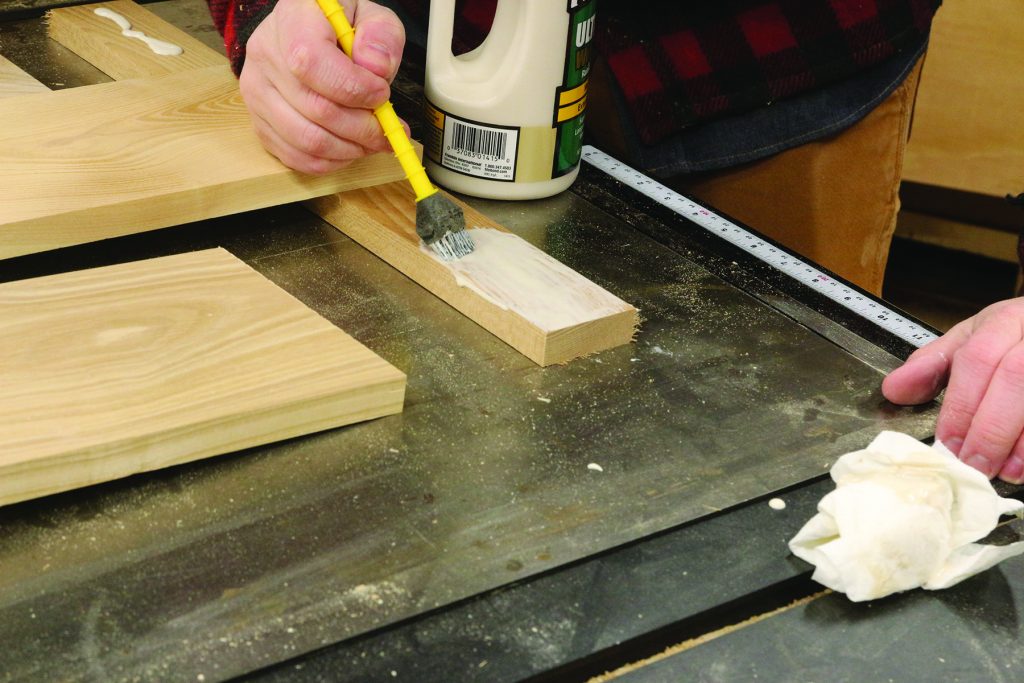
I used glue and pin nails for most of the joints on the chair. They’re almost all face grain to face grain, so the glue is strong enough to hold everything together. The pin nails are just to keep things in place while the glue cures. Don’t be afraid to use screws or other nails if you’d like, just try to keep things even and symmetrical.
The chair legs are 24″ long. The top of the rail should be 6″ below the top of the leg (leaving 12″ of leg below the rail). I put a coat of glue on the first leg, then put a few pin nails in the joint to keep it in place. Flip the assembly over and glue and pin the second leg to the rail.
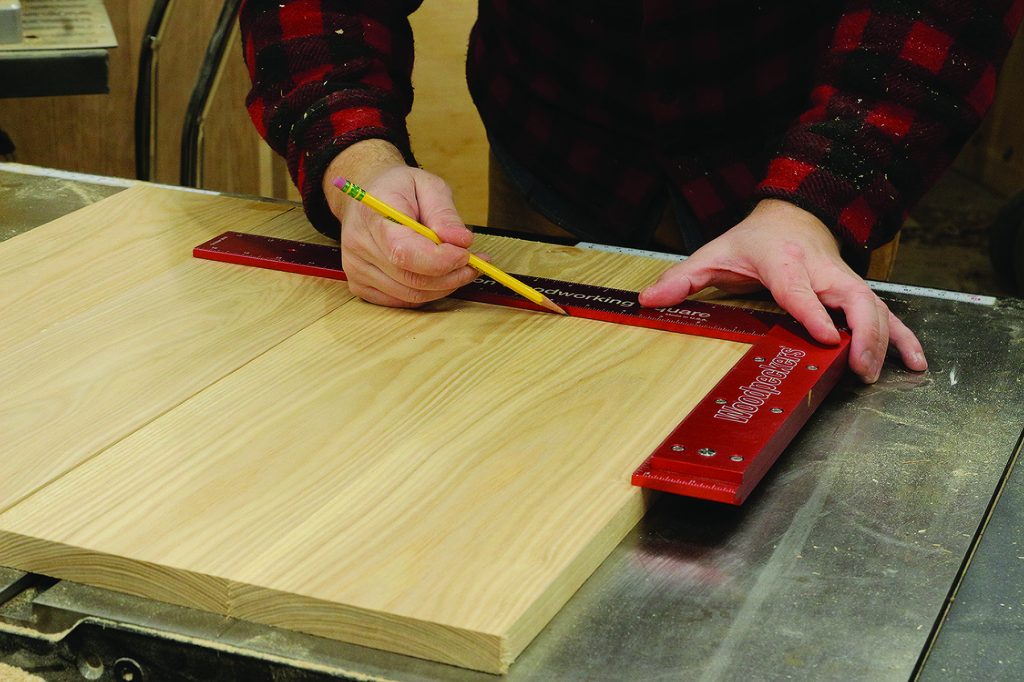
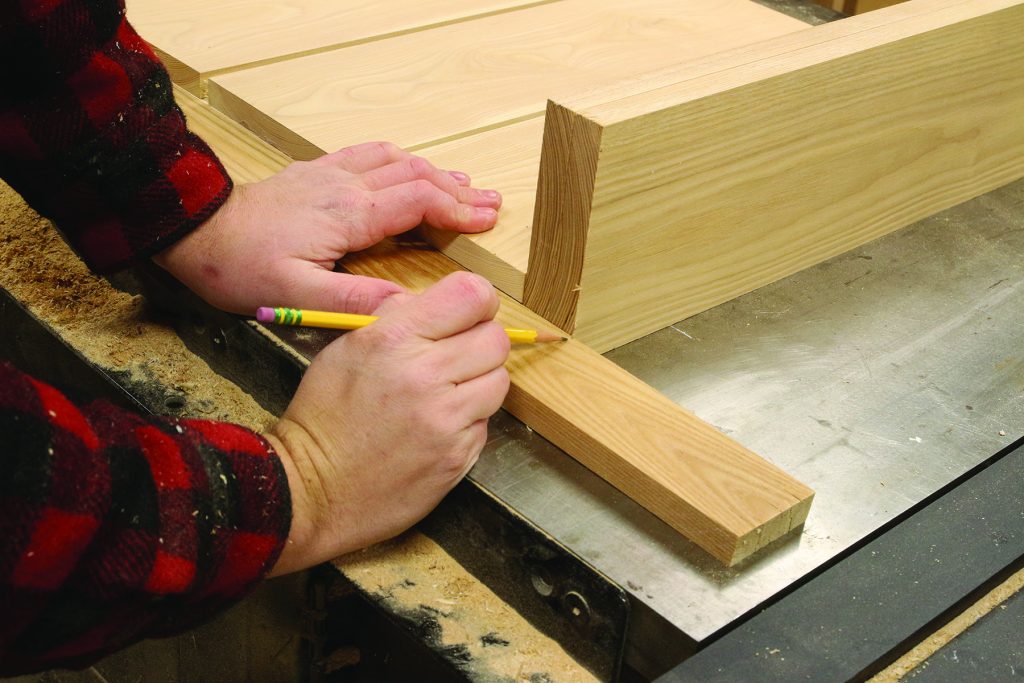
Make the leg assemblies first. Start by marking a line 6″ from the top of the legs.
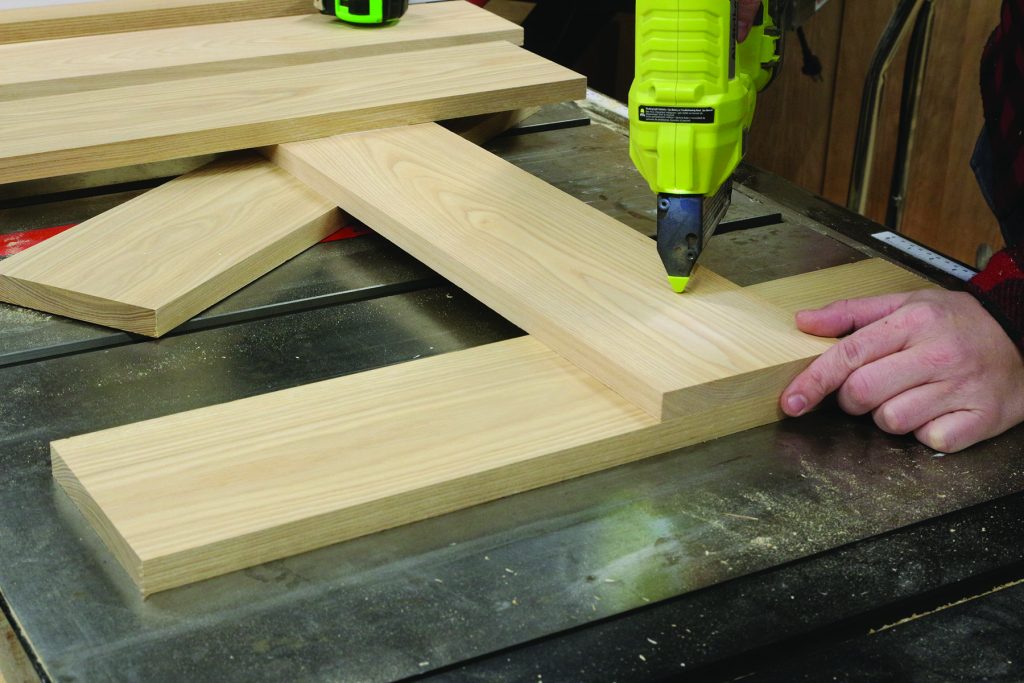
There’s plenty of face grain to face grain surface for the glue to hold. The pin nails just keep the boards in place. Make sure to mirror the two leg assemblies.
For the second side, you repeat the steps, but make sure you’re creating a mirror of the first side. (Avoiding this mirrored assembly issue is one strength of the original design. Because the legs were 18″long, with the 6″ rail, there is 6″ of material above and below the rail, so both sides are assembled exactly the same.)
Seat and Back
The seat and back are another opportunity to adjust the sizing of the chair. The back of the original design was about 18″ wide and the seat about 19 1/2″ wide. I needed a little bit more room and wanted some space between the back slats, so I took the back to 18 1/2″ wide and the seat to 20″ wide.
I assembled the back first with glue and pin nails. I cut a pair of battens to 18 1/2″. Then, I attached the two outside boards to the battens. After that, I eyeballed the spacing for the middle board and glued and pinned it in place.
Repeat the assembly process for the back, equally spacing the boards on the battens.
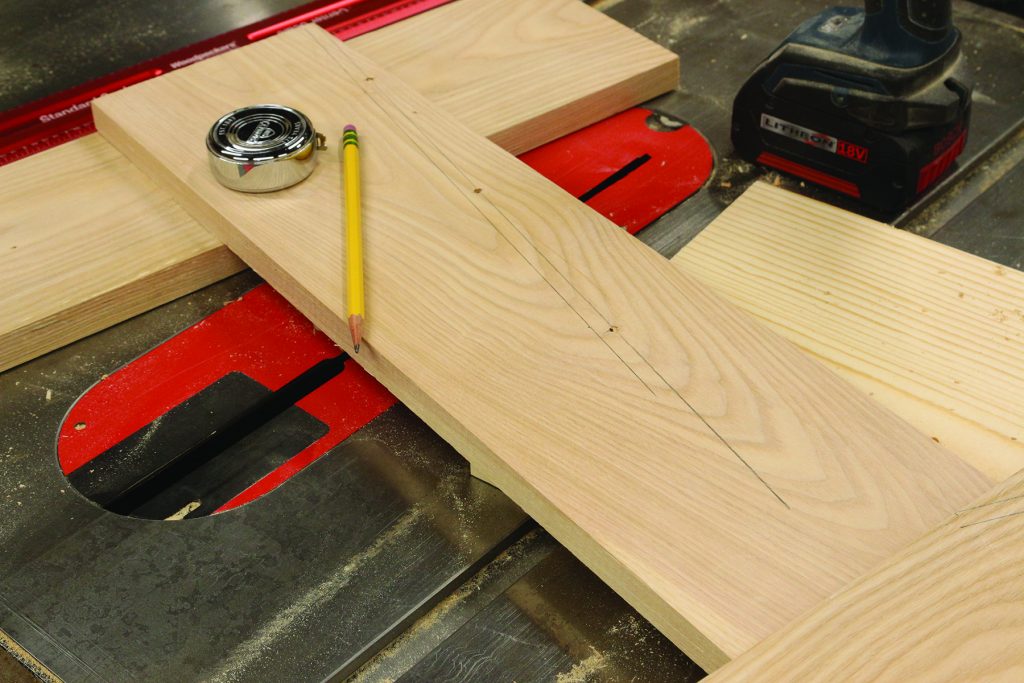
With the back assembled, I used it along with two offcuts from the legs to get a precise length on the seat battens. My lumber was a hair under 3/4″ thick after milling, so the seat battens came in just shy of 20″. Put together the seat in the same manner as the back. This is when the fun really begins.
Use the back and two 3/4″ offcuts to get a precise length for the seat battens, then attach the seat slats to the battens.
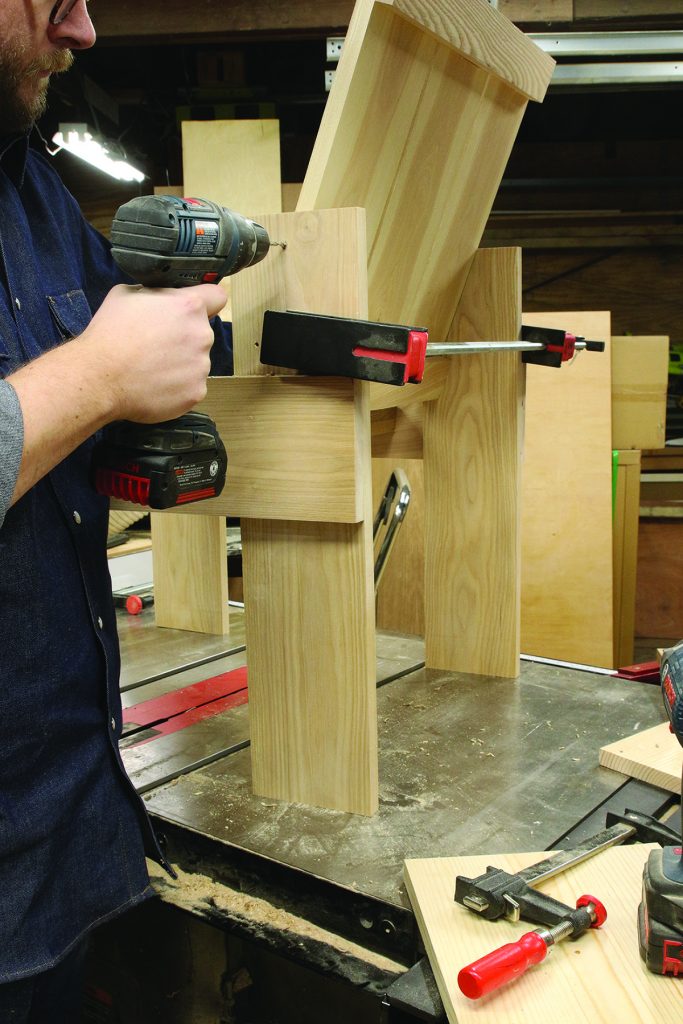
Depending on your plan for this chair, there’s a lot of variability in how you can position the seat and back. I used a few clamps to try some different seating positions. I was aiming for something borderline loungey, but not too reclined.
With a comfortable seat and back angle established, I traced the positions of the seat and back onto one of the leg assemblies. Then I unclamped the chair and mirrored those layout lines to the other leg assembly.
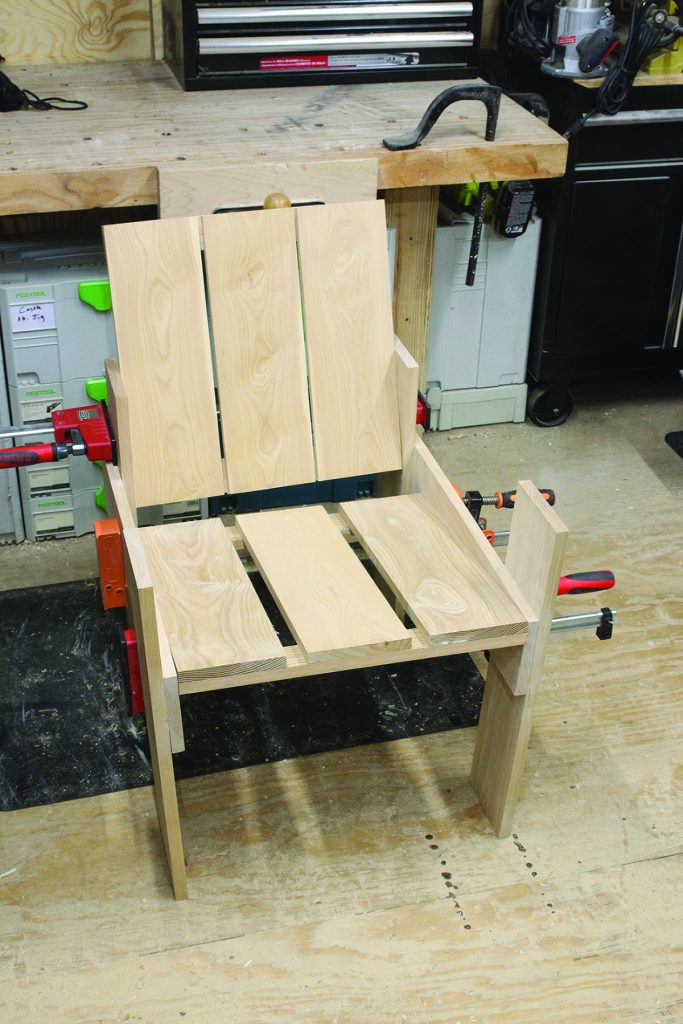
Dry assemble the chair and find seat and back angles you like and transfer layout lines. Mine were both at about 10°, give or take.
Then I attached the stretchers to the legs, paying close attention to make sure I made a pair of mirrored assemblies.
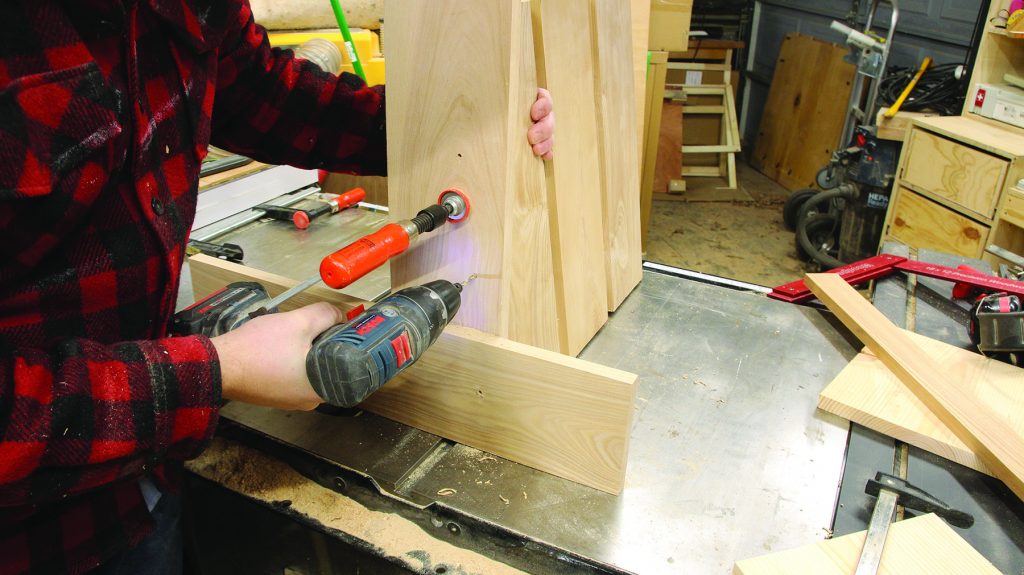
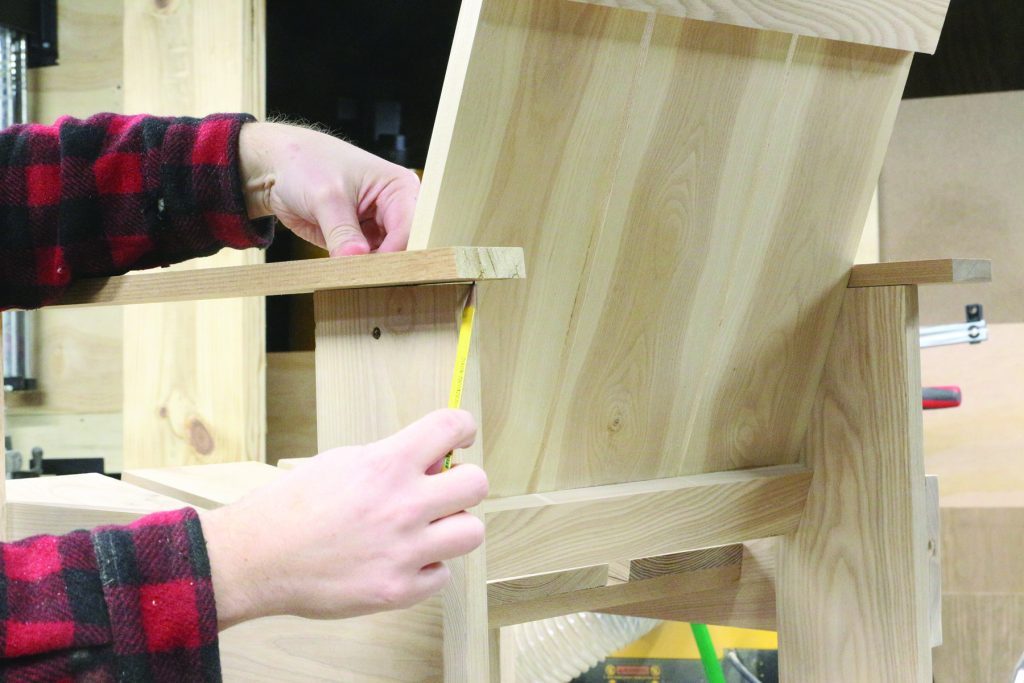
Next, I marked out and predrilled a few holes for screws in the leg assemblies. I used three screws on each side of the seat and two screws on each side of the back. I then clamped the chair back together and used those holes to predrill into the seat and back.
With the four pieces ready to go together, I countersunk the screw holes and did some sanding. With a name like crate chair, I’m not aiming for perfection here; I just did my best to make sure there were no stray glue marks and paid extra attention to where you’re likely to touch the chair with your hands (arms, seat, back).
Pre-drill and countersink holes for your screws to attach the seat. Clamps and an extra pair of hands help a lot here.
Repeat to attach the back.
The last step is to cut the arms to length and attach them with screws.
The last thing I did was add a couple coats of finish. Because the chair will likely end up on the porch at some point, I opted for a hard wax oil (this one made by Briwax). It brings out the grain in the ash and offers some protection. It’s also easy to reapply as needed. But perhaps the best part, is that it’s very low VOC, so I could apply the finish in the comfort of my dining room without stinking up the house.
As for the chair itself, I’m quite happy with how it sits. I also have grown quite fond of the form, which really emphasizes the core elements of a lounge chair. Plus, it’s quick to build, making it a great project to introduce a budding woodworker to some of the basic tenets of furniture making. And I can definitely see building a pair or more to sit outside around the grill, comfortable enough to relax but still keep your wits about you. PW
Side Note: Modifying the Original Design
Rietveld’s design called for 18″ legs, which would put the seat about 12″ off the ground. I mocked this up in the shop and it was just too low for me to sit in comfortably. So, keeping in mind that most dimensions in the chair were based off 6″, I added 6″ to the legs, which brings the seat up to about 18″ off the ground, which felt much better.

Here are some supplies and tools we find essential in our everyday work around the shop. We may receive a commission from sales referred by our links; however, we have carefully selected these products for their usefulness and quality.


A really fun build. I made it last night and really enjoyed its simplicity. Next time I will add pocket holes for the back and bottom part to attach them to the legs. Thank you for the idea🤙