More than 13 million homeowners raise backyard chickens, according to the U.S. Department of Agriculture, and that number is expected to grow over the next several years. You can rear chickens in regions ranging from rural country farms, to suburban neighborhoods, to congested urban cities. If there’s a patch of land, you can raise chickens, and the birds can bring more than just fresh eggs to your home. You might be surprised to discover that chickens can make great pets. They’re friendly, curious, entertaining, and have individual personalities.
If you’re interested in raising chickens, it’s important to first check with your town’s zoning department to confirm that chickens are allowed at your home. A recent study revealed that of the 150 most-populated U.S. cities, 93 percent allow backyard chickens. Chances are your town will, too. That leads us to the next step: getting a chicken coop.
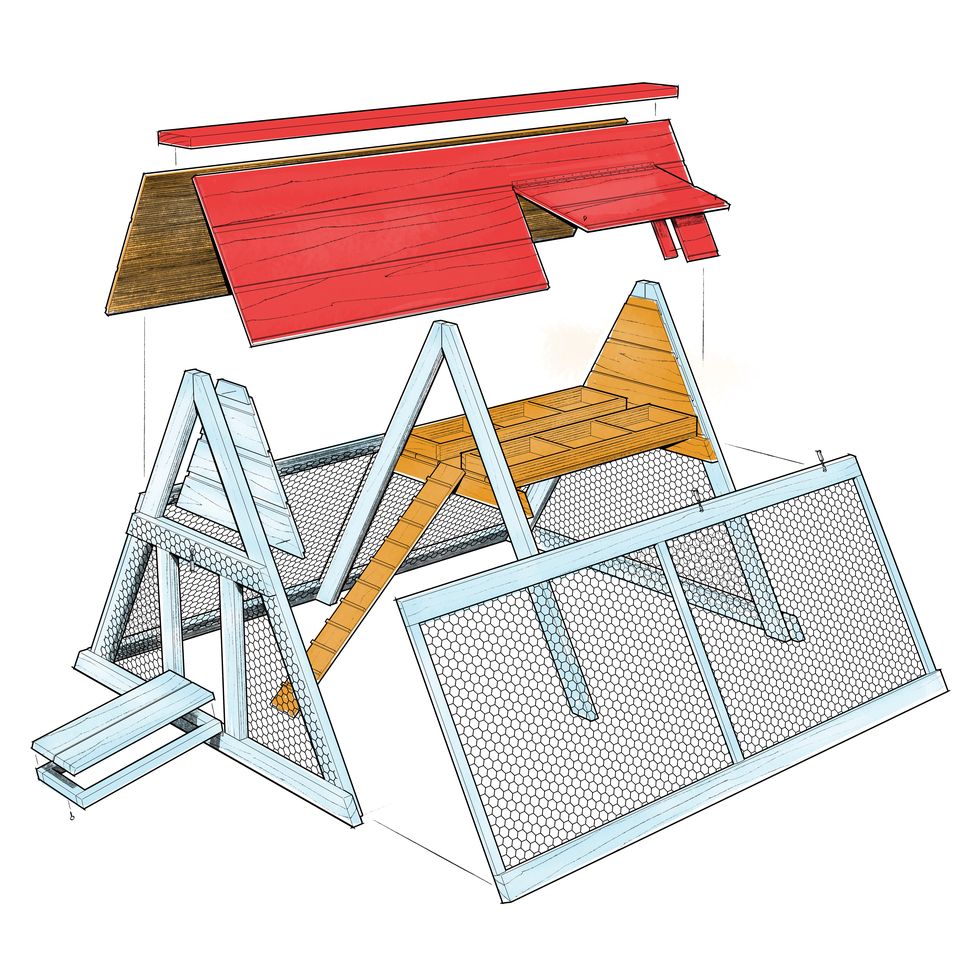
You could certainly buy a chicken coop, but where’s the fun in that? Summon your inner DIY spirit and build our simple A-frame coop. Building from scratch could save you hundreds of dollars, and you’ll be able to construct it to your exact specifications. As shown, our coop takes up less than 50 square feet of space and can easily accommodate six to eight chickens. (Each chicken typically needs a minimum of four to five square feet of coop space, depending on its size and breed.)
The coop has three A-shaped frames, which are built out of 2x4s. The upper portion of the frames is covered with a plywood roof, and the lower section with chicken wire. There’s a small fold-down door on one end to let the chickens out when you’d like, and another door cut into the plywood roof gives you access to the roosting loft when you need to gather eggs. The total cost for all the lumber, hardware, fasteners, and stain should run about $600. Choosing your chickens is its own adventure, but baby chicks are sold at farm-supply stores for between $2 and $5 each.
STEP 1: Cut the Rafters
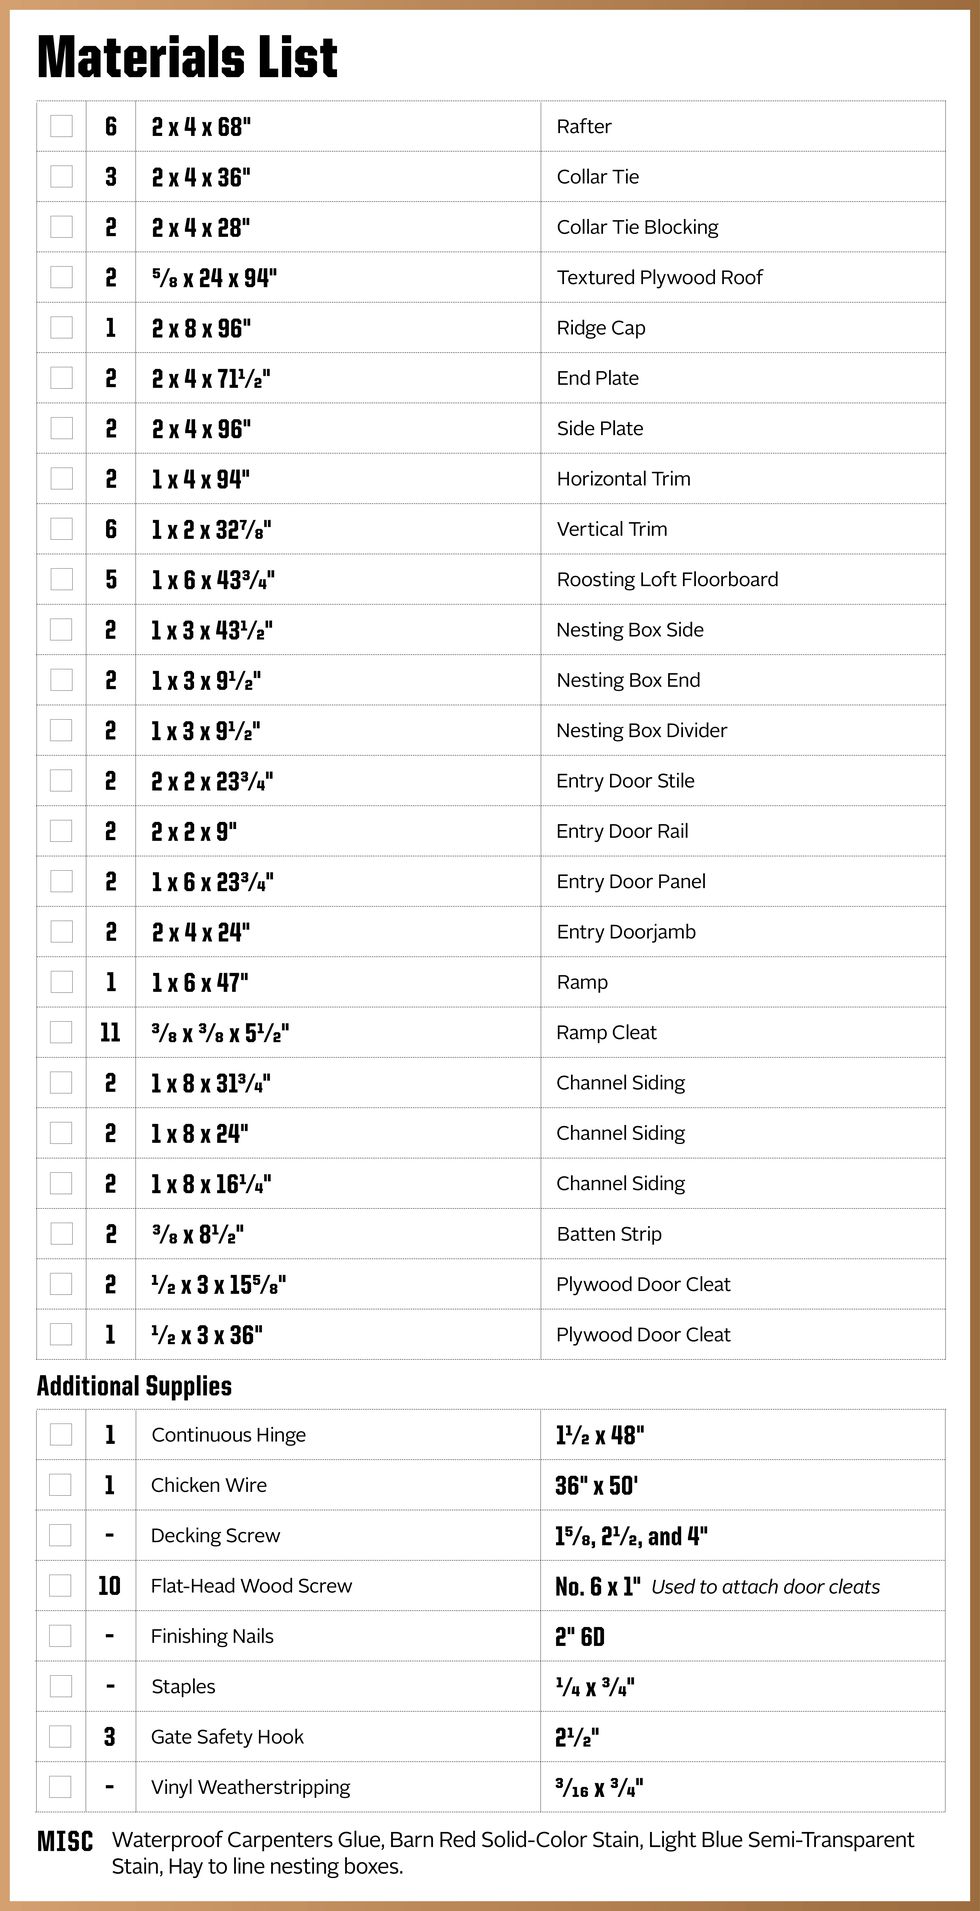
Start by using a power miter saw to cut the six 2x4 rafters to length. Cut the bottom end of each rafter to 30°. Measure up from the bottom end 68 in. and trim the top end to 60°. Next, trim off the pointed tip at 30° to create a 2-in.-wide flat top. Also, cut three 2x4 collar ties to 36 in. long, mitering each end to 30°.
If Your Miter Saw Doesn't Cut to 60°...
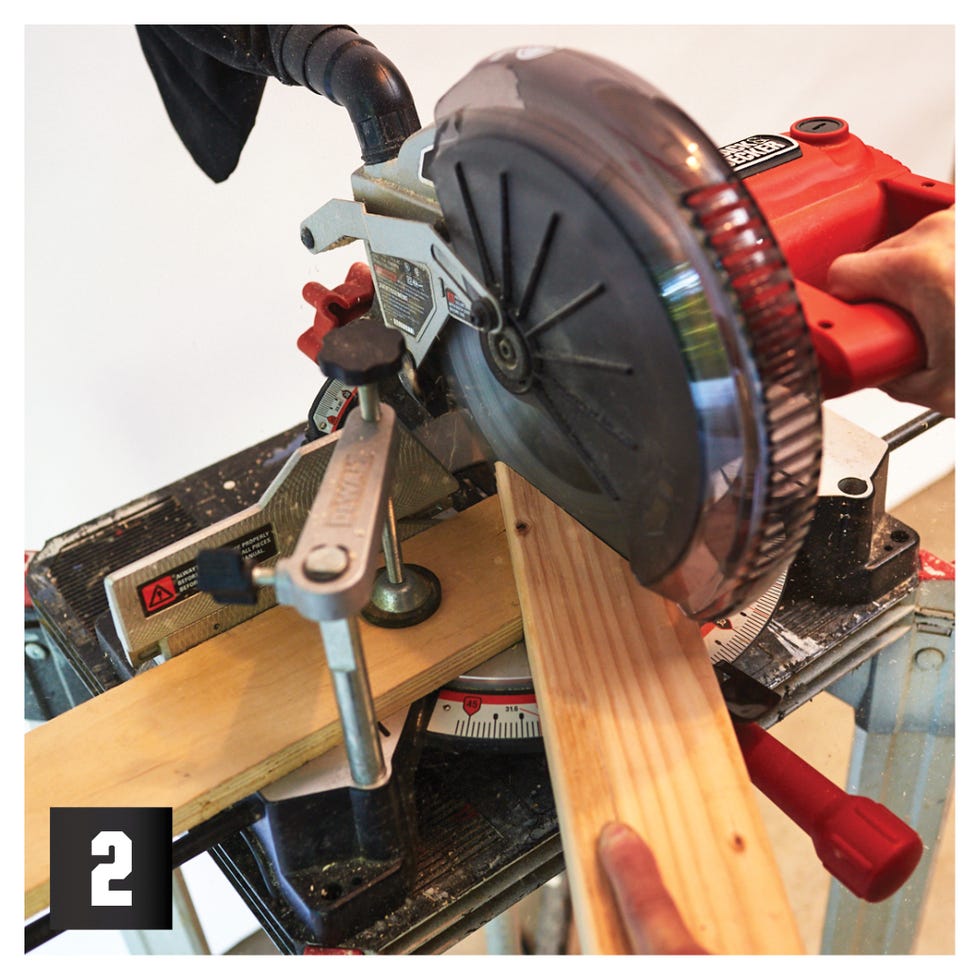
The DIY chicken coop’s three A-frame assemblies requires cutting the upper ends of each rafter to 60°. But what if your miter saw only cuts to 45°? Here’s a simple way to retrofit your saw to cut the 60° miters.
Start by making a cutting guide from a piece of ¾-in. plywood or lumber. Cut the guide about 4 in. wide and at least 12 in. long. Rotate the miter-saw blade to 30° and trim off one end of the guide. Next, clamp the guide to the miter-saw table, as shown. [1] Now, to make a 60° cut, rotate the miter-saw blade back to 0° and lock it in place. Hold the 2x4 rafter against the 30° mitered end of the guide and make the cut, as shown. [2] The result will be a precise 60° cut.
STEP 2: Build the A-Frames
Fasten two rafters together at the top with one 4-in.-long decking screw, and then attach the horizontal collar tie to the rafters with 2½-in. decking screws.
[1]. Be sure to drill counterbored pilot holes first. Cut two more 2x4s to 28 in., mitering each end to 30°. Fasten these pieces, called collar tie blocking, to the collar ties on two of the A-frames. The two frames with the double-thick collar ties are used at the front and back of the coop. The remaining A-frame, which has a single collar tie, is situated in the center of the coop. Once you’ve assembled the three A-frames, apply a coat of semi-transparent stain (we did light blue) to all surfaces. Staining the parts as you go is much easier and neater than trying to apply it once the coop is fully assembled.
STEP 3: Make the Roof
A 4 x 8–ft. sheet of 5/8-in.-thick textured plywood siding will keep your chickens safe and dry. Use a circular saw to rip the sheet in half lengthwise, creating two 24 x 96–in. panels. Apply a solid-color stain (ours was barn-door red) to both sides of each plywood panel. Fasten one of the roof panels to one side of the A-frames using 15/8-in. decking screws [2].
STEP 4: Add Wire and Siding
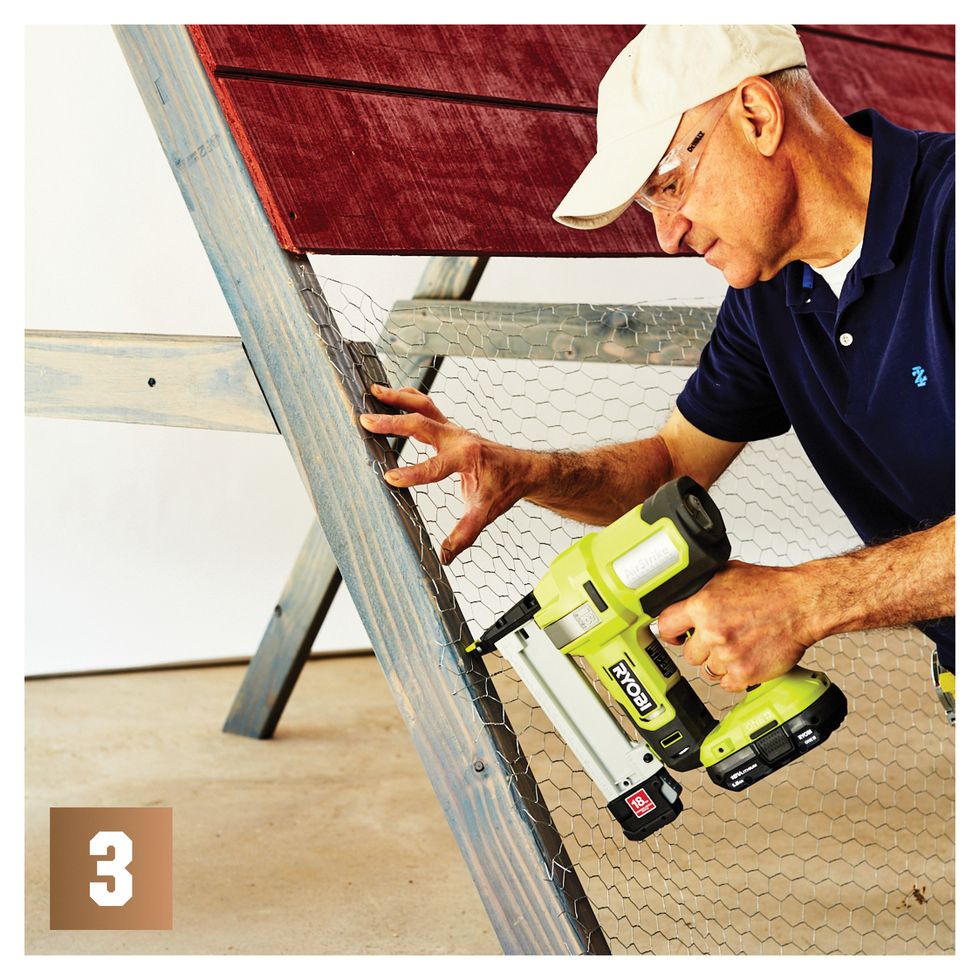
Staple chicken wire to the lower portion of the rafters [3]. Then screw a 94-in.-long 2x4—called a side plate—horizontally over the chicken wire and across the bottom of the rafters [4]. Enclose the triangular openings above the collar ties with three pieces of pine 1x8 channel siding cut to fit. Miter-cut the ends of the siding to 30°, and slide them into place [5]. Secure the siding pieces with 2-in. finishing nails driven through the back side and into the rafters. I used channel siding because I like its rough-sawn look, but you could substitute pine 1x8s or even plywood. Once you’ve installed the siding, screw on the remaining plywood roof panel.
STEP 5: Cut the Loft Door
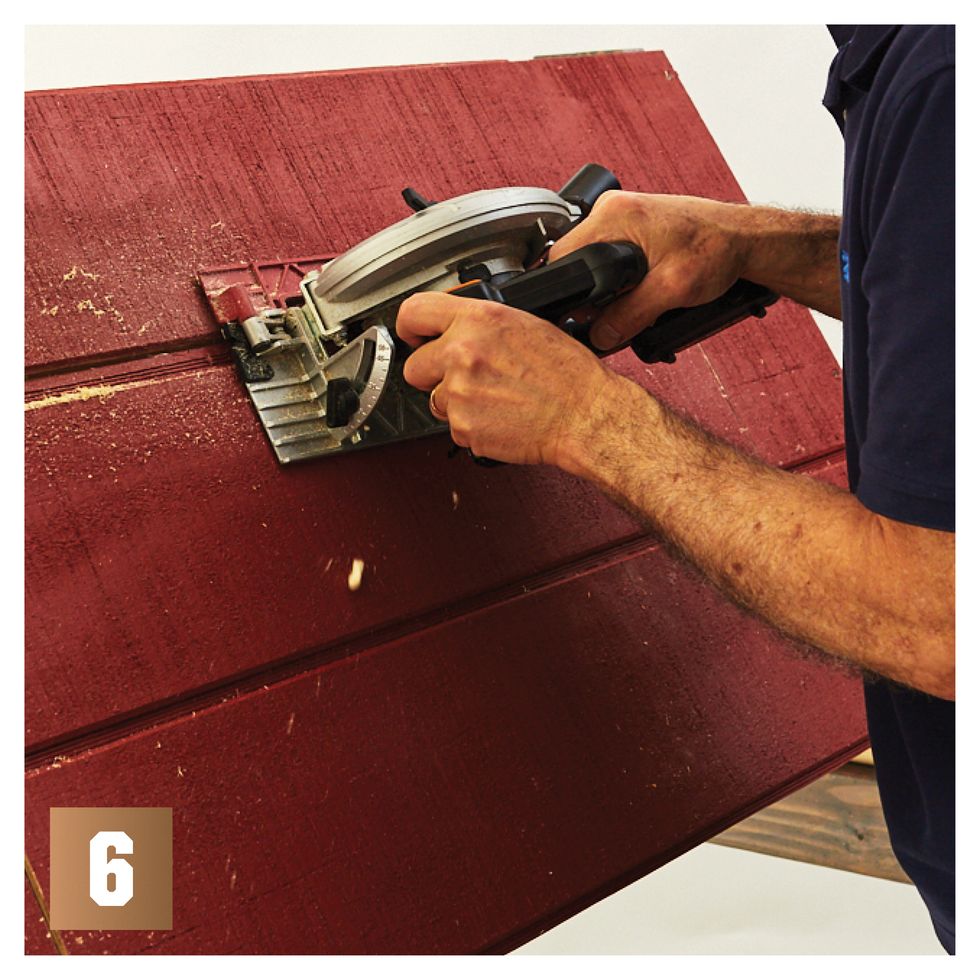
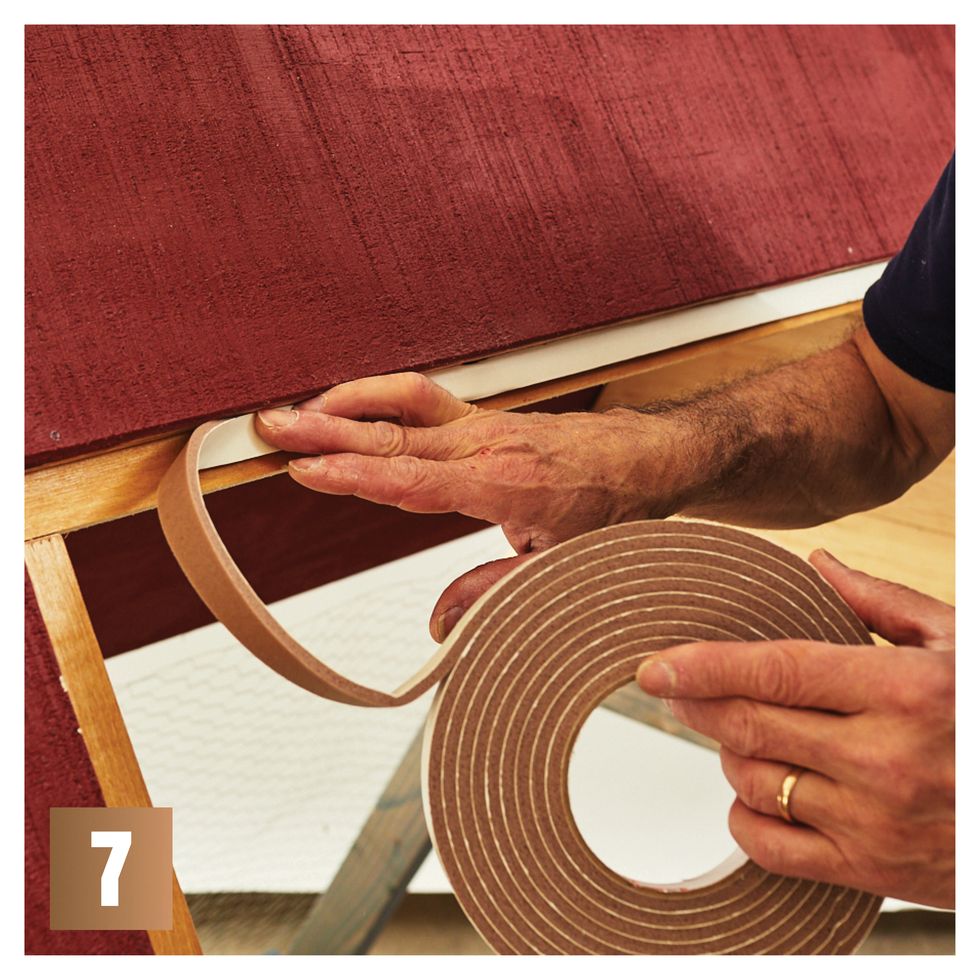
Use a circular saw to cut out the roosting-loft access door from the plywood roof panel. Cut the door 16¾ in. wide x 32 in. long [6]. Next, take some ½-in.-thick plywood and cut three 3-in.-wide strips; make two 155/8 in. long, and one 32 in. long. Glue and screw these plywood door cleats around the inside of the roosting loft doorway; allow the cleats to extend 1 in. into the opening. Now cover each cleat with a strip of adhesive-backed vinyl weatherstripping [7]. The 3/16-in.-thick x ¾-in.-wide weatherstripping will help seal out rain.
STEP 6: Build the Loft Floor
Create the floor of the roosting loft by cutting five pine 1x6s to 43¾ in. long. Lay the 1x6s across the collar ties and fasten them with 2-in. finishing nails [8]. Next, make two 11-in.-wide x 43½-in.-long nesting boxes out of pine 1x3s. Set the boxes along the sides of the roosting loft floor and secure each with two 15/8-in. decking screws.
STEP 7: Build the Ramp
Make a 47-in.-long ramp from a 1x6, so the chickens can access the roosting loft from the ground. Miter-cut the ends of the ramp to 30°, then attach 3/8-in.-sq. cleats, spaced about 4 in. apart, so the chickens can climb the ramp without slipping. Fasten the ramp to the center collar tie with a continuous hinge. Then cut an 8-in. length of wire from a wire clothes hanger and screw it to the center of the collar tie directly above the entry door. Twist a small screw eye into the edge of the lower end of the ramp. When it’s necessary to move the coop for cleaning, raise the ramp and slip the wire into the screw eye.
STEP 8: Add the Roosting-Loft Door
Take the door you cut out of the plywood roof earlier and secure it over the roosting loft with a 31¾-in.-long continuous hinge [9]. Then, lay an 8-ft.-long 2x8 across the tops of the three A-frames and fasten it with 3-in. decking screws [10].
STEP 9: Add the Trim and Wire
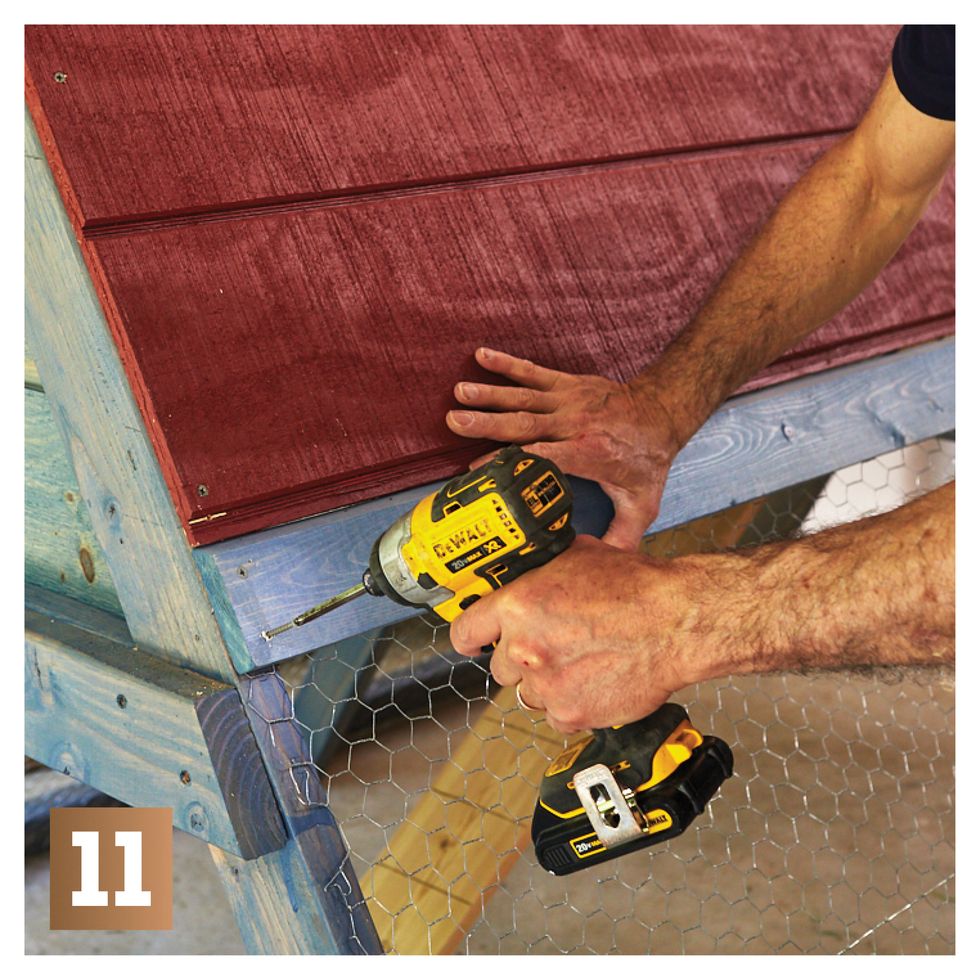
Next, cut two 1x4 horizontal trim pieces to 94 in. long. Use a table saw to bevel-rip the top edge of each 1x4 to 30°. Take one trim piece, butt its beveled edge tightly against the lower edge of the roof panel, and then fasten it to the rafters with 15/8-in. decking screws [11]. Cut 1x2 vertical trim pieces to fit snugly between the 1x4 horizontal trim and 2x4 side plate; attach the 1x2 trim pieces with 2-in. finishing nails [12]. Staple chicken wire to the opposite side and both ends of the chicken coop. Install the remaining 94-in.-long side plate, then cut two 2x4 end plates to 71½ in. long; miter the ends to 30°. Fasten the end plates to the bottom of the rafters using 3-in. decking screws [13].
STEP 10: Cut the Entrance
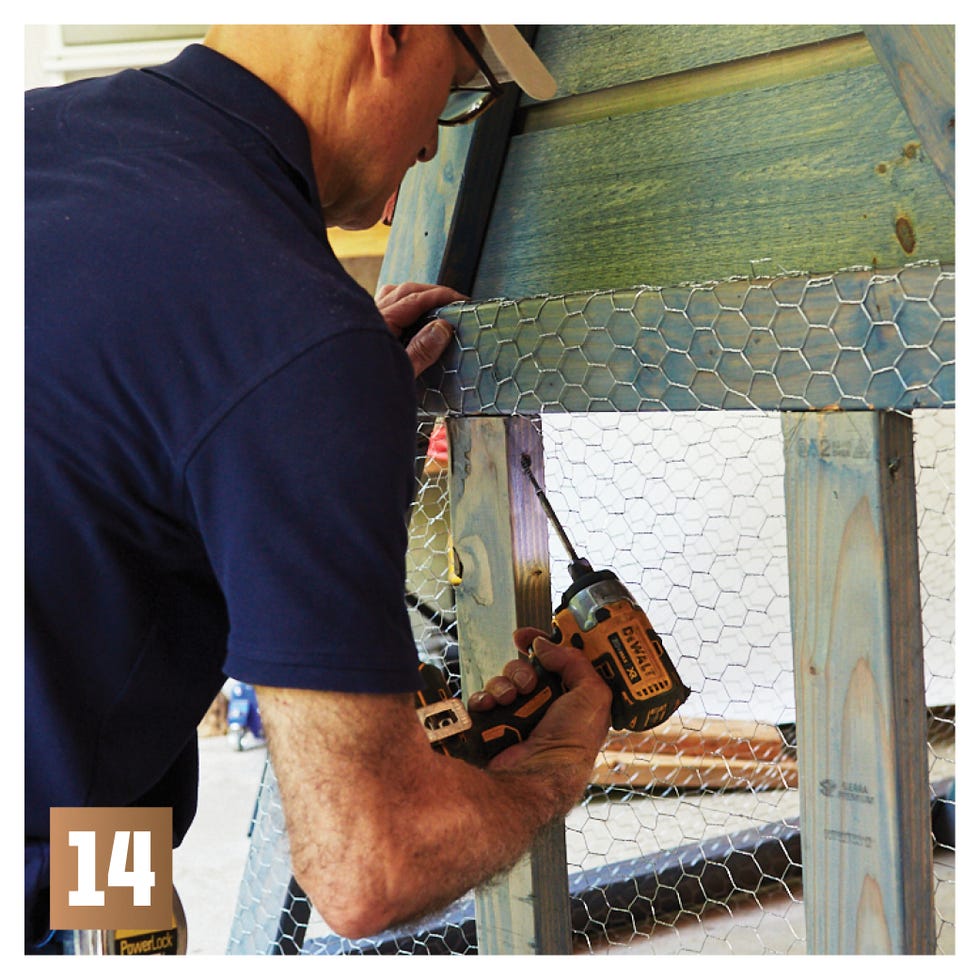
Frame out the entry opening for the fold-down door by screwing in place two vertical 2x4s [14]. Space the 24-in.-long 2x4s precisely 12¼ in. apart, making sure each is perfectly plumb. Then cut out the chicken wire from within the doorway opening.
STEP 11: Attach the Door and Finish
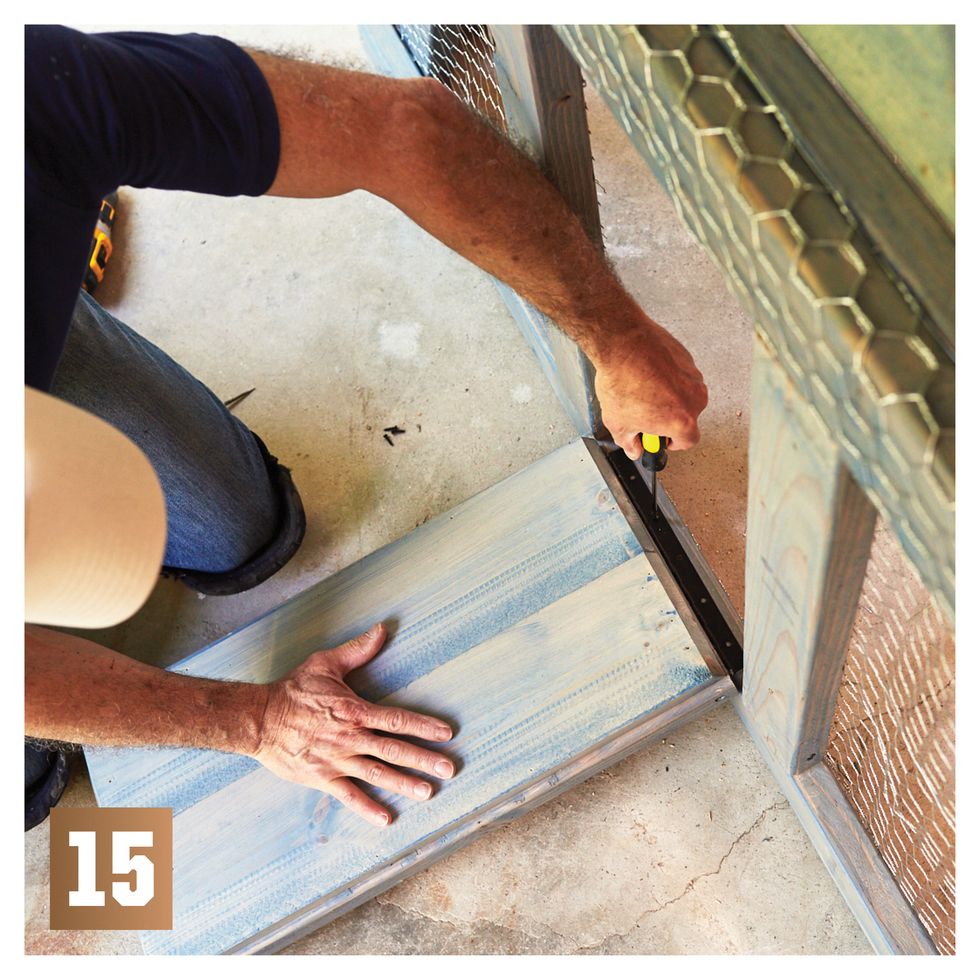
Next, build the 12-in.-wide x 23¾-in.-tall door frame out of 2x2s. Then cover the back of the frame with two 23¾-in.-long 1x6s, which create a solid walking surface for the chickens when the door is folded down. Attach the door to the 2x4 end plate with a continuous hinge.
[15]. Hold the door closed with a single gate safety hook. Install two gate safety hooks to secure the plywood door over the roosting loft. Finish up construction by installing the remaining horizontal and vertical trim pieces on the opposite side of the coop. Now, set the chicken coop on a level spot in your yard, fill the nesting boxes with soft hay, and welcome home your new flock.
4 Chickens to Start Raising Now
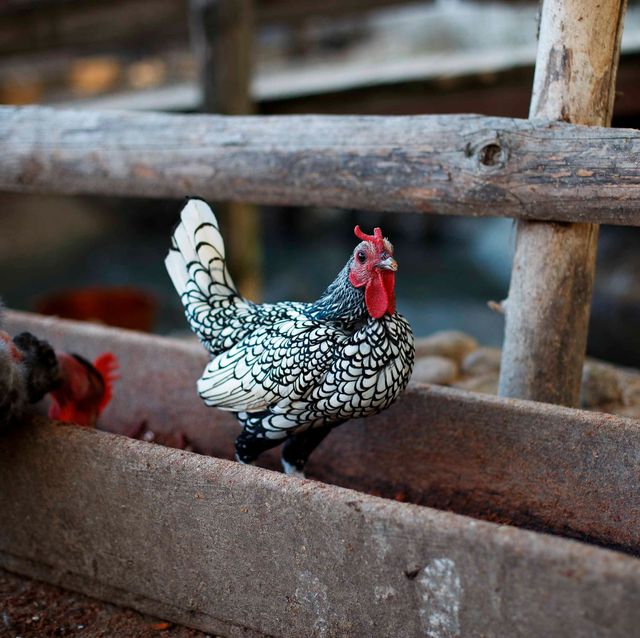
If You Want a Great Pet: Sultans
These were originally bred in Turkey as ornaments for the Sultan’s gardens. Today, they are on the Livestock Conservancy’s Critical List, so look for them at online/mail order hatcheries instead of your local feed store. Sultans typically weigh just 4 to 6 pounds and lay about 50 bright white eggs per year—ideal for those looking for a lap hen, rather than an egg producer.
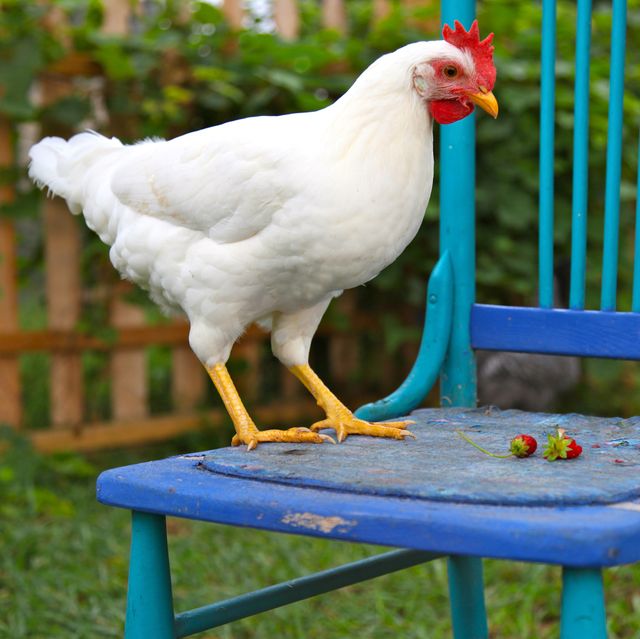
If You Want Lots of Eggs: White Leghorn
This is the archetypal bird you might imagine when thinking of a chicken. The hens lay about 280 eggs a year—they’re hardy in both winter and summer—and they’re easy to find at most places that sell chickens. They are a bit flighty, however, so they won’t make the best pets, but if you’re looking for consistent eggs from the backyard, these hens will deliver them.
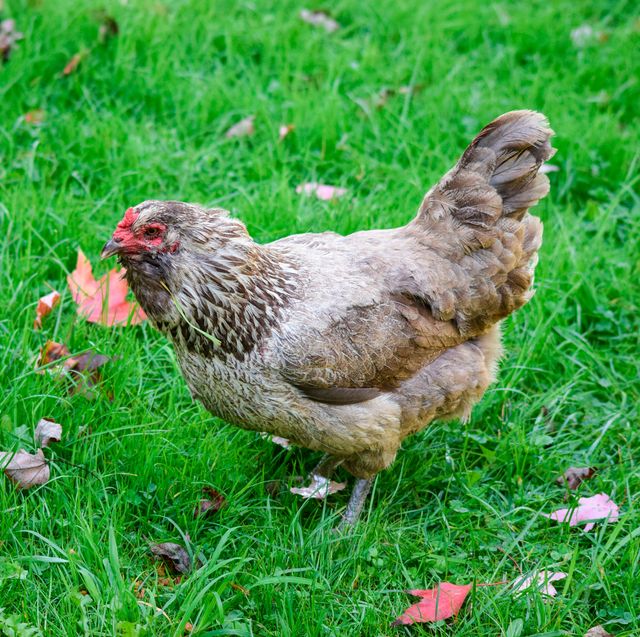
If You Want Flair In Your Flock: Ameraucana
This species lays blue-green eggs, but they’re not just nice to look at—Ameraucana eggs are large, in part because these hens don't stress easily. Ameraucanas rarely go “broody” and sit on their eggs for long. You can consistently expect up to 4 eggs per week. What’s more, these birds are hardy in colder climates and have sweet
temperaments. They enjoy being around humans.
If You Don’t Have A Lot of Space: Bantams
Bantams can be one-fifth the size of a typical chicken, ideal for those with less coop space. Bantams can be traced back to the 1500s, when they were bred to supply eggs and meat on cramped ships. These hens make great pets for children because they’re easy to hold. While the eggs are pint-sized, too, Bantams produce about 200 eggs per year.—Erica Somes
Joe Truini is a former carpenter and cabinetmaker who writes extensively about remodeling, woodworking, and tool techniques. He's the author of eight DIY books and is a long-time contributing editor to Popular Mechanics.


