
I was recently on a jobsite in Chatham, Mass., to review a new stair project with the contractor (someone with whom I frequently work) and his clients. While I was there, I noticed some old stair parts in the corner of the home’s unfinished living room. The clients noted that there had previously been an old, circa-1900 house on the lot (owned by their family), but that it had been beyond repair and was razed to make room for their new home. They managed to salvage some of the antique newels, balusters, and rails from the home and wondered if it would be possible to re-use them in the new construction. As a stair builder, I enjoyed meeting someone who appreciated the quality and history of the old parts, so I told them I would do my best to incorporate the parts into the finish design.


Unfortunately, the old balusters were too short to meet code, and there was not enough usable railing length for either of the home’s planned two stairways. The three salvaged newels, on the other hand, showed promise. Though they were also too short, and damaged at the base from the demolition, I was confident I could rebuild them, making them taller to meet code and strong enough to resist fulcrum loads typically associated with newel posts.
Joining Old to New
My biggest concern was how to join the old newel tops to new extension bases. I wanted to make a strong joint that was also invisible to the eye. After doing some research and making a few samples, I came up with a joint that allowed for a large gluing surface, with its strength bolstered by a threaded-rod connection. I planned to locate this new joint where the newel transitions from square to round—what woodworkers refer to as the “pommel” or “pommel cut.” Now that I had a working concept, all I needed was to execute it.


New base stock. The three salvaged newels varied slightly in style and size. I started with the larger, more ornate newel (which we planned to use for the first-floor landing), cutting off its base with my chop saw to create a flat surface for the post and new base to meet. Wanting to match its original 4 3/4-inch-square base block, I wrapped 2-by vertical grain (VG) fir stock around a removable 1 3/4-inch-square center piece (see Rebuilt Newel Detail, above). The center piece allowed me to glue up and clamp the mitered fir pieces together without distortion. The removable center was not glued, which allowed me the option to remove it and later re-install it to help with the threaded-rod installation, if need be. I squared off the new base block with my chop saw, leaving a flat, clean surface to shape.

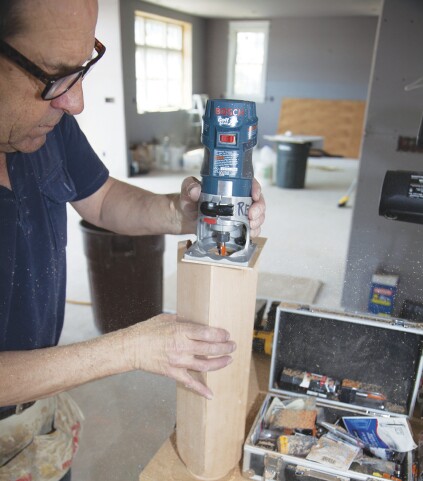
Shoulder and collar cuts. The next step was to create the joint where the old newel met the new base block. I first replaced the base plate on my Bosch trim router with a temporary Masonite one, which I used to help make radius cuts on the bottom of the old newel and the top of the new base. My plan was to create a rounded “shoulder” on the cut end of the old post and then a corresponding “collar” in the new base. With a new straight-cut bit in my router, I measured from the edge of the bit to the desired point that would give me the correct radius I needed (see photos). Because the existing newels varied in size, the distance between the router bit and the pivot point was different on each post.

Before making the inner diameter cut to create the collar, I brought my three block bases to a local wood turner, who made the rounded pommel cuts on his lathe (the center piece came in handy again for pommel cuts, providing a clamping surface for the lathe). Back on site and focusing on the larger newel, I made the inner diameter cut for my collar, then swapped the Masonite base with the router’s factory plate and hogged out the remaining wood freehand with the router.

Making a strong connection. Finishing up, I removed the center piece from the base block and dadoed a continuous groove along its length, making it U-shaped. I then cut it to length (the extension base had to puzzle-piece into the corner of the stair carriage at the winder). Next, I installed two brass threaded inserts in the bottom of the post, then re-installed the U-shaped center piece, this time applying Loctite PL 400 adhesive to it. I applied additional adhesive in the shoulder-to-collar joint, then installed a length of 3/8‑inch threaded rod with washers and nuts, which held the assembly together until the Loctite PL 400 adhesive dried. The combination of adhesive and mechanical fastening made for an assembly strong enough to satisfy the building inspector.
The two remaining, smaller-diameter newels (one located at the top of the second floor, the other at the bottom of the basement stairway) were built similarly. In both cases, however, I removed the center pieces entirely, since the remaining spaces were small enough to center the threaded rod for my final assembly.


