How to carve a pumpkin – expert tips that make it easy
Learning how to carve a pumpkin the right way will make the process easier, and can even make your jack-o-lantern last longer


Learning how to carve a pumpkin is the key to mastering one of Halloween's most revered traditions: the art of the Jack-o-lantern.
Perhaps you've never carved a pumpkin before and aren't sure where to start, or maybe you've carved your fair share, only to wind up with a Jack-o-lantern that withers a few days later?
The right pumpkin carving ideas and techniques can elevate your Halloween decorating ideas, and make your fall traditions more fun and less frustrating. There are even pumpkin carving tips that will help your carved pumpkins last longer (we've snuck in one that goes against all standard pumpkin carving methods, but is key to a long-lasting jack-o-lantern).
Sharpen your tools and preheat the oven (you roast the seeds, right?), because it's time to get carving.
How to carve a pumpkin
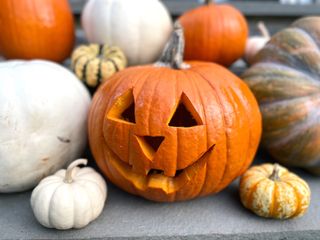
Before you consider those outdoor Halloween decor ideas, know that carving a pumpkin successfully starts with choosing the right squash, says pumpkin carving artist Jamie Jones.
'I avoid supermarket pumpkins and find a local farm, the pumpkins tend to be much bigger from farms,' she says. 'I also always try to find a pumpkin with a long firm stem, a soft stem is a sign the pumpkin is starting to rot or has a fungus infection and won't last very long.'
Finally, says Jones, go for a bigger pumpkin over a smaller one. Not only will a bigger pumpkin be a more impactful part of your Halloween porch decor, it will also be easier to carve, since smaller ones tend to be too firm.
Once you've got the proper subject, follow these steps to carve it.
You will need:
- Large pumpkin
- A pumpkin carving toolkit (this is Amazon's top-rated buy) or a small serrated knife and a large metal serving spoon
- A paper bag to clean the pumpkin on (cut it open and spread it out for more work room)
- A small LED candle – we love this flickering set of three, controlled by a remote control
- Pumpkin stencil or pumpkin punchers – these links take you to our favorites.
- Bleach or vinegar
- Water
1. Clean out the pumpkin
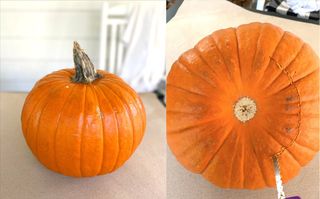
First, you'll need to clean out the pumpkin by scraping out the seeds and pulp. To do this, use a serrated knife to cut around the base of the pumpkin, to create a hole from which you can scrape out the pulp. You can also carve a hole in the back of the pumpkin, if you prefer. Wherever you make your hole, make sure it's large enough to stick your hand or a scraping tool into.
If you've been conditioned to clean out your pumpkin from the top, by cutting a hole around the stem, it's time to ditch that practice, says Jones. 'Hollow out your pumpkin from underneath or the back – never the top! The stem still contains some nutrients, cutting off the top will make the pumpkin rot faster.'
Cutting the pumpkin from the bottom also makes the whole job easier, since most of the seeds and pulp are attached to the base. So, when you cut from the bottom, you'll take a lot of the seeds out with you.
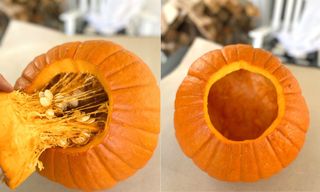
Then, use your hand or a pumpkin scraping tool to scrape out the pumpkin seeds. If you want to speed up the task, you can also purchase a pumpkin-cleaning drill attachment.
Scrape out the pumpkin as much as you can, which will make it easier to carve.
2. Lay out your design
Before you sharpen your tools, decide on where you'll put your design. Carve the flatter side of your pumpkin, if it has one. A flat surface makes carving easier.
If you'll be doing your pumpkin carving freehand, use a fine point pen or orange marker to map out your design before you start carving. This gives you a chance to make adjustments if you run out of room or need to start your design over.
If you'll be using a stencil, tape it onto the pumpkin. Then, use a circle punch tool from your pumpkin carving kit (or a push pin or nail) to punch holes along the lines of the stencil, tracing the design onto the pumpkin.
3. Start carving
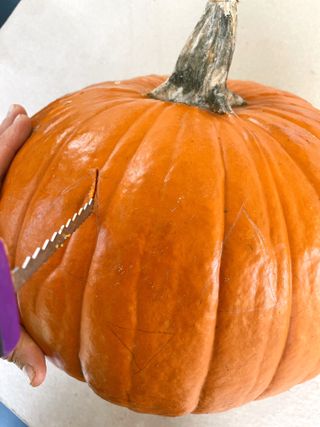
Once your pumpkin carving design is laid out, it's time to start cutting. Use your serrated knife to cut the pumpkin along the outline of your design. A sawing motion works best.
Remove the pumpkin cut outs by pushing them into the pumpkin, or inserting your knife into the middle of the cut out portion and pulling it out.
Once all your carving is done, use your knife to refine any uneven areas, and to remove any leftover pulp.
4. Preserve the pumpkin
'Once you've finished carving, to make it last longer, wash it with cold water and a little bleach, this will dramatically increase the shelf life of the pumpkin,' says Jones.
The bleach kills mold and bacteria that make pumpkins turn mushy and wilted, which will help it last a few extra days as part of your Halloween table decor. You can also use vinegar to stop pumpkins rotting – or at least slow the process down. And if you're displaying your pumpkin outside, perhaps also consider how to stop squirrels eating your pumpkins to protect your precious designs.
5. Light it up
The final step in carving pumpkin is to light it. Skip candles, which can be dangerous and finnicky, and choose a small LED light or LED candle instead. They're safer, and you won't have to worry about them blowing out in the wind or rain. To make things even easier, choose LED candles that run on a timer, or buy LED lights that are remote operated.
What tools do I need to carve a pumpkin?
If you're planning to carve a pumpkin using the cut-through method, which is the traditional method of cutting blocks out of the pumpkin, 'a small hack saw blade or thin serrated knife are the best tools to use,' says Jones. Whatever tool you choose, make sure it's sturdy and sharp. A sharp tool will require less pressure than a blunt one, which helps minimize accidents.
For more involved carvings, like pumpkin shading or sculpting, Jones suggests advanced tools like clay loops, cutting ribbons, wood carving chisels and lino cutters. This pumpkin carving kit we suggested from Amazon includes many of these.
How do I prepare a pumpkin for carving?
Preparing a pumpkin for carving is easy. Give it a scrub to remove any stuck-on dirt or mud, then wipe it clean with a damp cloth. Once it's dry, it's ready to carve.
Sign up to the Homes & Gardens newsletter
Design expertise in your inbox – from inspiring decorating ideas and beautiful celebrity homes to practical gardening advice and shopping round-ups.

Kaitlin Madden Armon is a writer and editor covering all things home. Her work has appeared in Real Homes, Architectural Digest, Martha Stewart Living, Refinery29, Modern Luxury Interiors, Wayfair, The Design Network, and lots more. She graduated from Northeastern University with a degree in journalism and currently lives in Connecticut with her husband, three kids, and black lab.
-
 How to check your decking for winter damage – 5 simple steps to ensure you don't overlook important warning signs
Although winter can take its toll on decking, most issues can be easily rectified if swiftly identified and dealt with – experts explain what to look out for
By Lola Houlton
-
 5 ways to fall back in love with your kitchen, even if it's not your dream space (yet)
Interior designers suggest 5 ways to love your kitchen even if it's not your dream space, and they're simple, easy solutions that make a big difference
By Molly Malsom Published
-
 What is the most popular Halloween decoration? The top 5 looks, according to Pinterest
Find a rundown of the five most popular Halloween decorations from one of our favorite inspiration sites
By Chiana Dickson Published
-
 Halloween party decoration ideas – 5 spooky looks adults and kids alike will love
Embrace the season of spooks, ghouls and things that go bump in the night with these fiendishly stylish Halloween party decoration ideas and makes
By Jennifer Ebert Published
-
 18 Halloween decoration ideas – these tricks will make your home look like a treat
From classic pumpkins to cozy candles, garlands, wreaths and more, celebrate Halloween by making your home look spookily stylish and scarily inviting
By Lucy Searle Last updated
-
 Blake Lively's handmade Halloween decor is the perfect inspiration for our spooky get-togethers
Blake Lively's inspirational Halloween crafts and bakes are just what we needed to get in the spooky spirit
By Chiana Dickson Published
-
 How to paint a pumpkin – a step-by-step guide for the perfect paint finish
Keep your painted pumpkins pristine for Halloween by learning how to paint a pumpkin properly
By Chiana Dickson Published
-
 Pumpkin painting ideas – 10 easy and stylish looks for adults and kids alike
Whether you're looking for pumpkin painting ideas that are chic or scary, these easy options will elevate your Halloween
By Kaitlin Madden Published
-
 Pumpkin carving ideas – 9 looks, from simple to spooktacular
These fun and easy pumpkin carving ideas will turn your squash into a luminary, a work of art, or a good old-fashioned Jack-o-lantern
By Kaitlin Madden Published