How to Make Polaroid Emulsion Lifts & Transparencies
A Step-by-Step Guide With Troubleshooting Tips
11 min read by Dmitri.Published on . Updated on .
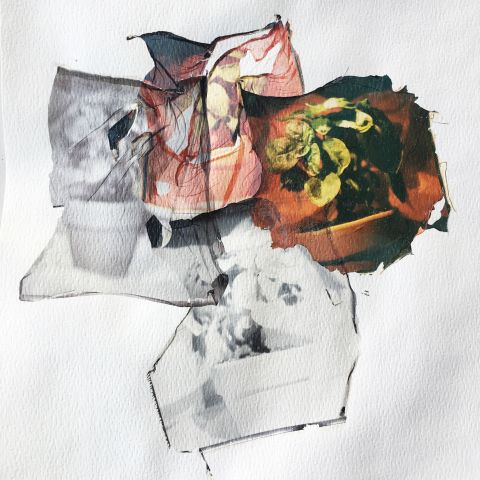
Emulsion lifts make beautiful, fragile, stretchy little “cloths” that float in water like jellyfish. Sometimes also called emulsion transfers, they can be arranged into a piece of delicate photographic craft.
Aside from the wrinkling effect, emulsion lifts can stretch to produce enlargements, up to 15% bigger photographs. If used with the right paper, they can also add contrast and brightness to the image. And in some cases, they can yield images that are more resistant to sun exposure.
Let’s get started.
For best results:
Your film’s type, generation, batch freshness, and exposure date can affect the quality of your emulsion lifts greatly. It took me a while and a lot of ruined film to figure out the right combination of factors, which are:
☑️ Use Polaroid film. Though Analog Things was successful with Instax in his video, emulsion lifts with Polaroid film are easier and cleaner.
☑️ Use monochrome film. Polaroid B&W SX‑70 and Polaroid B&W 600 films yielded the best results in my trials. They were easier to detach from the frame and clean from excess material.
☑️ Use freshly-shot film. It will be easier to wash off layers if the frame was exposed minutes or hours prior than weeks/years.
☑️ Practice with your least favourite photos first. Though I do my best to explain every step of the process in this guide, a lot of it comes down to fine motor skills, which you’ll improve with practice. And while you do, it may be best to save your best creations for when you’re well-rehearsed.
☑️ Download this FREE printable PDF guide with the full list of everything you need and each step of the process described with illustrations. That way, you won’t have to go back and forth between your screen and potentially messy and wet working space.
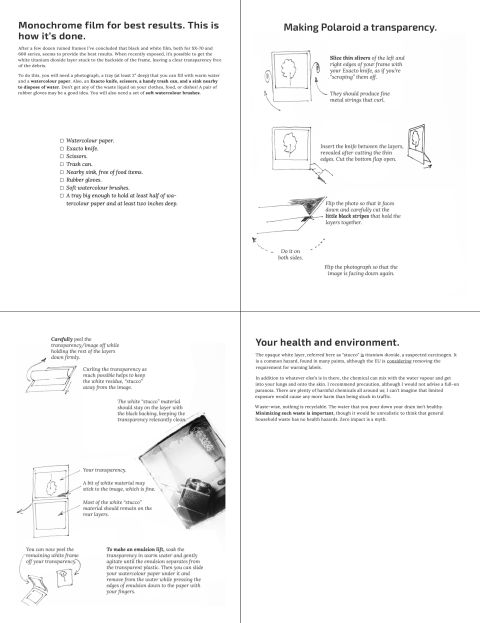
Print pages 4-7 if you’d like to save some paper. Those leaves include everything you need to get started with your emulsion lifts, step-by-step instructions and process illustrations.
The PDF guide includes all the steps for creating an emulsion lift listed in this article, including troubleshooting tips and a few suggestions for better results. It can be printed in either A4 or Letter format.
✪ Note: You will be asked to sign up for a free account with Analog.Cafe. It comes with access to more downloadable guides, additional website features, and a monthly community newsletter.
What you’ll need:
☑️ Your exposed Polaroid photo(s). See the tips above to help you select the best candidates for the job.
☑️ Watercolour paper. It will need to be submerged under water for minutes at a time and retain its shape. Hahnemuhle makes some nice sheets (see link above); whatever brand you go with, make sure that it is also thick — 300gsm or 200lbs is a good weight.
☑️ Soft watercolour brushes. This will be your principal tool for maneuvering your emulsions onto paper.
☑️ Exacto knife. Without one, you won’t be able to disassemble your Polaroid frames.
☑️ Trash can. Keep one close as this process, unfortunately, generates a lot of garbage.
☑️ A deep tray for water. It needs to be large enough to fit at least half of your watercolour paper and a few inches of water. I used a glass baking tray.
☑️ Nearby sink. You’ll need some water for this project. Not a huge amount, but you’ll need it to be running, and your sink should be free of dishes. It’s best not to splash the chemicals you’ll be washing off your film onto your plates and cutlery.
☑️ Rubber gloves. Keeping your fingers in warm water for a long time can make them dry, and the chemicals floating in it won’t be good for you either.
☑️ Scissors. You’ll need them to trim edges around your frames for easier layer separation.
And now that you’ve got everything you need, you can get started. Make sure you’re in a well-ventilated space and allow some time for clean-up after you’re done with your emulsion lifts. This will take about 1-4 hours.

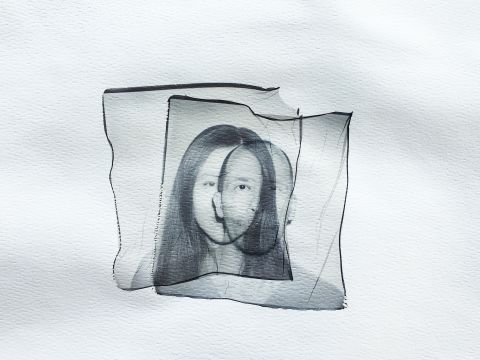
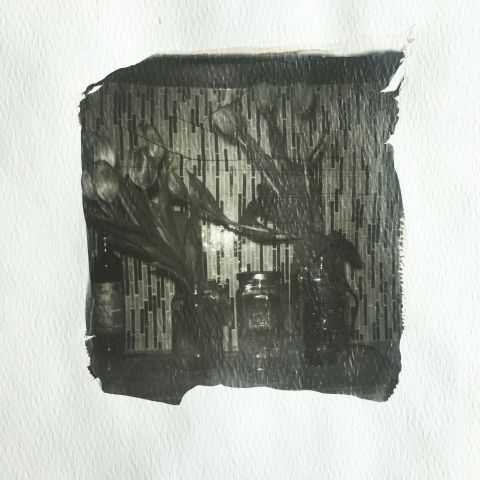
1. Make a Polaroid transparency.
Polaroid transparencies look like slide film — you can see right through them. Quite beautiful on their own, they are the first step towards making your emulsion lift. Here’s how you make one:
✪ Note: These instructions make the most sense when you follow the illustrations.
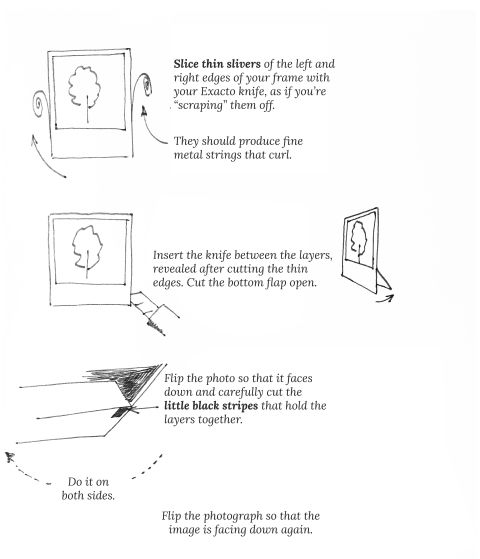
1.a. Shave thin slivers off your frame’s left and right edges with your Exacto knife. Your shavings should be thin, curly strips of metal foil.
1.b. Split the bottom of your Polaroid frame in half: insert your Exacto knife between the layers of the bottom frame — revealed after you’ve shaved the slivers (see above) — then slice the bottom of the frame from the inside (see the illustration). You would end up with the rear part of your bottom border flap.
1.c. Cut two small black strips on the sides underneath the flap. See the illustration for where to find those.
Your last step in creating a Polaroid transparency involves swiftly separating the layers of your photo. Your success here will depend on your selection of film (see the tips above) and your experience making this move.
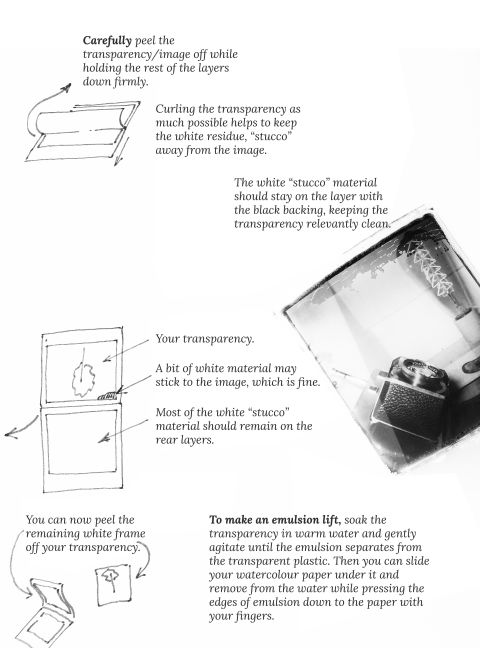
1.d. Place the frame facing upwards, then bend and peel the image side away from the rear half of your frame. Hold the frame steady and maintain the bend as you methodically move toward the end.
Your goal is to separate the layers so that you’ll end up with a clean transparency. The tricky part is to make sure that the crumbly white titanium dioxide layer leaves the least possible amount of residue on your image. Fresh, recently-exposed black and white Polaroid film makes this task easier.
If a few bits of titanium dioxide remain on your transparency — don’t worry. This process isn’t perfect.
However, if there’s a lot of titanium dioxide left on your image, you may have a tougher time getting rid of it in the next step. But don’t give up until you’ve done all the steps.
1.e. For the last step, peel the remaining white border off your transparency.
✪ Note: If you need more help, you may find additional clarity in Analog Things’ video that explains how to perform this step.
2. Separate the emulsion layer.
This step of the process involves separating the thin and flexible emulsion from the transparent plastic that holds you transparently rigidly.
2.a. Arrange your workspace. Fill your tray with warm water. Prepare your transparency or transparencies, watercolour paper, trash can, and brushes.
2.b. Cut a thin strip of plastic around your Polaroid transparency. This will ensure that the emulsion layers separate easier in the next step.
2.c. Submerge your transparency in the water facing down and watch the layers come apart. Gently push them away from each other, discarding the rigid plastic and a translucent emulsifier layer from your emulsion.
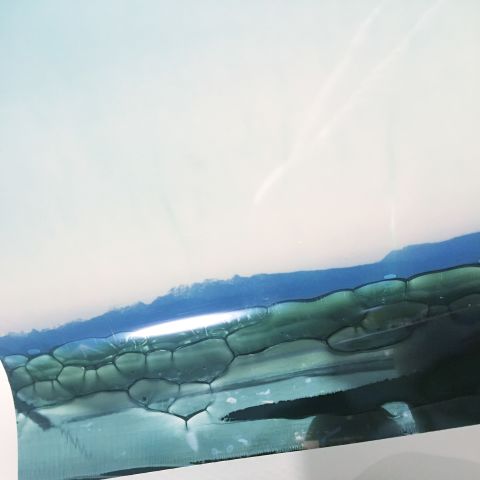
This step may take some time and skill to complete. Your objective is to cleanly remove the rigid plastic and as much remaining white titanium dioxide layer as possible. Once separated, the emulsion will float in the water like a piece of delicate cloth.
Be very gentle with your brushes as the emulsion can rip very easily. Avoid poking the emulsion with the bristles — instead, push it gently with the side of your brush. Take as much time as you need.
3. Transfer the emulsion onto paper.
Your last step involves maneuvering your emulsion on top of watercolour paper and making it look nice.
3.a. Submerge your watercolour paper carefully into the water tray with your emulsion, wedging it below your floating emulsion. Let the paper soak for a few seconds, and try to remove the air bubble that might’ve formed below the paper, so that it sinks to the bottom.
3.b. Carefully manoeuvre your emulsion onto submerged watercolour paper using your soft brushes. This is the best part of the project, where you can get as creative as you like.
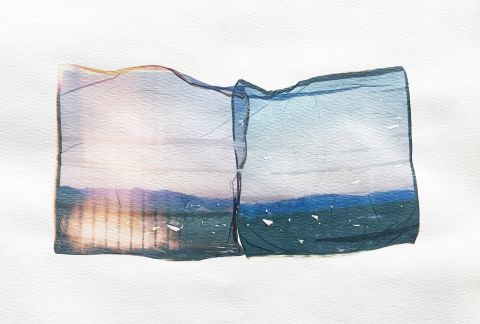
Here you may straighten and stretch your emulsions across the paper so that they appear crisper and larger than when they were locked inside your Polaroid frame. Or you can crease, crumble, combine, and do all kinds of magic with them. You can even use other waterproof materials to receive your emulsion — not just paper — but keep in mind that water will lift them again.
3.c. Once the emulsion is floating above your paper in the shape you like, press the two corners of the emulsion nearest to you lightly against the paper and lift the emulsion with the paper out of the water gently.
If you aren’t happy with your arrangement, feel free to resubmerge your work and start over with step 3-B.
3.c. Dry your Polaroid emulsion lift flat. You’re done!
Your health and environment.
Titanium dioxide is a suspected carcinogen. It is a common hazard found in many paints, although the EU is considering removing the requirement for warning labels.
In addition to whatever else’s is in there, the chemical can mix with the water vapour and get into your lungs and onto the skin. A well-ventilated room should be safe.
Emulsion lifts beyond Polaroids.
Emulsion lifts are not exclusive to Polaroid Originals film. This technique is quite old, dating back to the days when emulsions were first introduced.
Peel-apart instant film is known to produce fantastic results. Even some inkjet printers yield images that can be transferred. Insanely large photographs can be transferred too, like this 20x24 Polaroid print.
In any case, when done well, the technique creates an image that feels complete, exposed, and personal.

Troubleshooting tips.
Tears and tangled emulsions are pretty common. The best way to avoid those is to use the softest brushes you can find and not poke the emulsion with them — using the side of the bristles to move things around instead.
A stuck titanium dioxide layer — the white stuff that looks like stucco — is another problem you may face. Working with a fresh monochrome film that’s been recently exposed will help you avoid this issue. But if you’re stuck with colour, consider this:
With the fresh film for both 600 and SX-70 cameras, I’ve experienced very strong resistance from the materials. In my quest to remove the “stucco,” I’ve tried boiling, warm, and cool water baths. I spent hours gently brushing it away, only to find it adhering to the emulsion strongly.
Remarkably, dish soap has succeeded in disintegrating the image on the emulsion completely within seconds. Keep soap away from your water!
After spending considerable time online reading and talking to others, I concluded that Polaroid colour emulsions have recently changed their chemistry and have become a lot more rigid.
Ina, who has had a lot of experience working with emulsion lifts, recommended I try a hairdryer to soften the Polaroid layers — using this video for reference.
Sadly, the video showed another monochrome transparency, which isn’t the same as colour. Determined, I set my hairdryer on maximum heat and minimum airflow.
Keeping the dry, hot air flow close to the face of the image made the emulsion bubble and let go of the “stucco.” It is still a lot more difficult and at least ten times slower to do than with monochrome film.
However, I was able to get a workable transfer using this method (see the image below). Note that immediately after being heated up, the emulsion becomes dry and brittle — submerging it in water makes it behave normally.
❤ By the way: Please consider making your Polaroid B&W SX‑70 and Polaroid B&W 600 film purchases using the above links so that this website may get a small percentage of that sale — at no extra charge for you — thanks!