
Rope ascending with a Grigri and belay device
Note - This post discusses techniques and methods used in vertical rope work. If you do them wrong, you could die. Always practice vertical rope techniques under the supervision of a qualified instructor, and ideally in a progression: from flat ground, to staircase, to vertical close to the ground before you ever try them in a real climbing situation.
Hopefully you don't need to do this very often, but knowing some ways to ascend a rope without specialized gear (like handled ascenders and aid ladders) can be a useful self rescue skill. Why might you need to do this?
Stuck rappel rope (need to ascend it and fix the problem, yikes!)
Rappel down too far and miss your next anchor
Fall on an overhang or traverse, and are hanging in space or in unclimbable terrain
Can't make the moves and need to do some rope climbing to get past the hard part
Go up the rope to deal with an injured/scared partner
The old-school method was using some kind of dedicated foot and waist prusik loops. These can work, but they have some problems. It can be very slow and awkward, they are prone to tangling on your harness, and it's a specialized piece of rescue gear that you may always carry with you but never use. My opinion: in most cases, don't bother carrying them at all.
Another approach to rope ascending: creative use of gear you probably already have with you. With just this gear, you can get up a rope:
Grigri (or plaquette style belay device like an ATC Guide)
a short friction hitch
a double length / 120 cm sling
If you have some more modern tools, such as a Petzl Tibloc, Micro Traxion or Rollclip carabiner/pulley combo, this procedure becomes quite a bit easier. But for now let's see how to do it with the bare minimum of gear, okay?
A few notes:
The basic way this works: tuck your foot under your butt, stand in the foot loop to create slack, and then pull the created slack through the belay device.
Rigged like this, you have some mechanical advantage. It's not much, because of the friction every time the rope changes direction. Don't think you can do one arm pull ups and get yourself of the rope, you gotta use your legs. See the first point: stand up, create slack, pull slack through the device.
Interesting side question, what is the mechanical advantage here? Is it a 2:1 with a redirect, or is it a 3:1 because you’re lifting yourself? Well, there are some pretty smart people that feel pretty strongly one way or the other, but I'm gonna roll with rigging expert Richard Delaney from RopeLab. Richard says this is a 3:1. There are three strands of rope supporting the climber’s weight. For you to move up the rope 1 meter, you need to pull 3 meters of rope through the system. Yes, this may hard to get your head around, it was for me! Here's an article from moi and video from Richard explaining how this works.
Typically you're going to have less unwanted friction if you use a Grigri. This can depend on a rope diameter and whether the sheath is slick and new or old and crusty. If you have a Grigri, try that first.
If it's fairly low angle, you may not need the foot loop. Use the friction hitch as a handhold, lean forward, pull up with your arm, and pull slack through the device.
With the foot loop, it can help to take an extra wrap of the sling around your foot. This holds your foot in the sling so it doesn't slide out.
If the angle is quite steep, you may find it easier to clip a redirect carabiner into the friction hitch and clip the tail of the rope through the carabiner. That's what I show in the photos. This allows you to pull DOWN on the rope rather than UP, which can be more ergonomic if you're doing it for a while.
When ascending a rope, it's best practice to be connected to the rope in two places. My preference: every 6 meters or so, tie a backup bight knot in the rope below you, and clip it to your harness. You could also attach another sling from your harness to the foot prusik, but I find that to be annoying and tangle prone.
Think of rope ascending as a “movement sandwich.“ That’s a short movement of exertion, in between two periods of rest. Rest > move > rest. Rest > move > rest. Tuck your foot under your butt before standing, and use your legs. If your arms are getting pumped, you’re probably doing something wrong.
If it's vertical or overhanging, it may be more efficient to add a second foot loop with another 120 cm sling. This lets you push up with both your legs and can help save energy. On lower angle rock, it's not required.
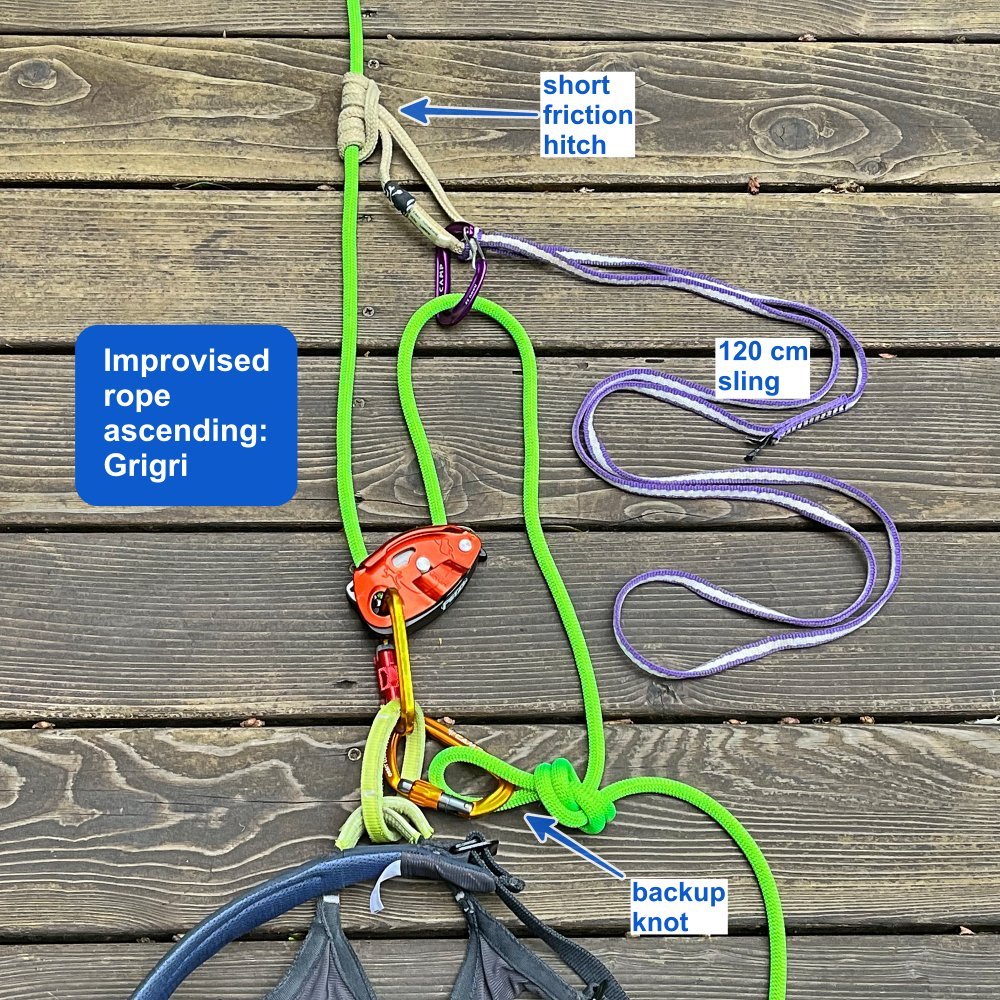
Example 1: Improvised rope ascending with a Grigri
Sequence:
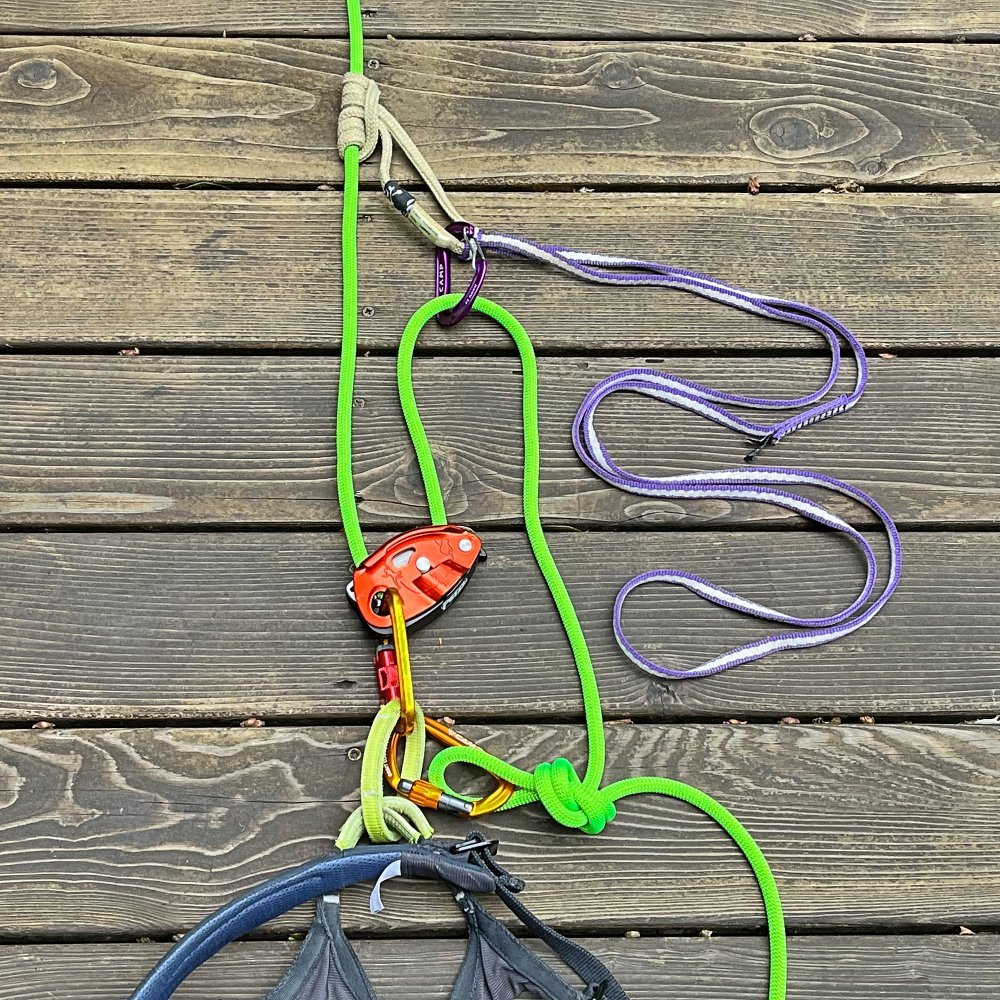
Set it up as shown below. Be sure the rope is loaded correctly in your Grigri.
Sit back in your Grigri. This is the “rest” position.
Slide the friction hitch as far up the rope as you can.
Put your foot in the purple sling, tuck your foot under your butt (important!), stand up, and pull the slack you created through the Grigri. Sit back down to weight the Grigri and rest for a moment.
Repeat. Tie overhand backup knots and clip to harness whenever you’re getting scared. =^)
Example 2: Improvised rope ascending with a plaquette style belay device
Same sequence as above. Be sure you set up the rope correctly through your belay device, as shown below.
Sit back in your belay device. This is the rest position.
Slide the friction hitch as far up the rope as you can.
Put your foot in the sling, tuck your foot under your butt, stand up, and pull the slack you created through the rappel device. Sit back down to weight the device and rest for a moment.
Repeat. Tie overhand backup knots and clip to harness as needed.

Finally, here's a quick demonstration from IFMGA certified guide Karsten Delap, getting it done with a Grigri and a Tibloc.