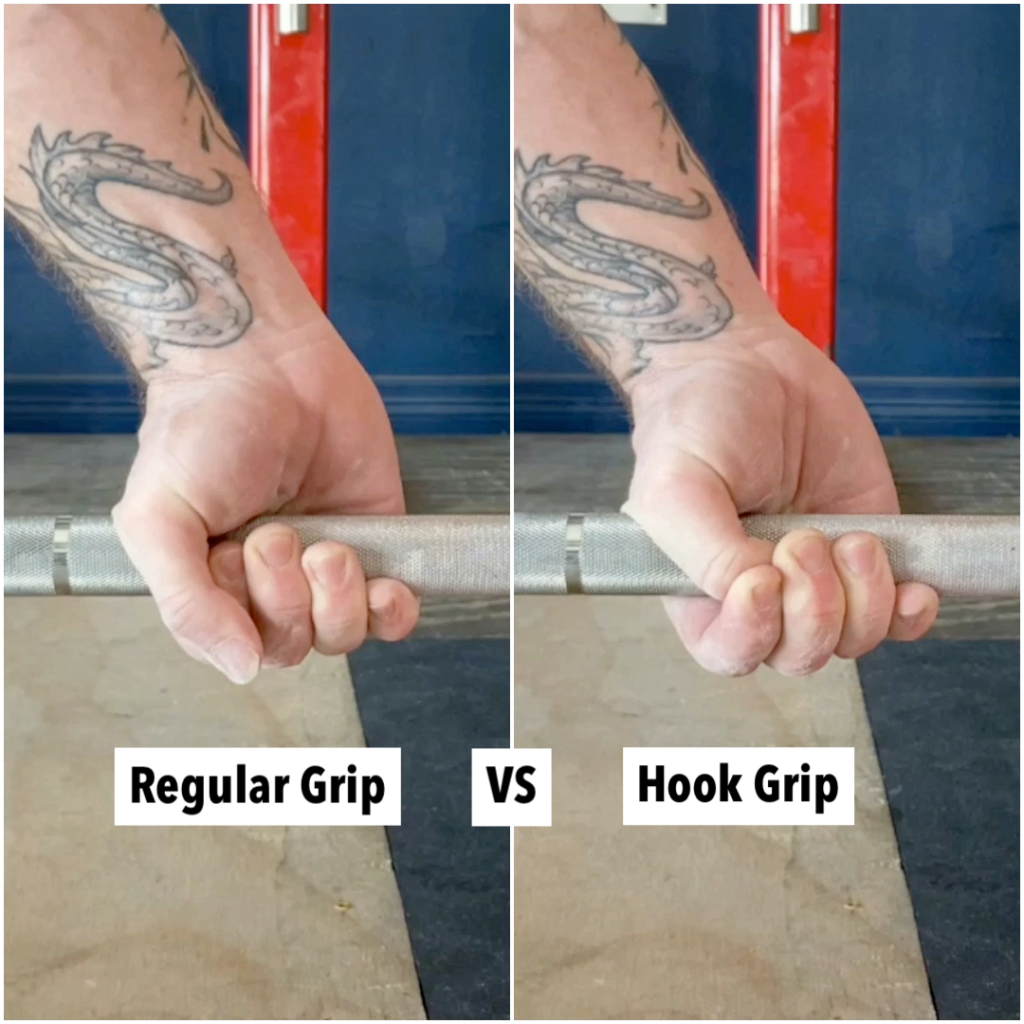
Another aspect of locking into the start position that we cannot overlook is using the hook grip. Simply put, the hook grip is a method of gripping the barbell that will help you, or rather, allow you to lift more weight in the snatch and clean (and deadlift). Without it, your grip will surely slip or fail at loads that you would likely be capable of otherwise. Before we discuss the benefits and any cautions further, let’s get a visual of this and cover the steps required to set it up and use it:
- Place your hands on the bar at the recommended grip-width for either snatch or clean.
- Position your thumbs under and around the bar towards the middle of your hand. Keep in mind that the thumb should be at an angle as it wraps around the bar and not parallel to it. (NOTE: Face your palm towards you where you can see it and signal “4” by holding up 4 fingers, then 3, then 2, then 1. In each signal look at the direction your thumb is going; THIS is the exact direction your thumb should wrap around the bar).
- Now, wrap the index and middle fingers around the thumbs, covering from the edge of the thumbnail down to the first joint of the thumb. (NOTE: Now, face your palm towards you and make a regular fist, your thumb goes over the top of those first two fingers, and in the same direction explained above. So, this is relatively the same as where the thumb should be but on the other side of those two fingers while holding a bar with the hook grip.

Wrapping the thumbs around the bar, and then the index and middle fingers around the thumbs creates a solid “lock” to the bar and therefore is stronger than just a regular grip. This is because you are trapping the thumbs with those fingers so it is less able to give and slip from around the bar. Additionally, the index and middle fingers now have a “notch” (the thumb) that they can “hook” to that is more secure than just wrapping around the bar alone. You have more “traction” or resistance so to speak; like climbing a man-made rock wall with big, secure hand holds vs trying to climb a brick wall of a home. This is why most weightlifters grow their thumb nails long and usually leave them at a specific (though unattractive) length; it adds to that notch. The long nails do typically dig into the middle fingers and create calluses, but don’t look at this as a bad thing! This means the grip is now even MORE secure.
Now, the specific location of the thumb on those two fingers may differ depending on the size of your hands. This means that we should be closing and opening our hand more to tighten most appropriately around the bar by sliding the thumb up or down our first two fingers. This is instead of adding the 3rd and/or 4th finger (if you have big hands and/or just prefer this) or using only the first finger (if you have smaller hands and/or just prefer this). For example, with a men’s bar (which is 28 millimeters in diameter), the edge of my thumbnail is sitting in the middle of the middle phalange of my middle finger, and the distal phalange of my index finger is centered on that joint of the thumb. (NOTE: Phalanges are the bones of the fingers and thumbs that are connected by joints that allow them to close and open the hand. The fingers are made up of a distal, a middle, and a proximal phalange. The distal is the one with the nail and then down the finger/thumb from there. The thumb has just a distal and proximal phalange).
With a women’s bar (which is 25 millimeters in diameter), my thumbnail is sitting closer to the joint between the middle and proximal phalange (further down the finger), and the edge of the joint of the thumb is now creeping into the middle phalange of the index finger (again, further down that finger). This means that with small hands the thumb might be somewhere in the distal phalange of the middle finger with just the tip of the index finger touching the thumb (instead of further down the index finger by using just that one finger). With big hands the thumb might be touching a portion of the proximal phalange of the middle finger (instead of touching any part of the ring finger). Phollowing so far?
NOTE:
If you are having trouble getting your index and middle fingers both completely over the top of the thumb, don’t just chalk it up as you have small hands and you’ll have to come up with something else. Most likely there is something missing in the setup process and in particular I’ve had a few athletes who were mis-directing their thumbs around the bar. In fact, they weren’t wrapping their thumbs around the bar at all but rather just placing it to the inside as much as they could to where the distal phalange of the thumb was completely parallel with the bar (hence the initial warning above). When I initially saw this in one of those athletes he wasn’t able to reach his thumbs at all, and I learned that he had been “hook gripping” this way for years! So, guess what? He had developed a big, unintentional early arm bend in his snatch and clean. We had to redirect his thumbs, re-teach the hook grip in general, and strengthen the new technique to then try to UN-learn the early arm bend. Lesson learned for me: make sure athletes understand the hook grip consists of TWO “hooks”: 1) the hook with the thumb around the bar at the appropriate angle (if the thumb is not wrapping around the bar at all, they’re not accomplishing this initial hooking action), and 2) the hook of the index and and middle fingers over the top of the first hook (the thumb).
The benefit in using two fingers instead of one is pretty straight forward: two together are stronger than just the one. Plus, the middle finger is bigger, longer, and stronger than the index finger (your middle finger makes up 35% of your overall grip strength vs. 25% for your index finger). So, if I can hitch onto the thumbnail with the middle finger instead of the index finger, my chances of hanging onto the bar increases. All this being said, surely if I can get three fingers around my thumb, wouldn’t this be stronger than just using two? If we are using more fingers for overall grip strength in say, performing a farmer’s carry or hanging from a pull-up bar, yes. But, not necessarily optimal for the specific task of snatching and cleaning with the hookgrip! By using just the first two fingers instead of three or four, you are able to coordinate the arms up from the grip more appropriately.
Try this: 1) Face one palm up with your hand open and look at your forearm (sit in a chair and place the back of the forearm on your quad). 2) Bend your thumb and each finger independently and watch the engagement of your forearm tendons and muscles switch from using the inside of your forearm to the outside as you go from thumb to pinky finger. To engage the outside of your forearm in this way more completely, you have to have the 3rd and 4th fingers around the bar as much as possible and aggressively as in a “death-grip.” Especially with the wide snatch grip, to have those two fingers wrapped as completely around the bar as possible means that the elbows would have to be bent so that the forearm is more directly on top of the hand. This is why an early arm bend goes hand in hand (pun intended) with athletes that do not use the hook grip. Without the hook grip the body is looking for all the help it can get so will bring these fingers in as much as possible, as well as more of the forearm, which bends the elbow.
To bend your arm you have to use your bicep and therefore relax your tricep. Optimal arm action in the start position and 1st ascent is a give and take of “relaxing” namely the biceps. This allows you to engage the triceps more aggressively in order to keep the arms straight and be in the best position possible to push back on the bar and keep it close to the body through the “leg drive”. Relaxing the biceps and engaging the triceps also allows the arms to remain straight in order for optimal transfer of power into the bar at the hip.
All this being said, let’s try to exclude these two outside fingers from the task as much as possible from the beginning. Just place them around the bar so that they look like they are doing something, but in reality are mostly relaxing and along for the ride. Due to the angle of the arm and the likely give or straightening of a bent arm at some point in the 1st Ascent (typically at the hip with power exertion for loss of momentum and power), those two outside fingers are very likely going to give anyway. Remember, it’s not about being able to relax your arm as a whole. Rather, it’s about being able to aggressively twist the arms in and keep them straight. Using the hook grip in this way is the only thing that makes this possible with heavy weight! Done correctly and honed over time, it should get to the point to where it feels like you’re using straps, and therefore there is no concern for your grip and no attention or awareness being directed down to your hands to take away focus from the actual movement. It is a given that they are there and will do the job of holding onto the bar securely no matter the weight.
My preference as a coach is to hold off on teaching/developing the hook grip (as opposed to teaching it day one or as one of the premier points of performance) for three reasons:
- It adds something else to think about/worry about and takes away from other, more critical introductory points of performance.
- Athletes usually hold onto it when they receive the weight overhead or in the front rack and therefore it teaches and engrains that undesirable action. If on day one you are having to teach and tell them to hook grip the bar AS WELL AS that they have to let go of it overhead, there is great potential for confusion. That is basically all they will be thinking about (having the hook grip and then letting go of it in the reception), leaving all basics within the 1st ascent to chance. This scenario is once again lending to over-thinking and un-prioritized focus.
- Along with maintaining the hook grip overhead and/or in the front rack it tends to teach and engrain a “death-grip,” neither of which we want in either of our receiving positions. Rather, we need relaxation in the hands that bleeds down the arms into the rest of the body and culminates into the best overall load supporting coordination (a death-grip leads to over-tension in certain parts of the body that are better off relaxed and takes away from where we do need more aggressive tension). This overhead and front rack coordination is one of those basics that is more important to teach first.
Let’s accumulate some reps where they are holding the bar overhead and in the front rack WITHOUT a hook grip, even before they know what the hook grip is, so that they and their body gets familiar and a “head-start” so to speak with being in those support positions without the hook grip. This will give them a better chance of their body automatically letting go of the hook grip when they receive the bar without thinking about it.
All this being said, the best time to teach an athlete the hook grip will differ a little for each individual, but we’re not going to hold off for long. Since using the hook grip in the start position and through the 1st ascent allows for the best coordination through that part of the lift, we don’t want them snatching or cleaning much weight without it (this will lead to the death-grip, hindered coordination, and compensatory arm bend that we previously discussed). Once they understand the general concept of a snatch and clean (I pick the weight up from the floor, move into a jump, and then the bar goes overhead or to the front rack) and can perform them with consistent set up positions and key basics intact, it is now time to get some reps in with the hook grip applied.
I recommend an athlete start learning the hook grip with their snatches and cleans from the hip first as opposed to all the way from the floor. This is so they can ease into the learning process with a partial range where there is less to think about. Along with these initial reps, I don’t say anything about the need or desirable action of letting go of the hook grip upon reception as I want to see what their body does on its own through the first few sets. In many cases it happens automatically (as mentioned, teaching the overhead and front rack positions first without it helps set them up for this), so nothing needs to be said about it or taught in this regard at this time.
For those that are holding onto it throughout the entire lift, we’ll need to have a conversation and plan some extra reps JUST from the hip or hang (or for the snatch we can use the “snatch grip push press” or “snatch balance”). With these snatch and clean variations they can emphasize and practice releasing the hook grip at the appropriate time BEFORE they get too far along in their weightlifting journey where reps to the contrary, especially with more and more weight, will be hard to undo. We’ll cover how to learn the hook grip release from the beginning for those that need it, AS WELL AS how to unlearn the maintenance of it for those that need that in a later blog (along with the topic of “getting under” the bar).
Lastly, how should an athlete “break in” the hook grip and make it strong? Anyone that has already learned the hook grip knows that it can be pretty painful initially (like breaking in a new pair of stiff shoes). The body/hands/thumbs need some time to adapt and adjust. Although we are going to be somewhat patient with WHEN to begin teaching the hook grip, once we do, it’s time to “rip the bandaid”! This means we are going to accumulate a lot of time with the hook grip up front, MORE than one would get with just the regular snatch and clean reps they are getting alone. I took this specific “overload” and “upfront” concept from my high school football coach as every year at the beginning of the season he would say, “pay me now or pay me later.” He meant that if you don’t put the extra running and conditioning work in now before the actual season starts, you’re going to be hurting more and your performance hindered on Friday nights (GAME NIGHT). With the hook grip, I believe there is a certain amount of pain for a certain amount of time one is going to have to withstand before the hook grip doesn’t hurt at all and it’s no longer even a consideration (so that it doesn’t have to be focused on or forced).
Let’s get through that time as efficiently as we can by adding in some long standing holds with the hook grip at the ends of your workouts for a few weeks. We’ll start off with light loads after the last exercise you’re using the hook grip with for the day. You’ll simply stand up with the weight as in a snatch or clean deadlift, and with the bar at the hip, hold for 20-30 seconds (arms straight and twisted in, shoulders relaxed down, and hook grip intact). Do this for 2 to 3 sets of just the single rep, progressing up a set or two AND holding a little longer on each rep each following workout as you begin to get more comfortable (keep in mind that it WILL get worse before it gets better). Ensure an even mix between snatch and clean grip (alternating days is a good protocol). This will as well expedite the learning and strengthening process of this grip that is necessary for optimal Olympic lifting.
As the hook grip becomes a part of your setup routine, you may prefer to throw your fingers over your thumbs as soon as you grab the bar, or wait until just before you lock the rest of the body in to then initiate the weight from the floor. This is an acceptable area of personal preference and style as many believe the choice of using a “static” or “dynamic” start position is. Next, we’ll define those 2 start position aspect variations, touch on this area of personal preference, label what is more “basic”, and give our recommendations on how to decide on what is best for you.
Until next time,

Chad Vaughn,
2-Time Olympian, USAW
_______
With

Dr. Aaron Horschig, PT,
DPT, CSCS, USAW
_______

Can you help me with ankle mobility for club foot please
LikeLike
Hello Jay! I’m sure I could point you in a good direction. Have you seen/read my blog post on the topic (club foot)? If not, I would suggest reading through that first and then I can answer any further questions you might have…
LikeLike