Do you want to learn how to draft the basic bodice pattern for women? Drafting a bodice pattern can seem complicated, but with a few basic measurements and some simple calculations, it can be done easily. I find the art of turning a 2D object like fabric into a 3D-shaped garment fascinating!
This is especially true for the woman’s bodice pattern for obvious reasons as there is some additional shaping to be done at the front and all this with the magic of darts.
In this tutorial, I will guide you through the process of drafting a basic bodice pattern for woven fabrics.
If you are interested in drafting a bodice pattern for knit fabrics, you should know that darts are not as much in need in terms of shaping the bodice and it can be done more through the behavior of the knitted fabric. That’s why I like to use a different approach which I show in this “How to draft a bodice for knit fabrics” tutorial.
A basic bodice pattern is also called a sloper or a block, and it closely resembles the shape and size of the body. It can be used as a base for pattern making. It is one of the main pattern blocks that you should learn how to draft if you are interested in pattern drafting: the bodice, the skirt, and the pants.
With all that covered, let’s get started drafting the woven bodice pattern.
Tools needed to draft a bodice pattern:
- Pattern paper
- Clear Grid Ruler
- French curve
- Pencil
- Measuring tape
- Scissors
Step 1: Take the body measurements for a bodice pattern
To draft a bodice pattern, you will need to take several measurements.
Some of these measurements are tricky to take by yourself, so consider some help from a friend. If you should take your measurements yourself, the easiest way to take horizontal measurements or a guide for the level for vertical measurements is to use a piece of elastic. Wrap it around the body keeping the same level at the front and back and use the elastic as a guide.
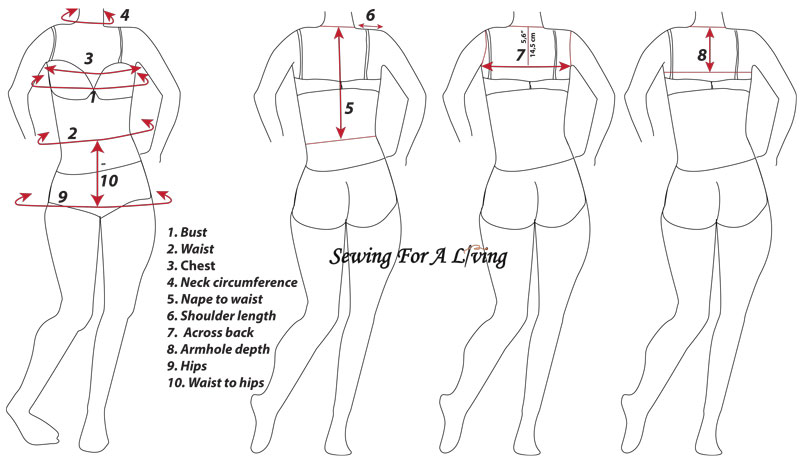
The measurements you are going to draft a bodice:
- Bust circumference: Measure around the fullest part of your bust.
- Waist circumference: Measure around the narrowest part of your waist.
- Chest width: Measure over the bust up to the armpits, keeping the measuring tape horizontal to the floor. Measure from one side to the other just between the vertical lines going through the front armpits.
- Neck circumference: Measure around the neck close to the torso. Hold the measuring tape not too tight and not too loose.
- Nape to waist: Measure at the back, from the base of the neck to the natural waist.
- Shoulder length: Measure from the end of the neck to the place where the shoulder joint moves when you lift your arm.
- Back width -horizontal measurement of your back, from the bottom of a standard armhole, across to the other armhole. Back width is measured horizontally across the shoulder blades, approximately 5.6” (14.5 cm) below the neck nape.
- Armhole depth: Measure from the base of the neck at the back vertically up to a guideline measured 2” or 5 cm below the armpit (use some elastic to help you determine that guideline).
- Hip circumference (optional): Measure around the fullest part of your hips. You don’t need this measurement to draft the bodice. You need it if you are going to develop the draft into a top draft (see the last steps in this lesson).
- Waist to hip: Measure vertically from the narrowest part of the waist to the widest part of the hips (also optional).
Step 2: Outline the basic bodice pattern
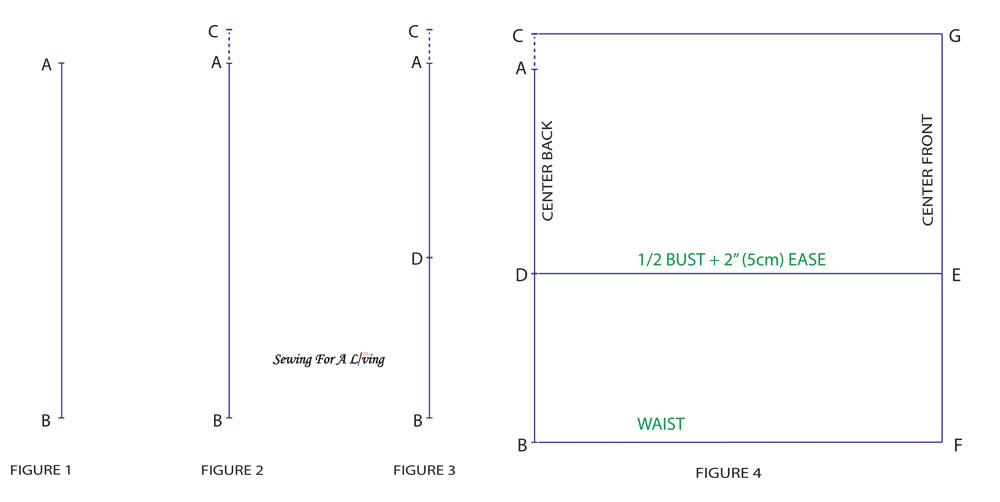
Begin outlining the pattern by marking point A on the paper, preferably close to the top right angle. Then, from point A down the line measure the nape to waist measurement and mark point B (figure 1).
Extend 3/5″ (1.5cm) up from point A and mark point C (figure 2). This (A-C) is going to be our measurement of the neckline depth for the back bodice pattern.
From point A down, apply the armhole depth + 1/5″ (0.5 cm) and mark point D (figure 3).
Up until this point, we have outlined the verticle side of the pattern. Let’s continue with the horizontal lines.
Square up from point D, and apply 1/2 of the bust measurement plus the sewing ease which in this example would be 2 inches (5 cm). Mark point E. (figure 4)
Sewing ease
Note: Sewing ease is the amount we add to allow for body movement in the garment so that you can sit, turn around, and lift your hands comfortably. You can add less or more, depending on the look you are trying to achieve – more fitted or loose. You can also skip adding ease altogether now and add it later. What’s important here is to stay consistent – if you add ease to the bust, add it to the waist as well. If you don’t add to the bust, don’t add to the other measurements.
Sewing ease is different from the seam allowance, which we add at the end to allow for seams.
The 2 inches (5 cm) that we chose to add here are actually 4 (10 cm) if we account for the whole circumference of the bust. Keep in mind that we are drafting for half of the body here (1/2 front and 1/2 back). This is a good amount of ease for a woven pattern, that would allow for better fitting later, so I suggest you add it now. Of course, you can add it later when you make the final adjustments, like “truing” the pattern and adding seam allowance.
Back to the draft
To finish outlining the pattern, square up from point B, apply 1/2 of the bust measurement plus the sewing ease, and mark point F (figure 4). Then again, square up from point C, apply 1/2 of the bust measurement plus the sewing ease, and mark point G (figure 4).
Connect points G, E, and F with a straight line.
Mark line C-B as “Center Back” and line G-F as “Center Front”. (figure 4)
Note: If your bust is larger than 39” (100 cm) you can rise point G straight up to accommodate for the larger breasts. For a bust of 39” (100 cm), rice point G 3/8” (1 cm) up. For every other 4” (10 cm) bust enlargement, add another 3/8” (1 cm). Then, square out of this new point, which would be the front’s top line. For the back, use the original C-G line. (figure 5)
Step 3: Draft the bodice pattern pieces
Let’s start shaping the back bodice. Take the armhole depth measurement and divide it by 5. Subtract 1/4 inch (0.5 cm) from this measurement. Measure down from point A, apply this number, and mark point H (figure 6).
Shaping the neckline

Square out from point H and draw a line until you reach the F-G line. Mark the point of intersection point H1. (figure 6)
To shape the back neckline, take the neck measurement and divide it by 5. Starting at point C measure and apply the 1/5 neck towards point G. Mark point I. (figure 7)

To shape the front neckline, take the neck measurement and divide it by 5. Add 1/4 inch (0. 7 cm) to this number. Starting at point G towards point C measure and apply this measurement. Mark point J (figure 7).
Measure down from point G and apply 1/5 neck measurement + 1/10″ (0.2 cm). Mark point K (figure 7).
Connect points A and I with a shallow curve that forms a 90-degree angle at the center back line. Using the French curve, connect points J and K with a smooth curve (figure 8).
Shaping the shoulders
Back shoulder
Next, you are going to need the shoulder measurement. Add 2/5 inch (1 cm) to that measurement for the shoulder dart.
From point I, apply the shoulder length + 2/5 inch (1 cm) measurement. Put the beginning of the ruler at point I and shift the ruler up until you reach the shoulder length measurement, finishing at the H-H1 line. Mark point L (figure 9). Connect point I and point L (figure 9).
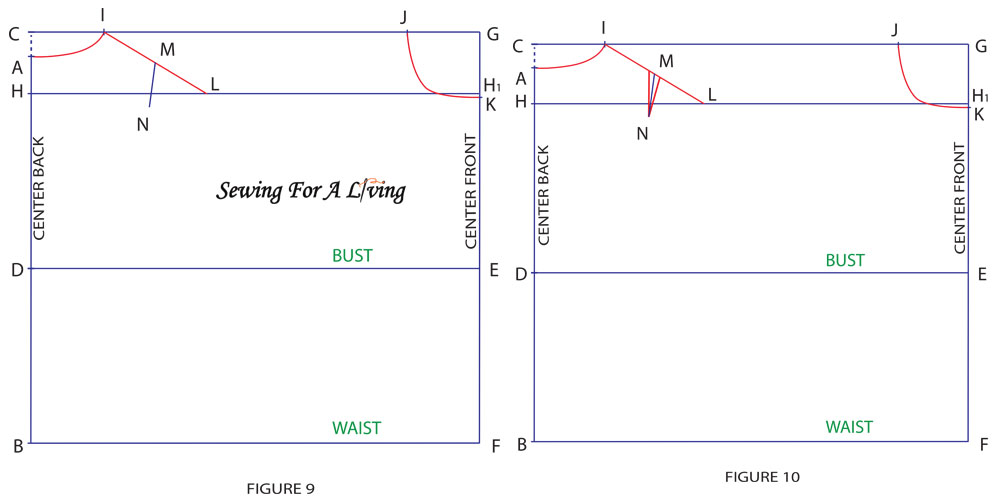
Measure the middle between points I and L. Mark point M (figure 9).
From point M, measure 2″ (5 cm) down, and 2/5″ (1 cm) to the left. Mark this point N (figure 9). This is the tip of the shoulder dart. Mark 1/5” (0.5 cm) on each side of point M. Draw a line from point N towards each of these points to form the dar legs (figure 10).
Front shoulder
To draft the front shoulder, we are going to need 2 measurements. One – the shoulder length. And two – the width of the shoulder dart. This one can be a bit tricky and I will do my best to explain it as well as I can.
To accommodate the body growth proportions, the front dart grows with the bust increment and its size is a calculation of the bust measurement.
The pattern drafting method that we are following here takes a bust of 34” or 88 cm for a base, which on a standard figure has a dart that is 2 ½” (7 cm) wide.
The dart then grows or decreases in size together with the bust size as follows:
In inches
For every 2” up or down from 34″, we add (subtract) 1/4” to the dart. Here are 2 examples to better grasp the formula.
Let’s say your bust measures 38″ which is 4” more than 34″. This means that for these four inches, we have to add 1/4” twice (for every 2” above 34). We add 1/2” (twice 1/4) to the standard dart of 2 ½”. This gives us 2 ½ + ½ = 3” for the dart width.
Let’s say your bust measures 32″ which is 2” less than 34″. This means that for these two inches, we have to subtract 1/4”. This gives us 2 ½ – ¼ = 2 ¼” for the dart width.
In centimeters
For every 4 cm up or down from 88, we add (subtract) 0.6 cm to the dart. Here are 2 examples to better grasp the formula.
Let’s say your bust measures 96 cm which is 8 cm more than 88 cm. This means that for these 8 cm, we have to add 0.6 cm twice (for every 4 cm above 88). We add 1.2 cm (twice 0.6 cm) to the standard dart of 7 cm. This gives us 7 + 1.2 = 8.2 cm for the dart width.
Let’s say your bust measures 84 cm which is 4 less than 88. This means that for these 4 cms, we have to subtract 0.6 cm. This gives us 7 – 0.6 = 6.4 cm for the dart width.
A couple more things to say here:
- your bust measurement may differ from 34” (88 cm) with a number that is not exactly 2″ or 4 cm. If this is so, round up to the closest before you calculate.
- If your bust cup is D or above, you still might need an FBA (Full Bust Adjustment) to get your bodice to fit in the most flattering way. This is an adjustment that I hope I will get the time to explain here on the blog soon.
Now that we have the dart size, let’s continue with the draft.
Starting from point E on the bust line, measure and mark 1/2 chest measurement plus one-half the DART size, and mark point O (figure 11). Measure the middle between E and O and mark point P (figure 11).
Square down from P towards the waistline and mark point Q (figure 11). Connect P and Q with a dashed line.
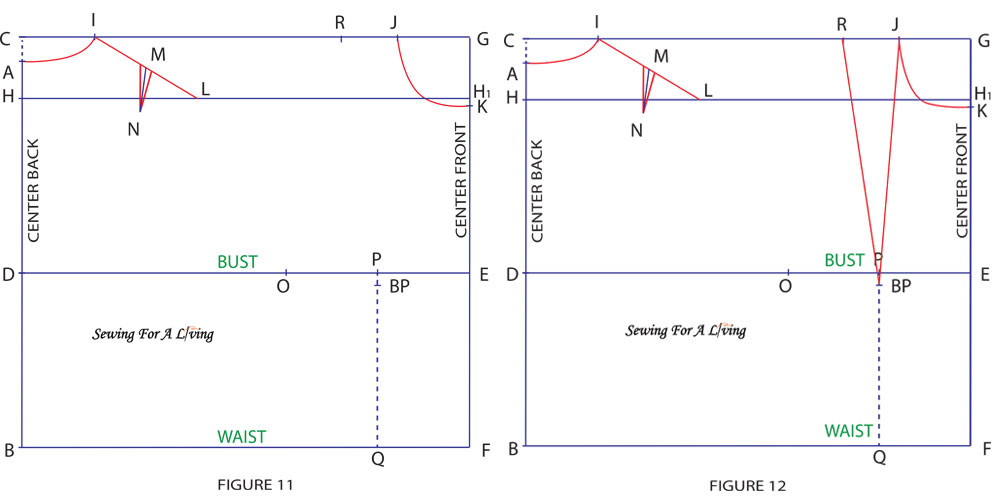
To mark the bust point, measure 1” (2.5 cm) down from point P and mark the bust point (BP) (figure 11).
From point J toward C, measure and apply the shoulder dart width and mark point R (figure 11).
To form the dart, connect each of points J and R with the bust point BP (figure 12).
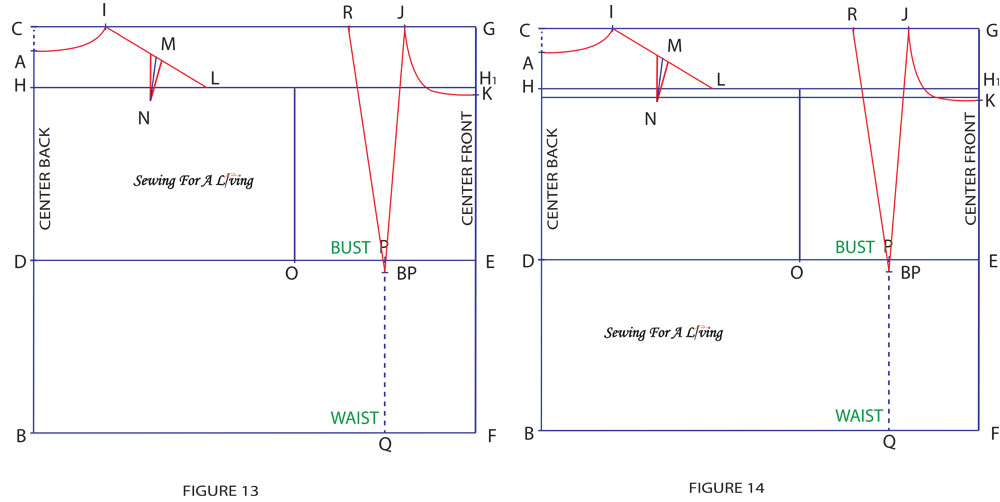
Squaring up from point O, draw a guideline until you reach the H line (figure 13).
To finish the shoulder, we need to draft one more guideline. Measure 3/5″ (1.5 cm) down from the H-H line and draw a new horizontal line across the block (figure 14).
Starting from point R, apply the shoulder length measurement. Put the beginning of the ruler at point R and shift the ruler up until you reach the shoulder length measurement, finishing at the guideline that we’ve just drafted. Mark point S. Connect point R and point S. (figure 15).
Starting at point D measure and apply 1/2 across back measurement plus 1/5″ (0.5 cm) on the bust line. Mark point T (figure 15).
Square up from point T and draw a line until you cross line H-H1. Mark point U. Find the point halfway between D and T and mark point V. Square down from V towards the waistline and mark point W (figure 15). Connect V and W with a dashed line (figure 15).

Drafting the armholes
Let’s move on to the armhole. Starting from point O, measure up and apply one-third of the armhole depth measurement and mark point X (figure 16).
Find the point halfway between U and T and mark it as point Y (figure 16).
Find the halfway point between points T and O and mark point Z. Square down from Z towards the waistline and mark point Z1 (figure 16). Connect Z and Z1 with a dashed line (figure 17).
Starting at point T, draw a 45-degree diagonal line inwards that is 1” (2.5 cm) long and mark point T1 (figure 17). Starting at point O, draw a 45-degree diagonal line that is 4/5” (2 cm) long and mark point O1 (figure 17).

Connect points S – X – O1 – Z – T1 – Y with straight lines (figure 18).
Drafting the side seams and waist darts
To make sure that the waistline will remain straight and not ride up due to the bust, extend 2/5” (1 cm) straight down from point F. Connect this extended point with point B (figure 19).
In most cases, our bust circumference is larger than the waist. To shape the waist, we need to add darts. We are going to put one dart at the front bodice and one dart at the back. The side seams will also be drafted like a dart.

Let’s figure out the size of each waist dart.
Take your waist measurement. To stay consistent, we need to add 2⅓” (6 cm) ease to the waist as we added to the bust.
Calculate your waist measurement plus the ease and divide it by two (as we are building the pattern for 1/2 the body – 1/4 front and 1/4 back). Subtract this measurement by the 1/2 bust + ease measurement. Divide the number by 3 for each of the three waist darts.
Distribute each third evenly on both sides of points W, Z1, and Q. For example, if you get 1” (2.5 cm) for each dart, mark 1/2” (1.25 cm) on each side of points W, Z1, and Q. Use these marks as starting points for the dart legs (figure 20).
Connect the dart leg points around point W with point V, the dart legs around point Z1 with point Z (these are actually the side seams), and the dart leg points around point Q with the bust point BP to form the front dart (figure 20).
If there is not much of a difference between the bust and the waist measurement, the darts might be smaller or not needed at all. You can figure this out later when you are fitting the muslin.
Final touches
Our basic bodice draft is almost done, but we need to make the final touches. Using a French curve, go over the armhole lines and smooth them (figure 21). Outline the pattern, adding your marks, notches, and seam allowance.

Step 4: Drafting a top from the bodice
Up until this point, we’ve drafted the basic bodice pattern that you can use as a base for other garments like dresses, tops, and even coats and bras.
If you would like to draft the pattern for a top, you probably would need to build your pattern down to the hip line. Here is how to do it.
Starting at point B straight down, measure and apply the waist to hip measurement and mark point B1 (figure 22). Do the same from point F, and mark point F1. Connect points B1 and F1 (figure 22).
Starting at point B1 towards F1, measure and apply 1/4 hip circumference + 1” (2.5 cm) ease. Mark point B2 (figure 22). Starting at point F1, measure and apply 1/4 hip circumference + 2.5 cm ease. Mark point F2 (figure 22). Connect the side seam of the front waist with point F2 (figure 23). Connect the end of the side seam of the back waist with point B2 (figure 23).

Mirror the waist dart of the front and back down toward the hemline. Make sure the tip of the dart is at least 3/5” (1.5 cm) up from the hemline (figure 23).
Using the French curve, smooth the side seams and the curves of the armholes (figure 23). Using tracing paper, redraw the bodice front and back pieces so that they can be used separately and serve as a base for pattern modifications.

Step 5: Bodice Pattern Adjustments
Now that you have your basic bodice pattern, there are a few final adjustments you may want to make.
Check the shoulder seam length
First, check the length of the shoulder seam. This should be the same length as your back width measurement. If it is too long or too short, adjust it accordingly. If we worked precisely, this shouldn’t be an issue, but as we work on a 1/4 of the body pattern, little mistakes add up quickly, so it doesn’t hurt to true, does it?
Next, check the length of the side seams. They should be the same length.
Finally, check the placement and size of the waist dart. This can be done after the draft is finished and during the fitting process. If it is too large or too small, adjust it accordingly. You may also want to move the dart slightly to achieve a better fit.
If your cup size is above D, (which is a very common reason for people to want to draft their own patterns) you might need to make adjustments to this bodice so that it fits well. This adjustment is called a full bust adjustment (FBA) and I hope I can get to write a tutorial on it soon. Test your pattern first to find out if you need this adjustment or not.
Once you are happy with your bodice pattern, carefully cut it out along the outside edges. Be sure to label all important measurements and points, such as the waistline, bustline, and dart placement.
Step 6: Test the bodice pattern
Before using your pattern to create a final garment, it is a good idea to test it by making a muslin. This will allow you to make any final adjustments to the fit and ensure that your finished garment will fit you perfectly.
Note: Due to differences in our body measurements, your bodice pattern might look very different than mine.
Although we aim for the perfect fit when we draft a pattern from measurements, your bodice might need additional fitting and adjustments. But hey, once you perfect it, you can use it to make whatever garment you like.
Like what you read here? Support my site
Hi sewing friends, Daniela here! As a passionate sewist and pattern maker, I love to empower fellow creators to sew their dream wardrobes. Join me on a fun journey where we unlock our creativity, stitch by stitch.
If this tutorial has helped you, please consider supporting the blog with a small donation. This way I can keep it up and continue sharing for free.
It is always greatly appreciated!
I hope you enjoyed this pattern-making lesson. Happy sewing!
Related posts:
- How to make a skirt pattern like an expert
- 3 Easy Ways To Draft a Harem Pants Pattern
- How to draft a circle skirt pattern
- Draft and sew a collar and a collar stand
SIGN UP FOR SEWING FOR A LIVING NEWSLETTER
If you like what you read here, join our mailing list so we can send you our new sewing tutorials, pattern-making lessons, patterns, and some occasional offers that we think might interest you!
We will protect and use your data following our Privacy policy.
You may unsubscribe at any time by clicking the link in the emails we send.
Hello. Thanks for the tutorial!
I would just like to tell about my problem and how I realized how to fix it (I am not an native english speaker, btw, so my problem could be just about reading comprehention):
So, my O and T kept going over points S and L. After I held my draft up to check if and what measurements I had gotten wrong, I realized that I had undestood the 3rd and 7th measurement wrong. I had measured from UNDER the armpits when they should be measured from INFONT off the pits, you should not shove your measuring tape under your arm! LOL.
I’m not sure whats going on, but every time I try to mark my T measurement its outside of the shoulder length, which causes massive issues with my armholes, would you happen to know a fix for this??
The neck measurement also seems too small when I compare it to the commercial patterns I’ve used, is 4 possibly a better divider??
Hi there! This article is very helpful, but I have tried a few times and keep ending up with points t and o crossing over, which doesn’t seem right. I’m wondering if it might be because of a slightly larger bust? My point p is also directly under point R. Was wondering if you might know what the issue/fix might be?
Thank you very much for the tutorial.
Hi! As much as I want to help, without knowing the specifics of your case it’s challenging to pinpoint the exact cause of the issues. However, here is some general guidance that I hope might help:
1. The crossing of points T and O is strange. It seems to me that you might not have taken the body measuremets right or applied them correctly to the draft. Sometimes, even minor discrepancies can impact garment construction.
2. The issue with P being directly placed under point R might be a case of miscalculated shoulder darth width.
3. Keep in mind that drafting a pattern from your individual measurements, (and especially if your body type doesn’t fit the standards) can result in a final draft that is very different from the one you see in the drafts shown here. But hey, isn’t this a legid reason why we might want to draft a pattern in the first place?
I hope this helps!
hi,
just needing a little bit of clarifaction, I thought bust darts cam through horizontally across the chest not vertically, or can they be both? Tia x
Hi Grace, you are right. Darts can be placed both vertically and horizontally. Differend pattern making methods can place the darts at different places. On top of that, once the pattern is drafted, you can further manipulate the darts and move them around the bodice pattern for design and functionality purposes.
This might be a good topic for a further tutorial as I find it hard to squeeze in details in this comment. There is a lot to be said 🙂
thankyou! Would be very keen for another tutorial if possible x
I also can’t figure out the waist dart. I’m assuming that when you say “take 1/2 the chest measurement plus 1/2 the dart size you meant to say 1/4 of the chest measurement because the front bodice piece is on the fold.
Hi Andrew, thank you for the heads up! Please read my responce to Oscar.
I appologise for the confusion and thank you for taking the time to write this comment. Your feedback is very helpful.
Hello. Thank you for your tutorial. I am confused about the waist dart width.
My waist is 28″, plus the ease I get 30.25″, divided by 2 = 15.125″. Divided by 3 = 5″ for each dart width? I must have misunderstood. Thank you!
Hi Oscar, thank you for the heads up! It seems I missed a step while explaining the processes. Once you get the 1/2 the waist + ease, you need to substract it from 1/2 the bust plus ease. This way you are going to get the difference between waist and bust and how much you need to take in with the darts.
And then, divide by 3 for the size of each dart.
I’ve added this to the article.
I appologise for the confusion and thank you for taking the time to write this comment. Your feedback is really appreciated.