Xbox 360: Red Ring of Death Repair
After a good gaming session of Street Fighter IV with a friend, my 360 froze to a black screen. I turned it off, and then on again, only to be greeted by my old nemesis.
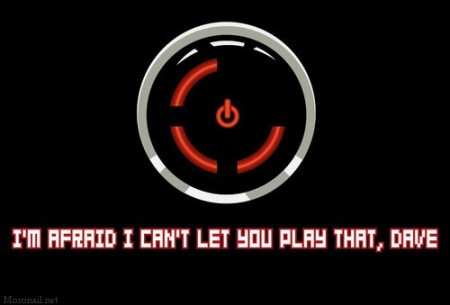
The damn ring of death that means your Xbox 360 is broken. This was the third time my 360 has had the RRoD, and its the third time I fixed it. If you’ve ever owned an Xbox 360, chances are extremely high that you’ve seen this little problem before. For consoles manufactured before the middle of 2008 (that is, the old core/regular white systems without HDMI) its almost a foregone conclusion that your system will red ring at some point.
Even if this hasn’t ever happened to you, there are two things every Xbox 360 owner should know:
1. Why it happens
2. How to fix it yourself WITHOUT sending it back to M$.
Section 1 – Why the Red Ring occurs
To put it simply, the cause of the RRoD is that your 360 motherboard is overheating. Like any computer worth a damn, the 360 will refuse to boot up if it thinks its overheating. So then that leaves the obvious question: why does this happen? The first generations of the 360 very often experience a build up of heat over time that continues to increase until the error occurs. Its happened to me and everyone I know who bought a 360 before the Elite came out.
The 360 uses lead-free solder, which as you may know, is more brittle than regular solder. Over time, the solder balls under the GPU and CPU can, due to repeated exposure to heat, literally start to loose their bond between the motherboard and the chips. A poor connection tells the system it has a general hardware failure, and that means you get the RRoD.
Although you can fix the problem, there is nothing you can do to prevent it from happening again. I’ve installed an X-clamp and an aftermarket fan that dramatically improves airflow, and still the RRoD returns. The problem lays in the design of the system. Still, you can get rid of the Red Ring for about ~6-8 month periods by following this heatgun tutorial.
There are several fixes for the RRoD, but the heatgun method is the most direct and most successful approach outside of reflowing the solder with a reflow station costing upwards of 10 grand. Since chances are you dont have that kind of money to throw around, and since the heatgun approach is so successful, there are some who try to cash in on the heatgun fix by selling a heatgun repair service. Here you will get the same treatment by following this free, do it yourself walkthrough.
So an overview: in order to fix the problem, you need to reflow the solder balls under the GPU and CPU. To do that, you need to introduce enough heat to the chips that the solder will liqufy before hardening back into place.
You might have heard of the infamous towel trick where people wrap their 360’s in a towel and turn it on, purposely leaving it to overheat in the hopes it will come back to life. The basic idea behind this is to reflow the solder balls just like what this tutorial will cover, but unfortunately the towel trick method is extremely inefficient and runs the risk of an electrical fire. Yikes! So instead of doing something stupid and unsuccessful like that, why not just go to the source of the problem eh?
Section 2. How to fix the RRoD
The repair process requires you to take the console completely apart thus voiding any warranty, but if you plan on doing this yourself you either don’t have one or don’t need one. Even under warranty, the process of mailing your system to M$ usually takes around six weeks. If you use this guide from start to finish, you can have a working 360 again in around 2 hours tops.
This project requires:
– Xbox 360 with RRoD (this tutorial covers the older variety and may not work for Elite models)
– Heat Gun (electric paint remover) a heatgun is a lot like a hair dryer, only it produces far far more heat. Heatguns range in price from $15 – 50. For the sake of this project, a fairly low end model without a switch to change the temperature will work fine. It should go without saying, but a simple household hair dryer can not be substituted for a heatgun.
– Large sheet of thick plastic (at least the size of the 360 console) weatherproof plastic for interior walls works great; you can get this at your hardware store.
-Tinfoil enough to cover the 360’s motherboard
-3-4 sticks of Poster sticky tac this might seem like a lot, but its better to have too much than not enough. This is a good extra measure to keep your system’s capacitors from overheating.
-Torx 5 and 10 screwdrivers to open the system
-Star and flathead Phillips screwdrivers also to open the system
-Clamps optional if you have decent ones. Mine suck. You don’t really need them as long as you’re careful.
-Exacto Knife to cut the plastic and tinfoil
-Marker simply to mark where to cut the plastic and tinfoil
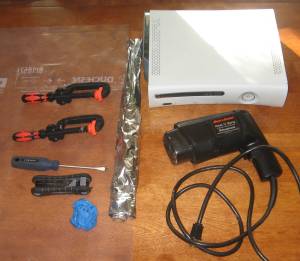
A complete balanced breakfast!
Disclaimer: I take no responsibility for your console should you screw up and destroy it. If you have moderate repair skill and the ability to follow direction, the fix is fairly simple. Note that it isn’t what I would call “easy”. Just like in life, there are no “easy” fixes.
Step 1 – Take the system apart. There are countless tutorials on how to do this already, so just check someone else’s tutorial on how to take your system apart. Google is your friend.
Step 2 – Remove the Heatsinks and place everything in a safe spot off to the side for later when you reassemble it.
Step 3 – Once you’ve got it apart, you can inspect it for any physical signs of problems such as cracks. If you don’t see any, you’re ready for the next step.
Step 3.5 – OPTIONAL: I would recommend buying an X-clamp off ebay. The entire kit is $5. Get it and install it later. You should get this because it reinforces the bond between the motherboard and the CPU and GPU. It will help ensure this RRoD stays away longer. Anyway, you should know have a bare 360 motherboard.
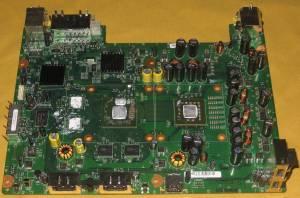
Step 4 – Before we heatgun, let’s add a bit more protection to the parts of the motherboard you don’t want to overheat. Skipping this step will likely result in the destruction of your 360. You’ve been warned. Take your several sticks of stick tac and roll it all up into one large clump. Knead the clump and break off sections to form fairly thick blobs of stick-tac and cover up all interior capacitors. Doing this will give the caps an extra layer of protection against the tremendous heat the CPU and GPU need to receive before solder can reflow.
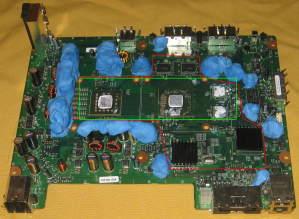
Cut along the red line if you want to do everything. Otherwise use only the green.
Step 5 -Once the capacitors are covered, place your large sheet of weather proofing plastic over the motherboard and with a marker trace an area along the interior. It’s recommended you follow the full red line area in my above picture, but at the very least trace the green line.
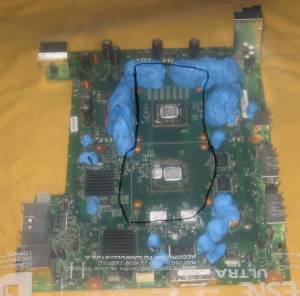
Cut alone here
Step 6 – Remove the plastic from over the motherboard and once set aside, cut out the interior of the line you traced. Place the plastic over the motherboard so that it lines up within all the capacitors covered in stick tac. Then press down where the stick tac is to help keep it in place. You could clamp it down, but I didn’t and it worked out fine. Just don’t bump it.
Step 7 – next, take a large sheet of tin foil and cover the motherboard with it. Again like the plastic, trace along where the interior is and then cut out the middle. Pack the foil over any plastic and then up and away from the caps. Tin foil is a great way to reflect heat away from anywhere you don’t want it and along with the plastic and stick tac will keep your caps safe and sound while you heatgun the main chips.
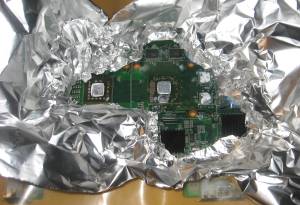
Apply tinfoil and serve
Step 8 – find yourself a heatgun (a really powerful blow dryer used to remove paint) to remelt the solder balls under the CPU and GPU. No, a soldering iron will not work. You want to blow extremely hot air over the chips to melt and reflow the solder under them. A soldering iron wouldn’t get hot enough to do this, and physical contact would likely destroy your precious chips.
Step 9 – Turn on the heatgun and allow it about a minute to heat up to proper temperature. If your heatgun has settings, set it to low to low-medium. You only want to reflow solder, not weld steel.
Step 10 – Wave the heatgun in slow circular motions about a 30cm above the motherboard. Continue this process for a few minutes. Then move in closer and make slow motions about 15cm above the motherboard for another minute or so. Finally, move real close and apply slow circular motions to the entire area for about 30 seconds. Sometimes the solder can be stubborn.
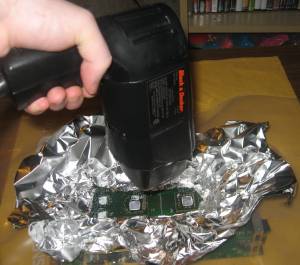
Red Ring got you cold? Time to heat things up!
Step 11 – Let it rest for at least an hour, preferably longer or overnight. Make sure you don’t touch anything or allow the 360 to be bumped in any way.
Step 12 – Once the system has completely cooled down, set the motherboard back into its metal case. Reattach the heatsinks and fan and hook up the power assembly PCB as well as AV and power cables. Once everything is set, press the small button on the power assembly PCB. If all things went according to plan, your system will now have sprung back to life.
Step 13 – Once you know your system is working again, fully reassemble it and bask in the knowledge that you fixed your so called “broken” system!
If this guide has helped you, please drop a comment telling of your success and also give the manufacturing date can be found on the back of your system. My theory is that most systems are prior to middle 2007, as Elite systems made after about the middle of 2007 were redesigned to stop the RROD from occurring as often.
June 23, 2010 at 3:11 pm
Hi .. thanks for the article, i’d love to see more from you 🙂
June 23, 2010 at 3:29 pm
What would you like to see? I’m open to suggestions.
June 25, 2010 at 3:33 pm
Like this vey much ! Three thumbs up for you !
June 26, 2010 at 12:28 am
Wow ! Good info, i have bookmarked ur site and i’ll be back again and again ! Many thanks buddy 🙂
August 18, 2010 at 7:09 pm
nice guide wish i had a heat gun to try it penny fix only worked for about 4 months
September 14, 2010 at 11:17 am
I have tried all the different methods on the wed thus far, tried taking the x clamps out and replacing to newer screws etc, tried the penny trick also. Still no luck, I am going to try you method right now. I didnt have all the stuff needed like you stated. I just put tin foil in all the places you said to. So in another words I put a @#$ load of foil to protect the board. Gonna use the heat gun on it now. Wish me luck! *fingers crossed*
September 14, 2010 at 5:34 pm
Oh boy, good luck but I DON’T RECOMMENDED doing what you’re doing. The foil will reflect most of the heat, but it alone isn’t enough to protect the motherboard and especially the capacitors from the extreme heat you’ll be giving it.
If you’re going to do this mod it is important to have all the tools necessary including the large sheet of thick plastic and stick tac. Trust me, I don’t like adding things in when not needed either, but I would be skeptical of long term success without following my tutorial exactly.
Still, post an update when its finished. I’d like to know how you made out. Still don;t think it will work long term, but who knows you might get very lucky and won’t burn anything out while still reflowing the solder balls enough to reverse the RRoD….
September 15, 2010 at 1:44 am
Lol, didn’t work, I gave the console overnite to let it cool down, no luck. *sigh* looks like I’m going to be one of them people that turns the dreaded rrod into a arcade stick.
September 27, 2011 at 12:39 am
Couldn’t you just lookup what temps the solder flows at, then set your oven to this temp, and keep it in there until the solder blobs gloss over? Turn the oven off and let it cool slowly? The heat distribution would be far more evenly distributed with this method. I’ve heard of people sticking their Xbox360s in their ovens to fix them; now I understand why.
I never owned an Xbox, but I don’t recall any gaming hardware in history ever having a higher failure rate, save for maybe the FDS and their faulty drive belts.
September 27, 2011 at 12:44 am
That’s a TERRIBLE idea because it exposes everything to extreme temperature; the 360 is covered in various sized capacitors. The idea is to reflow only the solder under the GPU; that’s why its necessary to go to such lengths to cover the other areas and prevent them from getting very hot.
The old “towel trick” or just as you said, putting your system into an oven is an absurdly bad idea.
October 31, 2011 at 2:18 pm
Thanks for such a great guide!
I have two questions:
1) Does the weather proofing plastic melt onto the motherboard?
2) Instead of using the plastic, can one use something like flame retardant wool or even a fire blanket and put the foil over that?
Thanks again
October 31, 2011 at 10:17 pm
No no, the weather proofing plastic is isn’t ordinary plastic. It can take a lot of heat before it melts. I’ve used the same sheet on 4 or 5 360s and its only now starting to melt in the center, and only slightly. It won’t melt to the motherboard as long as you use high commercial grade sheeting. The idea of the plastic is to act as a barrier to protect the capacitors and other components that you don’t want to heat up. The tin foil surface simply reflects any lost heat back to the center, just how it’s used when cooking.
I don’t know if you could use something flame retardant or not, the idea is just to have something thick enough that you can protect the caps with, yet thin enough to cut away a middle section large enough for area you need to apply the heatgun to.
I should also say that since I wrote this guide it’s only ever had to apply to my original 360. I bought another, new Arcade system in 2010 that’s never once had a problem due to its GPU being 40% larger and much more efficient at getting rid of heat. I’d honestly recommend getting a newer 360 as they’re all just more efficient designs that further limit the RROD.
February 21, 2012 at 12:50 am
Thank-you so much for the great repair manual. IT WORKED!!! My xbox was manufactured on December, 2006. Keep up the excellent work!
February 21, 2012 at 12:59 am
Glad to be of service! I recommend you don’t throw away any of the materials you used, especially the stick tac or the weatherproofing plastic. You’ll need all of this stuff for the next time you need to fix the RROD. Unfortunately, you can bring a 360 back from the dead by doing this, but it’s merely a treatment for an incurable disease – there is no permanent way to prevent 360s made prior to 2010 from getting the RROD. You might get six more months out of it before having to do this again, or longer or shorter. My advice is to place it in a well vented space (i.e not in an entertainment center) and to never pile anything on top if it. The more venting the longer you can hold off the coming of the RROD.
February 24, 2012 at 2:35 am
I’m really glad i read your blog, i followed all the steps and my xbox came back to life! I understand that the fix is not permanent and will probably collapse again, but other than leaving the xbox well vented is there anything else i can do to make it last longer? And i don’t know if you can answer this but i’ll ask anyway, if i buy one of the later models of xbox (the slim version) is there any way i can transfer my saved games from my 120gb memory to the new system? Thanks for all your help everything was really well explained and very easy to fllow.
BTW. My modell Is a 2007 and i let it cool for about an hour and a half (i was ansious) and worked great, thanks again
February 24, 2012 at 5:36 am
Heat is the main problem. So follow these guidelines to make sure it lasts as long as possible:
-make sure its places on a hard surface (never on ever carpet!) with at least 12 inches of clearance on the back from any obstruction. I know the 360 can be loud, but you gotta deal with it if you want it to last.
-place rubber feet over the existing rubber feet to elevate it even just half an inch higher. As you know from opening it, the motherboard sits on the bottom, and that’s where the heat generates from. Any little bit of extra venting helps.
-limit your play time to a maximum of two hours per session. I know this sucks, but the 360 gets hotter the longer it runs, so don’t marathon run it.
There are indeed third party transfer cables that allow you to put old harddrive data into a newer 360. I dont have one personally, but you should be able to find them just by googling Xbox 360 transfer cable.
I’m glad it helped! I wrote this guide hoping to help as many people as possible after the “towel trick” made its rounds on the internet. That is still an idiotic move as its dangerous and also ineffective. A heatgun is your best friend when it comes to 360 repairs.
Just curious, how did you discover my post? I’d like to gauge where people are finding my stuff.
February 24, 2012 at 8:59 am
Apparently, you can buy an Xbox Slim hard drive case off ebay for around £5, open the fat xbox hard drive and put it in the slim case and it will work normally in the new xbox with all your content from the old one.
This is great for if you buy a new model without a hard drive. There are loads of videos on YouTube and it seems easy to do.
(BTW an Xbox 360 hard drive is just a standard laptop hard drive in a fancy case)