
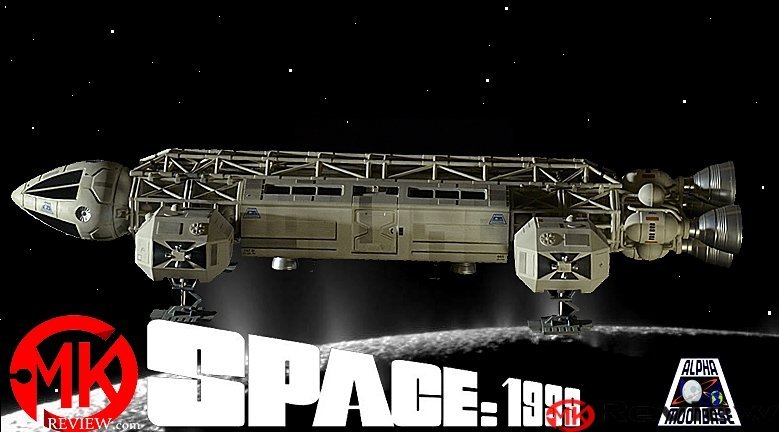
Almost two weeks ago I posted a rundown of the new 22” Space 1999 Eagle Transporter from Round 2 Models. After missing a part of the carpet monster in the studio and getting a replacement by a nice gentleman in Italy, the Eagle was ready for pictures. This is the 1/48th scale (22”) Eagle Transport from Space 1999. It started as a water cooler rumor and almost 2 years later the folks at Round 2 Models finally materialized the hopes of the Space 1999 cult classic fans.
The kit is comprised of 300+ pars molded in off-white and clear. The instructions are very easy to follow but I must warn you that there are a few mismatched part numbers so for those errors, please check the link provided at the bottom of this entry. Staring to build this model kit is like starting to read a good book, it is very hard to put it down. Step #1 starts with the command module and the clear windows. I found that the clear windows do not fit properly in their respective spots. To overcome this, I removed the locator tabs and it worked fine for me. Other builders are recurring to more drastic measures including building their own windows. I did try to keep it simple and you can see the results in the pictures below. Glue is optional on the CM and bulkhead but I used it sparingly for more structural integrity.
If you intend to light up the command module, now is the time to take the necessary steps to do so. For this build, I used 5mm Orange LEDs on the upper half of the CM. On the bottom half, I did cover the area with Bare Metal Chrome Foil to bounce that light back to the figure faces. I call the concept of this model the Space Crane. That’s what the ship’s spine looks like. Because it is a tubular design, be ready to clean the mold lines. This is completely up to the model builder but personally, I didn’t want to see mold lines on the pictures or in person. The mold lines are not a defect of the kit but a natural line that comes with the tooling and injection process. To clean the lines I used an old #11 blade. Once the mold lines cleaning was done, I passed a brush soaked in Tamiya Ultra Thin Cement. This softened any hard lines and/or scrape residue left.
The landing pods are is a very straightforward step but please pay attention to the sidewall orientation in step 16. As the ship it represents, the Eagle Transporter is a very modular build. I started with the landing gear to immediately find out issues:
The supplied springs are a bit tense to make the model sit a little bit on its own weight. This can be fixed with more ‘spongy’ springs so make sure to pay the R/C section of your local hobby shops a visit. As a result, the stance of the ship is on the high side making it look a bit awkward. To lower the stance of the ship, I left the supplied springs but I did cut the shocks which by the way, they are 5/32” aluminum tubes from K&S metals. Scrapping off some plastic (see pictures below) from the shocks, I inserted the sleeves of the 5/32” aluminum tube. It does look a lot better than paint after polishing them with metal polish.
This whole kit is a gem but you will love the engine nozzles. Instead of being molded in two halves which would lead to a hard-to-remove joint line on the ridges, the engine bells are molded in one piece. Kudos to Round 2 for this because the engine bells are something that attracts the viewer’s attention. As I type this entry, Round 2 is already shipping their Upgrade Set. This set will set you back almost as much as the kit itself but I’m sure it will satisfy the most Space 1999 purist.


I found that the engine compressor halves won’t align very well. Removing the locating tabs did help greatly but still, there was a bit of sanding to do. Make sure you follow Steps 23 to 26 very carefully because there are chances of getting parts mixed up with all that pipping in the way. The passenger pod is a very straightforward build as well. I read a few reports of the window frames being a bit warped and mines weren’t the exception. I fixed them by carefully bending them by hand to a more straight position. This is a long part and probably the cooling time in the mold was not long enough. Not a big deal but worth mentioning. The clear windows will look a lot better if you paint them from the inside rather than on the outside. Use #320 grit wet/dry sandpaper so the paint has something to bite onto. Since the paint will be on the inside, it wouldn’t make a difference if you use gloss black. In fact, using flat black is recommended because it will stick better to the clear plastic and also dries faster. I used Testors Spray Flat Black on this model. Don’t forget to mask the front side of the windows to avoid any overspray damaging your windows.


It is a lot easier to paint the windows from the passenger separately plus you won’t have to deal with masking them if you glue them prior to painting the pod. It was in the passenger pod where I hid the 9v battery pack for the command module LED’s. To access the battery and ON/OFF switch I used magnets on a base made with .030 stock styrene.
Painting the Eagle Transport:
If you ask around the color that you will be recommended is Ford Diamond White as the color of choice. Instead, I used Tamiya XF-2 Flat White because I knew that later on, the white was going to be toned down with an enamel wash. By the way, the wash used on this Eagle Transporter was PLW Light Gray A.MIG-1600 from AMMO Mig. Also, A.MIG 1601 was used randomly in certain areas. Some paneling was done via airbrush and pastels over masked areas. Tamiya XF-19 Light Gray was used on the engine area with the air compressor set to around 8-10 psi. That way I got the spatter-weathered effect in some areas.

As I mentioned earlier the engine bells are a true sight on this model kit. At 22” this kit is long but (this is my personal opinion) not big enough to use Alclad 2 Chrome or Polished Aluminum. I wanted to go close to a filming miniature look and the proper look is more like aluminum rather than chrome. Chrome at half the scale of the hero filming model can make it look a little bit ‘toyish’. Again, this is my personal opinion and our mileage as model builders may vary. So for that aluminum material look, I decided to dust off an old can of Testors Metalizer 1451 Buffing Aluminum Plate. If you wonder if I used Metalizer Sealer the answer is no. The sealer removes the metal look making it look more like a gray shade rather than aluminum. I have unsealed model kits that are as good-looking today as they did years ago when I built them.

I won’t lie, the 22” Eagle Transporter kit has a couple of defects here and there. But feel free to point me to a perfect model kit. The issues found on this can be fixed with little trouble and are not issues that take away from it. In fact, you’ll be happy the kit is giving you a little extra work because overall this kit goes together with high precision and a small gap here or it is absolutely forgivable.
My sincere thanks to Jamie Hood from Round 2 Models for this review sample.
If you are planning to build this model, make sure to join the Space 1999 Props & Ships Facebook group. You will find a great knowledgeable community there willing to help you with any questions that may arise during your Eagle project.


")


Where I agree that chrome (and stainless steel) look to shiny, I disagree with the use of Aluminum. As these arn’t chemical rockets but atomic rockets, something tougher that Aluminum is warranted. I chose Testors Metalizer 1454 Buffing Titanium. Although it comes out darker, I feel it looks more appropriate that the pretty Aluminum.
I agree with you, Rob. You went the science fact route. But many modelers [myself included] went with what we see on screen. Either the show or photos of the actual filming props. All 3 scales of the filming miniatures are aluminum looking with one of the 44” Eagles having a tinge of blue.