
As a part of our crop rotation plan among our 10 garden plots, we grow many different warm-season and cool-season cover crops on our homestead. These cover crops benefit our garden plots in many ways including erosion control, crop rotation, pest management, weed suppression, nutrient scavenging, and more. Many of these cover crops not only do great things for the garden soil, but they can also be used as forage for livestock like chickens, goats, pigs, cattle, etc.
Around the third year of being on this property, we built a rectangular chicken tractor that we could move around the different garden plots we have. And while it worked well, that particular design was quite heavy. It was made with 2x4s and had 2x6 sled on the bottom that made it pretty cumbersome to move.
When we had that chicken tractor design, we also implemented some of the mobile, electric fencing from Premier One to provide additional roaming area for the chickens. We would stake the fencing in the ground around the rectangular chicken tractor and allow them to free range within that fenced area during the day. And then at night, the chickens would go back into the chicken tractor and we'd close the door in the evenings to keep them safe.
We started having some issues with that setup though. First, the chickens learned quickly that they could fly over the fencing if they got a running start. And these chickens weren't always easy to catch and get back into the pen. Secondly, we had some issues with hawks and other predators killing the chickens while they were roaming around the enclosed area. The end result was that we lost all our chickens one by one within a period of a couple months.
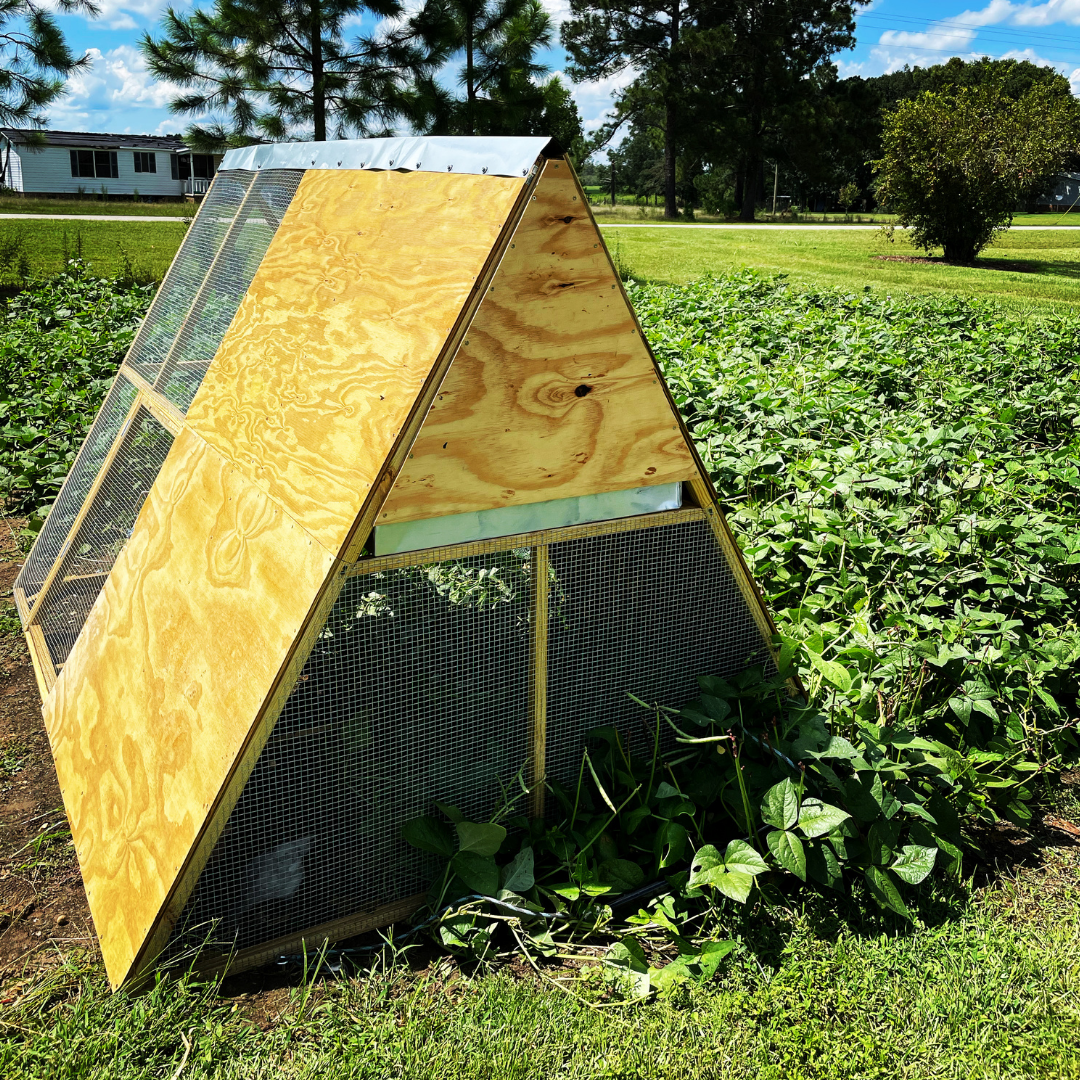
After that happened, we went several years without any chickens here at Lazy Dog Farm. We wanted to have more chickens, but wanted a better chicken tractor design that was easier to move. We always liked the idea of an A-frame design, but wasn't sure exactly how we wanted to build it to suit our needs.
This summer, we decided to take the chicken plunge again and add them back to the homestead so they could enjoy our cover crops and we could enjoy their fertilizer! We took a trip one Saturday to tractor supply and purchased six pullets -- 2 Isa Brown, 2 Sapphire Gem, 1 Barred Rock, and 1 Australorp. The kids wanted to a variety of colors, so those were our choices based on what they had at Tractor Supply.

To hold the chickens until we were able to build the new chicken tractor, we started with a brooder that was made from a clear, rectangular storage container. They quickly outgrew that setup, so we went back to Tractor Supply and purchased a heavy-duty, Rubbermaid container and placed chicken wire on the top. This worked very well to hold the chickens until we finished the chicken tractor. We did have to place the chick waterer and feeder on top of a brick to keep them clean.

As mentioned above, we knew we wanted to use an A-frame design for the new chicken tractor. I wanted to build it primarily with 2x2s instead of 2x4s so that it would be lighter and easier to move. We started with a basic design that was 6' wide and 8' long, and added the features we wanted from there.
I wanted to have a removable egg laying pan that could be pulled and cleaned without having to get inside the chicken tractor. So I purchased an aluminum pan on Amazon that was originally designed for a rabbit hutch, but it worked perfect for what we were doing here. I also wanted to have a hinged door for accessing that laying pan to easily collect eggs, and I wanted to have a door on the bottom to easily refill their food and water.

Because I was using 2x2s, I made sure to add plenty of bracing for attaching the plywood and hardware cloth that would eventually encase the A-frame design. We also added a ramp for the chickens to easily access the laying pan in the top. We added a couple roosting bars in the top as well.
We used deck screws for the frame to ensure that everything was secure. Once the frame was complete, we stained all the wood with 2 coats of Spar Urethane to protect the wood. Even though we were using pressure-treated wood, we wanted the extra protection provided by the urethane.

Once the frame was stained, we started adding the hardware cloth and plywood to the sides. We stained the plywood with Spar Urethane as well, but we did this prior attaching it to the frame. We framed the nesting door and bottom door, and added hinges and latches to both of those to increased security. The final addition was a piece of metal flashing along the top to provide additional water protection.
We were very pleased with the finished product as it checks all the boxes for what we were wanting in a mobile chicken pen. It has shade for the chickens, it's easy to access, and it's light enough to move easily. The first destination for our new chicken tractor was a plot of field peas that we had stopped picking due to some intense pest pressure. Our young chickens have been thoroughly enjoying foraging this area and we look forward to all the free fertilizer they're giving us in return.
To see more a full tour of our A-frame chicken tractor, watch the video below: