Paste Paper Masterpieces!
Paste paper is a surface decorating technique in which a mixture of paint and paste, (in our case, papier mache paste,) is applied thickly to white or colored paper. Patterns and textures can be created in the wet paint/paste mixture with tools such as combs and plastic forks, or even finger tips.
I use Elmer’s Art Paste, (Methyl Cellulose), which mixes into a slimy, gelatinous consistency. Be sure to read the mixing instructions and use COLD water. Lumps will dissipate after sitting overnight. I then portion out the clear paste into quart sized containers and mix in acrylic paint. Cheap school-grade acrylics work wonderfully. I usually go about 2/3 paste, 1/3 paint, but opacity can be increased with a higher paint to paste ratio. I then make box lid trays with smaller yogurt cups for each table, and generally have 7-8 colors in each tray.
We spent three class periods creating a variety of paste papers. Here are the basic steps:
Lay a piece of paper in your work space. (Cover tables with newspaper or disposable table cloths!) Apply large, simple sections of color, but do not let the colors touch in order to avoid contamination of your table set of paints. Be generous with the application— it needs to be thick! Next, use your fingers to blend the colors so that no white is showing. The pictures below show students applying and blending their paste-paint.


Next, use simple tools such as trimmed plastic forks, texture rollers or combs to create designs through the thick paint.


– – –
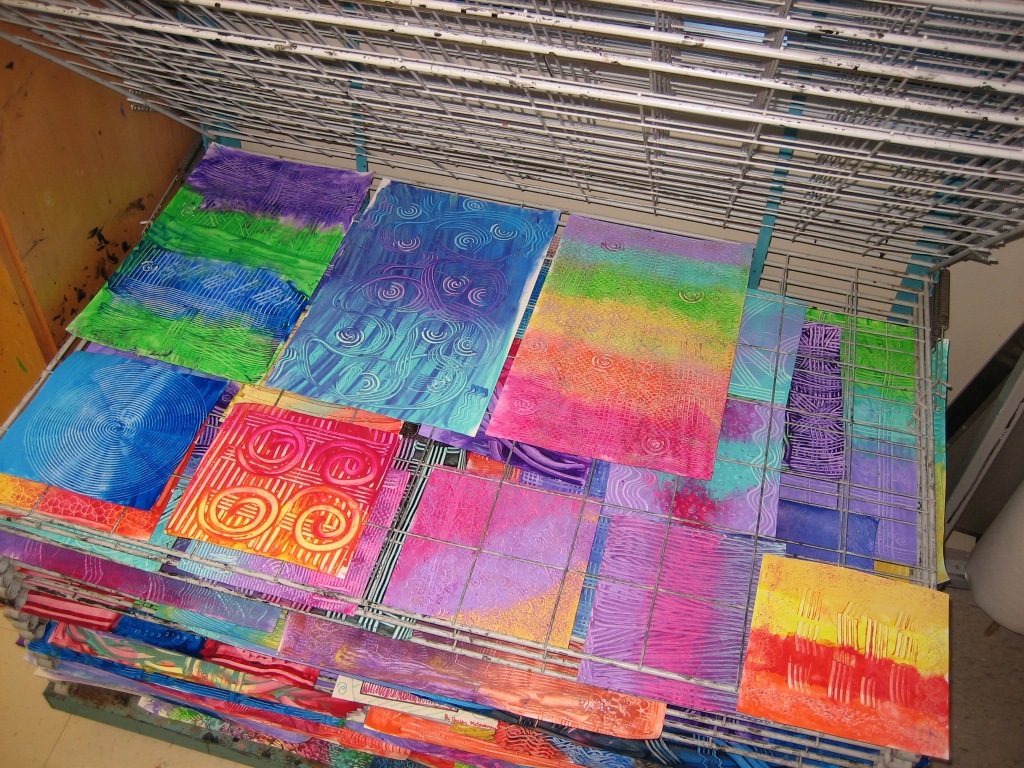
After a few days of making paste papers, students had many beautiful examples to work with for the next step of the lesson. They chose one favorite sample to further embellish as a stand-alone piece with their choice of colored pencils, glitter glue, metallic pens and rolled printing ink. Below are some beautiful examples of these stand-alone, embellished paste papers:


– – –
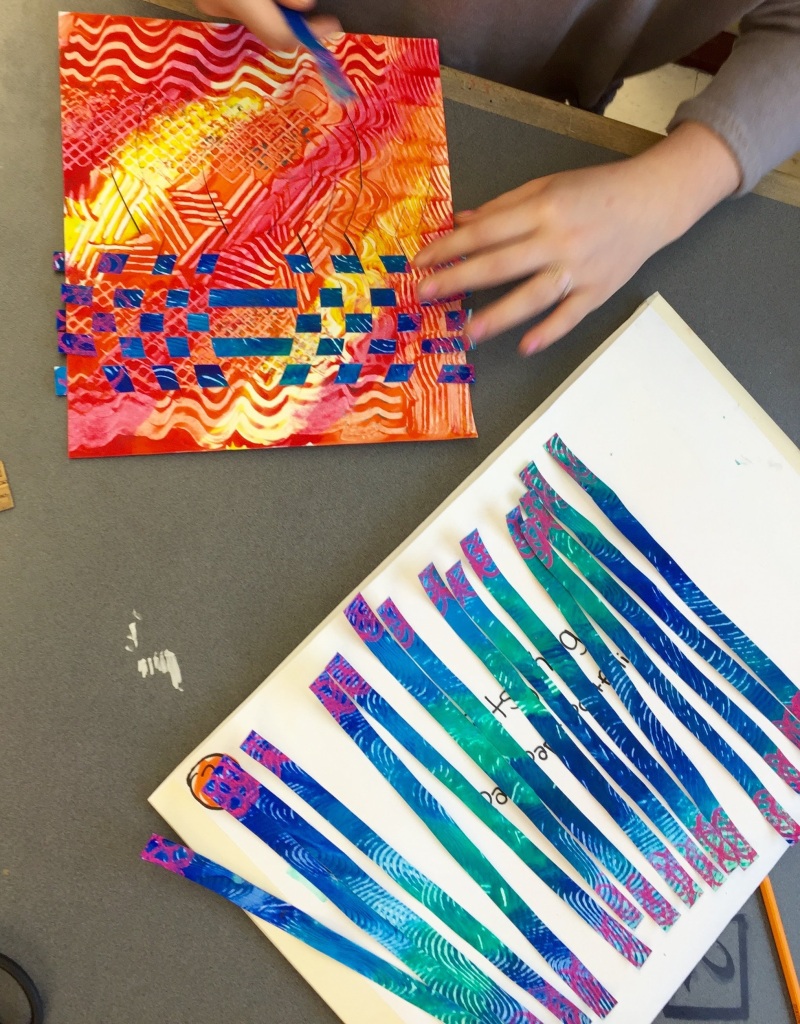
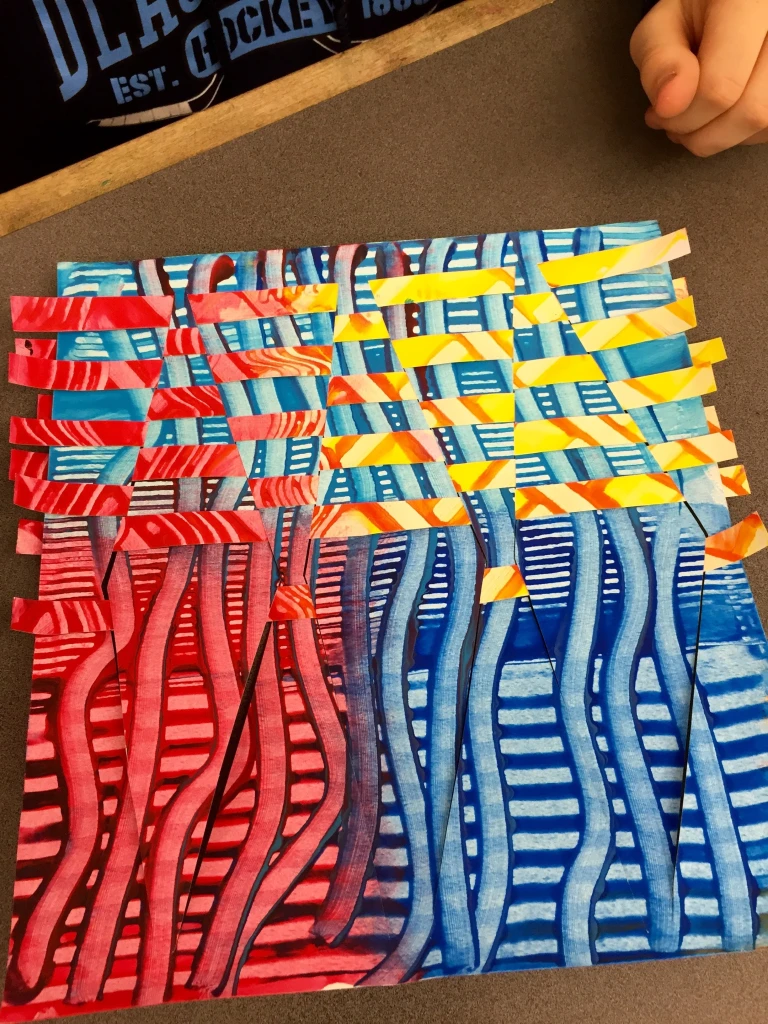
Another two paste papers were cut into strips and woven together to create a colorful paper weaving.
Tips for weaving: One piece remains WHOLE with slits. This is the warp. You can create a symmetrical warp design by folding a piece of paste paper in half and cutting slits from the fold to about 1″ away from the edge. One piece gets cut into strips and these strips are woven over and under the warp slits. Here are two posters to help the students in preparing their papers for weaving— (I really need to re-do these digitally, but you get the idea!)


Vocabulary for this unit included Asymmetry, Focal Point, Warp & Weft, (weaving terms) and Emphasis. Paste Paper can be used for so many things: Bookmaking, Collage, Journaling, Cards, etc! Have fun if you try this with your students and let me know how it goes!


Jul 08, 2019 @ 17:22:17
I love these – what type of paint and paper mâché paste do you use?
Jul 08, 2019 @ 17:57:28
I use acrylic paint—cheap student-grade, and Elmer’s art paste. It is a 2 oz. box of powder that you mix with COLD water. It gels into a thick slime. It does not go moldy, so unlike wheat paste, you don’t have to refrigerate it. I use a ratio of 3 parts paste to one part paint for the mixture.
Jul 13, 2019 @ 23:29:22
These look great! Are the woven strips glued down if so how?
Jul 14, 2019 @ 01:16:19
If they don’t lay flat, we tack the tips down with a gluestick after the weaving is complete. Sometimes students make an “X” on the back with masking tape to hold things in place, but generally, it stays together well. One thing that helps a lot with the weaving is to fold the “warp” paper in half when cutting the slits. Your cut from the fold to about an inch away from the edges, then unfold. This keeps the frame WHOLE, with slits running through the center in which you weave the cut strips in and out. You can sort of see this in the pictures of the half-done weavings.
Jul 14, 2019 @ 09:41:36
Thank you!
Aug 06, 2019 @ 19:29:28
Love to do this with my 4/5/6 graders.So you have several cups of the paste with colour mixed in.?For weiving the kids cut randomly?
Aug 07, 2019 @ 18:35:02
Yes, I have boxes on each table with pre-mixed paste and paint. I use Elmer’s art paste, (which is a clear goop used for papier mache), and acrylic paint. About 1 part paint to 3 parts paste. For the base piece of the weaving, have the kids fold the piece in half, white side out. They make cuts from the fold towards the two open edges, stopping about 1″ before they hit they edge so as to not cut it into pieces. (I have my students draw a “stop line”. When they unfold the paper, they will have a symmetrical set of slits, ready to weave into! I also make a poster with some cutting patterns. Straight lines are boring— curves and zig zags make more fun patterns, but they need to keep it pretty simple! Try a few options and you will discover the pitfalls, such as don’t let the cuts touch each other, don’t let the cuts hit the edge. Draw the pattern BEFORE you cut. Have fun!
Aug 13, 2019 @ 19:36:58
I am so excited to try this with my middle school kids! A couple questions though… in some of the paintings it looks like the color is the base and then black is applied on top and scratched away. How did you do that? Did they paint the color first, let it dry and them apply the black? It’s almost like scratch paper, which I’ve done before with crayon underneath. Also, what size paper did you do these with? The strips you cut would have to be perpendicular to the weft paper, correct? I will of course be making a few teacher products to work the kinks out, but always helpful to have advice first.
Aug 27, 2019 @ 19:35:52
I was wondering the same. It looks like that though- let first layer dry, then apply black. Probably works best on a smooth tag board surface, I’d think.
Aug 28, 2019 @ 01:04:13
You can start with light colors and then let it dry and do black on top, but for the example in my pictures, I am pretty sure the green and yellow was just coming out faint and so the student glopped some black on there and put it on thickly, right when the green/yellow layer was still wet. NOTE: whatever color touches the paper first tends to be what is “revealed” when you start adding textures with the tools and rollers. Best to not plan things too much, but just let the technique reveal itself spontaneously!
Aug 29, 2019 @ 09:00:35
This project is so amazing! I adore the colors and designs. I teach a lower elementary and did this with fourth’s. They LOVED IT!
I was wondering how to see other projects? You’ve got some incredible art I can see on the student art show page, but I do not see how to see other projects.
Thank you for this one! I would love to see others 🙂
Aug 30, 2019 @ 04:56:33
on my home page, http://www.amslerartroom.wordpress.com, click on the “student work” tab. There’s a drop down menu with dozens of pages of my projects!
Aug 29, 2019 @ 18:58:48
Is there any other glue that can be used with the same results?
Aug 30, 2019 @ 04:53:53
You could try other types of papier mache paste, (i.e. wheat paste,) but I have always used the Elmer’s or Ross Brand “Art Paste” Slimy stuff!
Sep 11, 2019 @ 22:32:47
I only have tempera. Do you think it will work?
Sep 11, 2019 @ 22:34:29
It will. It will be less permanent, (more susceptible to bleeding if it gets wet, but yes!)
Sep 12, 2019 @ 18:01:42
I love this and can’t wait to try it. How much paste would you recommend for 65 students?
Sep 12, 2019 @ 23:36:36
One box of the elmer’s art paste (2 oz. of powder) gets mixed with 3.8 liters of water— you don’t have to be super strict with that ratio, it’s just what the box says! I find that I usually need to make two boxes worth of paste to get through my rotation of 110 kids. I mix the paste in a white 5 gallon bucket it then ladle it into old yogurt cups to mix the individual colors. I do this activity for several days and the kids make 5-6 sheets. If you are planning on only doing 2-3 per kid, 1 box is probably enough. Easy to mix more if you need it! Gels overnight. USE COLD WATER!
Sep 15, 2019 @ 21:42:43
I keep hearing about paste paper! I’m so curious. . . Do you use a certain type of paper? What is the benefit of the paste versus using just paint? Does it make the paint go further?
Sep 16, 2019 @ 05:39:35
Any paper will do, even colored! Paste allows you to manipulate and leave textures in the paint. It’s like finger painting for adults—has the same thick consistency, (but dries flat.) Try it!
Aug 09, 2023 @ 05:13:47
I don’t understand the paste paper. I’m trying to find it and all that comes up is pastel paper. What makes it unique? Texture? Thickness?
Sep 22, 2019 @ 00:32:40
Thanks for the reply!
Jan 29, 2020 @ 00:08:14
What did you use for the stencils? I cant seem to find anything that works.
Jan 29, 2020 @ 00:32:50
These come in a variety of styles: https://www.schoolspecialty.com/wedge-1436160
These are great too:https://www.schoolspecialty.com/paint-and-clay-explorer-set-1433368
Jan 29, 2020 @ 23:05:21
Thank you. Did you use the paste to print with or did you use another medium?
Sep 23, 2021 @ 21:29:13
I love this project!! So vivid! I was wondering what size paper you used??
Sep 23, 2021 @ 22:49:11
varied—- about 9″ by 12″!
Nov 07, 2021 @ 17:10:18
Hi beautiful art work throughout your website! A question please… is art paste, the same as PVA glue? I’m in the UK. Thank you
Nov 08, 2021 @ 17:11:58
Hello! NO, it is not PVA glue. The art paste I use is commonly known as methyl cellulose, It is powder you mix with cold water and it sets into a clear, thick gel. I believe it is also used as an ingredient for handmade papers, but is likely available online through your art supply companies.
Jan 27, 2023 @ 08:11:52
Loved making these in class today! Having trouble with the papers curling up and not laying flat after they are dry. Suggestions?
Jan 27, 2023 @ 19:36:14
Try using a thicker paper, or pressing the dry ones. You can also iron them!
Jan 27, 2023 @ 20:24:16
Will try the iron. Thanks!
May 12, 2023 @ 11:18:10
This is so beautiful!
May 12, 2023 @ 11:18:42
This is so beautiful! I love how vibrant the colours are.
Aug 09, 2023 @ 05:02:08
I don’t think Elmer’s art paste anymore. So I looked up methyl cellulose on Amazon. Is that the same thing? Not sure how much to buy. I can get a 2 lb bag for $23. How will that last?